Hello! Welcome back to our course on sketching.
Introduction
In our last lesson, you learned one of the most fundamental skills in drawing: how to deconstruct complex objects and see the simple 3D primitives within them. You practiced analyzing objects around you, breaking them down into their core components of cubes, spheres, cylinders, and cones.
Today, we'll build directly on that foundation. The learning outcome for this lesson is to draw basic 3D primitives from multiple angles, maintaining their volume.
Now that you can see the forms, it's time to learn how to draw them convincingly on paper. This isn't about memorizing a single way to draw a cube; it's about understanding the structure of these forms so you can rotate them in your mind and draw them from any viewpoint. Mastering this skill is the key to moving beyond copying references and starting to create from your imagination.
1. From 2D Shapes to 3D Forms
A square is a 2D shape. A cube is a 3D form. When we draw a cube, we are using 2D lines to create the illusion of a 3D form. The key to making this illusion believable is understanding how the form's surfaces and edges relate to each other in space.
The process of constructing these forms from scratch is systematic. It involves using guidelines and understanding how simple shapes like squares and circles are distorted when viewed in perspective. To get us started, let's watch a clear, narrated guide on how to build these forms.
How to Draw Basic 3D Shapes for Beginners: Narrated Step-by-Step
The Circle Line Art School's video, 'How to Draw Basic 3D Shapes for Beginners,' provides an excellent, step-by-step demonstration for constructing our core primitives. We will watch it in segments as we discuss each form.
For now, just get a general sense of the process. We will refer back to specific parts of this video throughout the lesson. Notice how guidelines are used to ensure the forms are symmetrical and proportional.
The video introduces a concept called "wireframe drawing." This is the idea of drawing the forms as if they are transparent, showing all their edges. This is a critical technique for maintaining volume and a perfect preview of our next lesson.
2. How to Draw the Basic Primitives
Let's break down the construction of each primary form one by one. Grab your pencil and paper and try to follow along with these constructions.
The Cube (or Box)
The cube is arguably the most important form to master because it defines space so clearly with its three sets of parallel edges.
Construction Steps:
- Start with the front corner: Draw a single vertical line. This will be the edge of the cube closest to the viewer.
- Draw the receding bottom edges: From the bottom of the vertical line, draw two lines angling away from each other. These establish the "floor" of the cube.
- Draw the receding top edges: From the top of the vertical line, draw two more lines that are parallel to the bottom edges. This is crucial for making the cube look right.
- Complete the form: Add two more vertical lines to define the back corners, and connect them at the top.
The LINK video demonstrates this process clearly.
How to Draw Basic 3D Shapes for Beginners: Narrated Step-by-Step
Let's re-watch the section on drawing a cube. Focus on how all vertical lines are parallel to each other, and how the top and bottom diagonal lines are also parallel.
Watch the segment from 01:11 to 02:45. Follow along and try drawing a few cubes yourself.
The Cylinder
The challenge with cylinders is drawing the circular top and bottom faces, which appear as ellipses when viewed from an angle.
Construction Steps:
- Draw the central axis: Start with a light vertical line. This ensures your cylinder is symmetrical.
- Draw the ellipses: Draw two ellipses, one for the top and one for the bottom. The central axis should pass through the center of both.
- Key point: The bottom ellipse should be slightly "rounder" (wider) than the top one if you are looking down on the cylinder, due to perspective.
- Connect the sides: Draw two straight vertical lines connecting the outermost edges of the two ellipses.
Let's see this in action.
How to Draw Basic 3D Shapes for Beginners: Narrated Step-by-Step
This segment shows how to use guidelines to keep your ellipses symmetrical and aligned.
Watch from 00:10 to 01:11. Pay attention to how the horizontal and vertical guidelines help in drawing the ellipses.
The Sphere
A sphere is a circle in 3D. The problem is, a flat circle on paper can look... well, flat. The trick to giving it volume is to think about its surface with contour lines.
Construction Steps:
- Draw a circle: Use the confident line techniques you learned in Module 1 to draw a clean circle.
- Add contour lines (ellipses): Imagine the sphere has an equator and lines of longitude. Draw an ellipse wrapping around the middle horizontally. Then draw another ellipse wrapping around vertically. These lines instantly describe the form's 3D surface.
The resource from The Design Sketchbook offers a great drill for this.
Basic Forms Hub: Cube, Cylinder, Sphere
The article 'Basic Forms Hub' has a quick drill called 'Sphere in 3 Seconds' that perfectly illustrates this concept. The combination of a circle and two ellipses is a powerful and fast way to create the illusion of a sphere.
Scroll down to the 'Sphere Skills' section and find the warm-up drill titled 'Sphere in 3 Seconds — Circle + 2 ellipses drill.' Read the instructions and look at the associated image to understand the method.
The Cone
A cone is a hybrid of a cylinder and a point.
Construction Steps:
- Draw the base: Like a cylinder, start with an ellipse for the base.
- Find the apex: Draw a vertical guideline up from the center of the ellipse to the desired height of your cone. This point is the apex.
- Connect the sides: Draw two straight lines from the outer edges of the ellipse up to the apex.
The video LINK shows this in a straightforward way.
How to Draw Basic 3D Shapes for Beginners: Narrated Step-by-Step
Finally, let's watch the construction for the cone. Notice its similarity to starting a cylinder.
Watch from 04:06 to 04:42.
3. Practice Drills: Building Three-Dimensionality (25 minutes)
Theory is one thing, but muscle memory and visual understanding are built through practice. Let's do some focused drills to solidify these constructions.
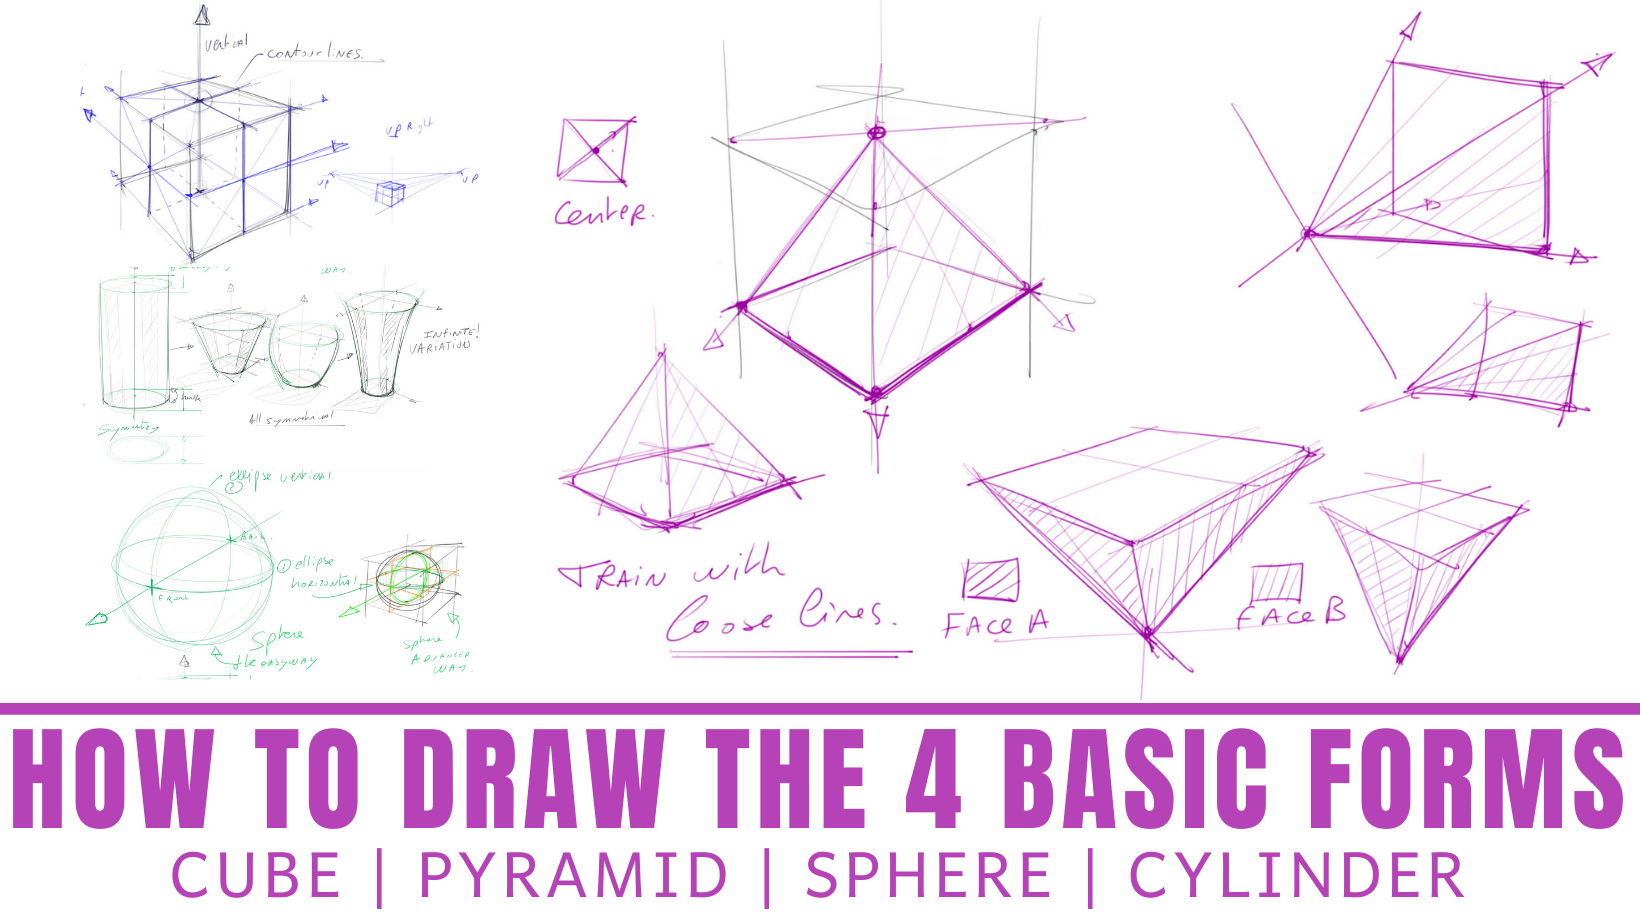
Drill 1: Rotating Cubes (10 minutes)
This exercise is designed to get you comfortable drawing a box from any angle.
The Ultimate Guide To Drawing In Perspective From Simple Shapes ...
We'll adapt an excellent exercise from the 'How to Draw Comics Academy' guide. The goal is to draw cubes in various orientations, which forces you to think about how the planes relate to each other.
Find the section 'Enter the 3rd Dimension - Practice Time' and look at Exercise 3. You don't need to read the whole article, just the instructions for this drill.
Your Task:
- On a single sheet of paper, draw 5 to 10 cubes.
- Vary their orientation. Draw some as if you're looking down on them, some as if you're looking up, some tilted to the left, some to the right.
- Focus on keeping the parallel lines parallel. Use light construction lines.
Drill 2: Cylinders in Space (10 minutes)
This drill is about controlling your ellipses to place cylinders at different angles.
Your Task:
- Draw at least 5 cylinders.
- Draw one standing upright.
- Draw one lying on its side, pointing away from you.
- Draw one lying on its side, parallel to your point of view.
- Draw two more at different, more challenging angles.
- Focus on the ellipses: Notice how the ellipse becomes a perfect circle when you look straight down the barrel of the cylinder, and gets "skinnier" as it turns away from you.
Drill 3: Spheres with Contours (5 minutes)
This drill reinforces the idea of volume on a curved surface.
Your Task:
- Draw 5 spheres using the "circle + 2 ellipses" method you read about.
- On each sphere, try changing the orientation of the contour ellipses. Imagine turning the sphere in your hand. How would the "equator" line change?
Conclusion
Fantastic work today. You have moved from just seeing forms to actively constructing them. This is a critical transition. By learning the repeatable steps to draw cubes, cylinders, spheres, and cones, you are building a visual alphabet that will allow you to construct anything.
Key Takeaways:
- 3D primitives are drawn by understanding their underlying structure—parallel lines for cubes, ellipses for cylinders and cones, and contours for spheres.
- Drawing forms from different angles is a matter of manipulating these structural elements consistently.
- Using light construction lines (like a central axis or perspective lines) is not "cheating"—it's a professional technique for ensuring accuracy and volume.
In our next lesson, we will formally explore the concept we've been using implicitly today: drawing through. You will learn how to visualize and represent the hidden edges of a form, a technique that is absolutely essential for connecting and combining primitives to build more complex objects.