Introduction
Hello! In our last lesson, you built a strong foundation for shading by learning to control pencil pressure and use layering to create a range of smooth, even values. You practiced creating a 5-step value scale and saw how different pencil grades can make achieving a full tonal range much easier.
Today, we're going to expand your rendering toolkit by exploring a different method for creating value: hatching and cross-hatching. Instead of blending graphite into smooth tones, you'll learn to build up value using disciplined, structured lines. This technique is not only essential for many drawing styles, particularly pen and ink, but it also allows you to add texture and a sense of direction to your forms.
By the end of this lesson, you will be able to create even tonal gradients using both hatching and cross-hatching, giving you another powerful way to make your drawings look three-dimensional.
Part 1: From Value to Lines - The Theory of Hatching
At its core, hatching is a system for translating value (lightness or darkness) into lines. Where smooth shading relies on an even field of graphite, hatching relies on the density and layering of individual marks.
Let's begin with the core definitions.
This article from Erika Lancaster's art blog provides clear, concise definitions for the two main techniques we'll cover today.
Please read the short subsections titled '1. Hatching/Parallel Hatching' and '2. Cross Hatching'. This will give you the foundational vocabulary for the lesson.
To summarize, the core ideas are:
- Hatching: Creating value with a series of parallel lines. The closer the lines, the darker the value.
- Cross-Hatching: Layering sets of hatching over one another at different angles. The more layers you add, the darker the value becomes.
Think of each hatch mark not as an individual line, but as a component in a larger system designed to create a specific tone. For this system to work, the components need to be consistent.
10 Drawing Exercises for More Confident Lines and Hatching
This next short reading reinforces this idea of uniformity. It draws an excellent analogy, comparing a single hatch mark to a member of a chorus, where each part must work together to create a unified whole.
Read the section under the heading 'Distinguishing Regular Lines From Hatching'. Focus on the concept that hatches are 'part of a bigger system that acts as a whole' and should be uniform.
Part 2: The Mechanics of a Clean Hatch
Achieving a clean, even tone with hatching requires control and precision. It builds directly on the line control skills you developed in the first module. There are two key mechanical skills to focus on.
This video provides an excellent breakdown of these skills.
10 Essential Cross-Hatching Exercises
Let's watch a video from Marc Kompaneyets Studio that breaks down the essential motor skills for creating clean, professional-looking hatching.
Watch from 00:51 to 04:35. Pay close attention to: Consistent Hatch Marks (00:51 - 02:23): Notice the emphasis on maintaining a consistent 'gauge' or spacing between your lines. Soft and Hard Strokes (02:23 - 04:35): This is a crucial concept. Learn the difference between a stroke that starts and ends abruptly (hard) versus one that tapers at the ends (soft). This determines whether your shaded area will have a sharp edge or a soft, gradated one.
The key takeaway is that successful hatching is about discipline. You must strive for consistency in your spacing, and you need to deliberately choose how your strokes begin and end to control the edges of your tonal shapes.
Practice Session: Building Value with Lines (30 minutes)
Now it's time for the hands-on practice you prefer. Get your sketchbook and a pencil (an HB or 2B is a good choice). We'll start by building discrete value steps and then move on to smooth gradients.
Drill 1: The Cross-Hatched Value Scale
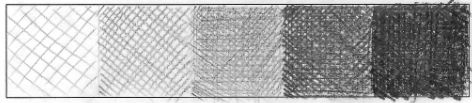
Just as we did with smooth shading, our first goal is to create a 5-step value scale. This will calibrate your hand and eye to this new technique.
This video provides a great follow-along demonstration.
Cross Hatching for Beginners - Art Challenge #9
The channel Painting with Paint Basket has a clear, real-time demonstration of creating a 5-step value scale. Follow along and create your own.
Watch from 01:30 to 08:08 and work alongside the instructor. Draw five connected boxes. Fill them in, starting with light, widely spaced hatches and progressively adding more layers at different angles to build up to your darkest value. Don't worry about perfection; focus on the process of building density.
Drill 2: Creating Smooth Gradients
Now, let's move from discrete steps to a continuous, smooth gradient. There are several ways to achieve this.
First, let's see how you can create a gradient by varying the length and density of your strokes.
Cross Hatching for Beginners - Art Challenge #9
The same video continues with an excellent demonstration of creating a smooth gradient. This method is great for quickly shading areas that transition from dark to light.
Watch from 08:08 to 10:50. Notice how the artist creates a smooth falloff from dark to light by making the hatch marks shorter and more spaced out. Try creating one or two of these gradient bars in your sketchbook.
Another, more structured method for creating gradients is to maintain a consistent line length and spacing, but to build up value through multiple, carefully angled layers.
10 Essential Cross-Hatching Exercises
For another perspective, let's return to the Marc Kompaneyets video. His approach is highly systematic, emphasizing consistent spacing and controlled layering.
Watch from 04:35 to 06:19. Note his key rules: Keep the 'gauge' (spacing) consistent. Change the angle of each new layer by at least 15 degrees. You can use more pressure for darker layers, combining last lesson's skill with this one. Try creating another gradient bar using this multi-angle layering approach.
Part 3: A Glimpse Ahead: Contour Hatching
So far, we've practiced hatching on flat shapes. But the true power of this technique is unlocked when you make the lines follow the form of a 3D object. This is called contour hatching.
Let's briefly introduce this concept, which you'll use extensively as you start shading real objects.
Read the short subsection '3. Contour Hatching'. The key takeaway is that your lines themselves can wrap around the object to enhance the illusion of volume.
To see what this looks like in practice, let's observe how an artist applies it to a simple curved object.
Cross Hatching for Beginners - Art Challenge #9
Here is a practical demonstration of contour hatching on a coffee mug. You don't need to follow along with the drawing, just observe the principle.
Watch from 10:50 to 13:40. Pay attention to how the artist first draws light 'cross contour lines' as guides, and then makes the hatch marks follow those curves. This is how you make a flat drawing look round.
Conclusion
Great work today. You've tackled a challenging but essential rendering technique. While smooth shading is excellent for some textures, hatching gives you a crisp, graphic alternative that is indispensable, especially for pen and ink work.
Key Takeaways:
- Hatching and cross-hatching are systematic ways to create value using lines. Density and layering are your primary controls.
- Consistency is crucial. Strive for a uniform "gauge" (spacing) in your hatch marks to create an even tone.
- To create darker values, add more layers of cross-hatching, changing the angle of your lines each time.
- Smooth gradients can be created by either varying line length and density or by gradually adding more layers of hatching.
- Contour hatching, where lines follow the form of an object, is a powerful tool for emphasizing three-dimensionality.
In our next lesson, we'll return to the world of smooth tones. You'll learn how to use blending tools like stumps and tortillons to create soft, seamless transitions, adding yet another texture to your artistic arsenal.