Introduction
Welcome to our final module, "The Complete Drawing Process." In the previous nine modules, you've built an impressive toolkit of fundamental skills, moving from confident linework and basic forms all the way to constructing a complete portrait from reference in our last lesson. You have learned the "what" and "how" of drawing individual components accurately.
Now, we will synthesize everything you've learned into a single, cohesive workflow. This module is about the strategic process an artist uses to tackle any subject from start to finish. We begin with the most critical first step: analysis. Before you make a single final mark, you must understand what you're looking at.
Today's lesson focuses on the first stage of that analysis. Your goal is to deconstruct a reference image by identifying its basic forms, perspective, and key proportions. This is the "blueprint" phase of your drawing, where you establish a solid, three-dimensional understanding of your subject.
1. The Philosophy of Deconstruction: Seeing Through the Surface
A common mistake for beginners is to start by tracing the outlines of a subject. This approach treats the subject as a flat shape and almost guarantees a flat, unconvincing drawing. The professional approach is to think like a sculptor: you must first understand the object's underlying 3D structure. This process is often called constructional drawing.
To get a clear definition of this mindset, let's start with a short reading from Drawabox, a resource known for its structured, almost engineering-like approach to drawing.
Lesson 2: Contour Lines, Texture and Construction
This text from Drawabox, titled "Lesson 2: Contour Lines, Texture and Construction," lays out a clear, step-by-step process for constructional drawing. It will provide the foundational 'why' for our lesson today.
Please read the first two sections, titled "The process" and "Observation vs construction." Focus on the three-step process for breaking down an object and the explanation of why this method is crucial, even when working from 2D photos.
As the text explains, the goal is to observe, identify the components, and then rebuild them. But what are those components? Complex objects in the real world aren't made of perfect cubes and spheres. This is where the idea of manipulating basic forms comes in.
This next video provides an excellent framework for thinking about this. It breaks down the process of understanding any subject into a few key stages. We'll focus on the first three, which are all about analysis.
In "6 Steps to Draw Anything" from the Proko channel, the presenter explains a powerful mental model for tackling complex subjects. Pay close attention to his concepts of 'structuralization' and 'manipulation'.
Watch the segment from 02:33 to 14:15. This covers three key ideas: Structuralization (starts at 02:33): This is the foundation—understanding basic primitives. Manipulation (starts at 03:59): This is the critical part. Note the different ways a simple form can be altered (bent, twisted, squished, contour changes). This is the key to seeing the structure in organic objects like animals or people. Observation (starts at 10:42): This is where you apply the first two concepts to a reference image, creating a 'mannequin' of what you see. This is the essence of deconstruction.
The key takeaway is that you should "try to manipulate your reference and not be manipulated by your reference." By deconstructing it into forms you understand, you gain control over the subject.
2. A Toolkit for Deconstruction
Now that you have the philosophy, let's assemble the practical tools you'll use to analyze a reference. This process involves answering three questions, which correspond to the three parts of our learning outcome.
A. What FORMS is it made of?
This is a direct application of what you just watched. When you look at your reference, try to see past the details and identify the underlying volumes.
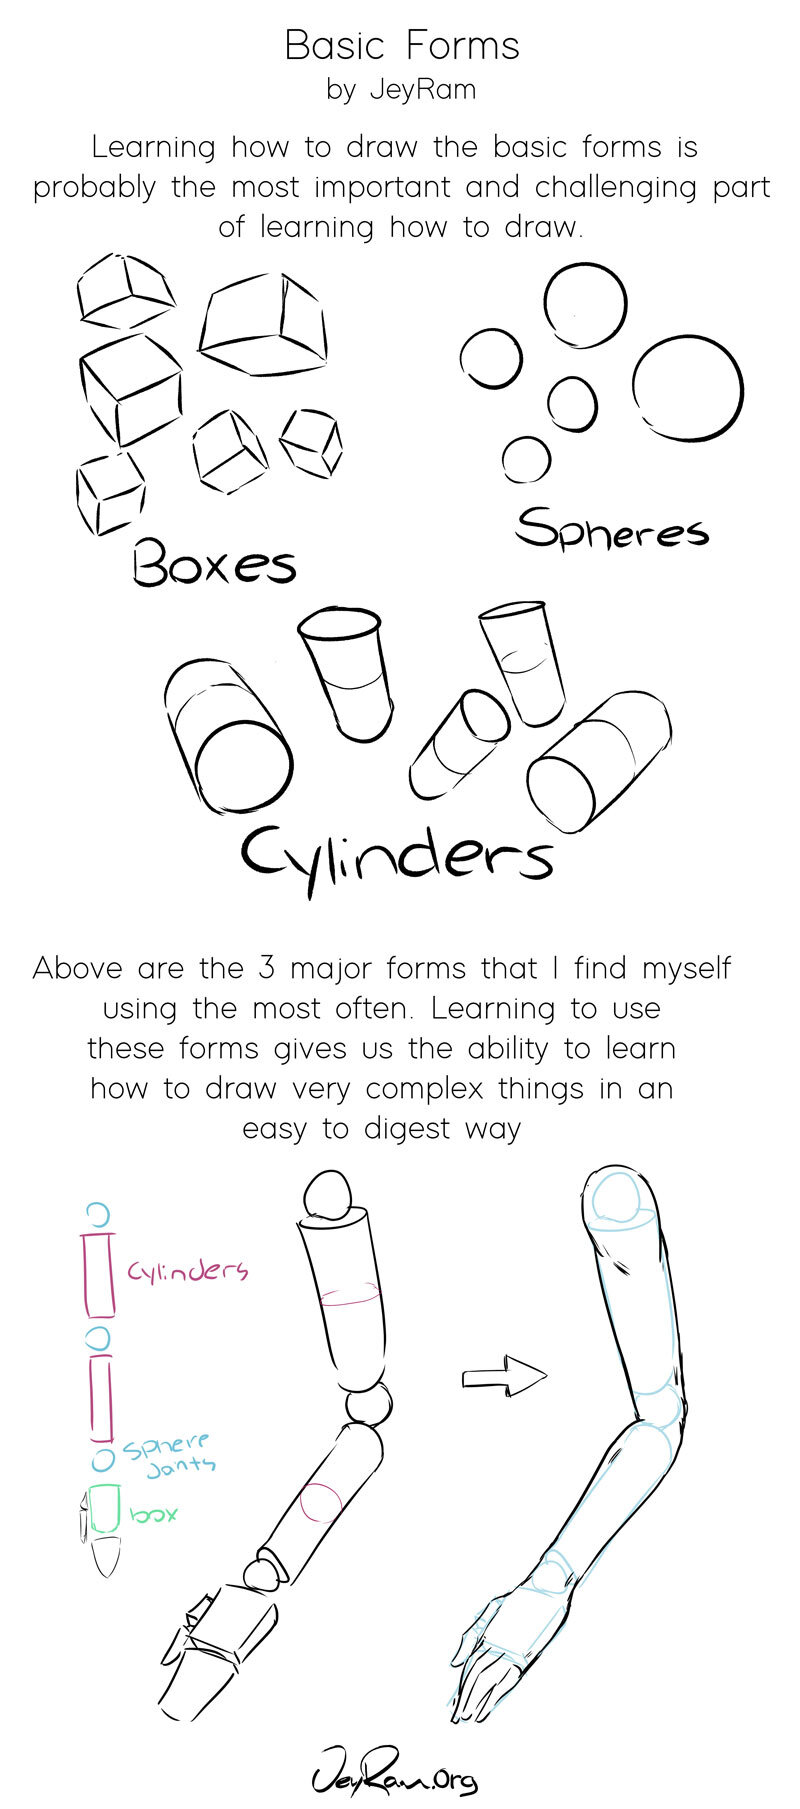
- Start with Primitives: Look for the largest, simplest forms first. Is the main body of a car a box? Is a head a sphere? Is an arm a cylinder?
- Look for Manipulations: How are those simple forms being changed? Is that cylinder bent (like an arm)? Is its contour manipulated (like the horn of a ram)? Are its edges rounded (like a modern car body)?
- Combine and Intersect: How do these forms connect? A person's arm (cylinder) plugs into their torso (a modified box or oval form) at the shoulder (a sphere).
B. What is its PERSPECTIVE?
Once you see the forms, you need to understand how they sit in 3D space. This is a quick review of what you learned in Module 3. In your analysis, you should identify:
- The Eye Level (Horizon Line): Are you looking down on the object, up at it, or straight on?
- The Vanishing Points: Is the object in one-point, two-point, or three-point perspective? Mentally (or with light lines) trace the parallel edges to see where they converge. This tells you how the object is rotated relative to you.
C. What are its Key PROPORTIONS?
Before you can place smaller forms, you need to lock down the big relationships. This is where the measurement skills from Module 4 come into play.
A critical concept here is working from big to small. You must establish the largest proportional relationships first to avoid running out of space or distorting the overall drawing.
How to Draw Accurate Proportions
Let's watch a segment from Proko's "How to Draw Accurate Proportions." It reinforces the measurement techniques you know and introduces the vital workflow concept of working from big to small.
Watch the section from 06:46 to 09:25, which focuses on the "big to small" principle. Notice how he starts with an 'envelope' containing the whole subject or the largest shapes, and only then breaks them down into smaller parts. This is the workflow you'll use in your analysis.
When analyzing your reference, use comparative measurement to find these big relationships. Ask questions like:
- Using the head as one unit, how many heads tall is the figure?
- What is the ratio of the car's width to its length?
- If you drop a vertical line from the tip of the bird's beak, what part of the body does it align with?
3. Practice: The Deconstruction Blueprint
Estimated Time for this Exercise: 30-40 minutes
Now it's time to apply this analytical process. Your task is to act as a detective and create a "blueprint" for a few subjects.
Your Task:
- Find three reference photos of different subjects. I suggest one organic subject (like an animal or a plant), one hard-surface object (like a vehicle, appliance, or piece of furniture), and one of your own choosing.
- For each photo, you will create a deconstruction sketch. You are NOT making a finished drawing. The goal is to create a structural underdrawing that shows your analysis.
For each deconstruction sketch, you must include:
- Form Construction: Draw through the objects, breaking them down into their primary and manipulated 3D forms (boxes, cylinders, spheres, etc.). Use light, confident lines.
- Perspective Analysis: If applicable, draw the horizon line and the convergence lines leading to the vanishing points.
- Proportional Notes: Make notes on the side or directly on the drawing indicating key proportional relationships you've measured (e.g., "Width = 2x Height").
The image below gives you a perfect idea of what your output should look like—the stage between the raw photo and the final outline.

Take your time with this. The more thorough your analysis is at this stage, the easier and more accurate the final drawing will be.
Conclusion
Excellent work. Today you've focused on the most important—and often most overlooked—part of the drawing process: understanding your subject before you draw it. This analytical phase is not just a preliminary step; it is the foundation upon which your entire drawing is built.
Key Takeaways:
- Analysis Precedes Action: A successful drawing begins with a deep analysis of the subject's form, perspective, and proportion.
- Think in 3D: Deconstruct subjects into their underlying simple and manipulated 3D forms, rather than copying 2D contours.
- Work Big to Small: Always establish the largest shapes and proportional relationships first to ensure a solid and accurate foundation for your drawing.
- You Are in Control: By deconstructing a reference, you understand its structure, giving you the power to draw it convincingly from any angle and even to alter it for your own designs.
Preview of the Next Lesson:
You have just learned how to analyze a subject's physical structure. The next logical step is to analyze how light interacts with that structure. In our next lesson, you will learn to analyze the lighting in a reference to map out the main shadow shapes and highlight areas. This is the second half of the planning phase and is the key to creating drawings that feel realistic and full of volume.