Introduction
Welcome back! In our last lesson, you learned to deconstruct a reference image by analyzing its underlying 3D forms, perspective, and proportions. This "blueprint" phase is the crucial first step in creating a drawing that feels solid and believable. You learned to think like a sculptor, understanding the object's structure before worrying about its surface.
Now, we move to the second and final stage of our analysis: understanding how light interacts with those forms. A drawing of a cube is just an outline, but a drawing of a cube with light and shadow becomes a three-dimensional object.
Today's learning outcome is to analyze the lighting in a reference to map out the main shadow shapes and highlight areas. This is not about shading or rendering yet. It's about creating a clear "map" that tells you exactly where your lights and shadows will go, turning your structural blueprint into a guide for creating volume and realism.
1. Training Your Eyes to See
The first and biggest challenge in drawing light and shadow is that our brains often lie to us. We don't see the world as a mosaic of abstract value shapes; we see "a white coffee mug" or "a dark shirt." Our brain labels objects and makes assumptions about their brightness, often ignoring the actual effect of the light. To draw realistically, you need to learn to override this instinct and see what's truly there.
This first video from Proko brilliantly illustrates why we can't always trust our eyes and introduces the single most powerful technique for seeing value correctly.
Watch this segment from "Train Your Eyes to See Values" to understand how context can fool your perception and how to counteract it.
Watch the video from the beginning to 05:47. Pay close attention to: The Checkerboard Illusion (00:48): A powerful example of how your brain's assumptions can override reality. Avoiding 'Tunnel Vision' (02:53): The danger of focusing on one small area and losing sight of the overall value relationships. The Squinting Technique (04:10): Understand how squinting simplifies a complex scene into large, manageable value groups. This is the key technique for this lesson.
The core takeaway is that you need a deliberate process to see accurately. Squinting is your most important tool for this. It filters out distracting details (like texture and small color changes) and forces you to see the big, simple shapes of light and shadow.
2. The Language of Light
Before you can map the shadows, you need a vocabulary to identify what you're seeing. When light from a single source hits an object, it creates a predictable set of light and shadow zones. Understanding these zones allows you to analyze any lighting situation logically.
The next video will walk you through the essential terms that describe how light behaves on a form.
Go From Flat to Realistic Shading! Here’s How
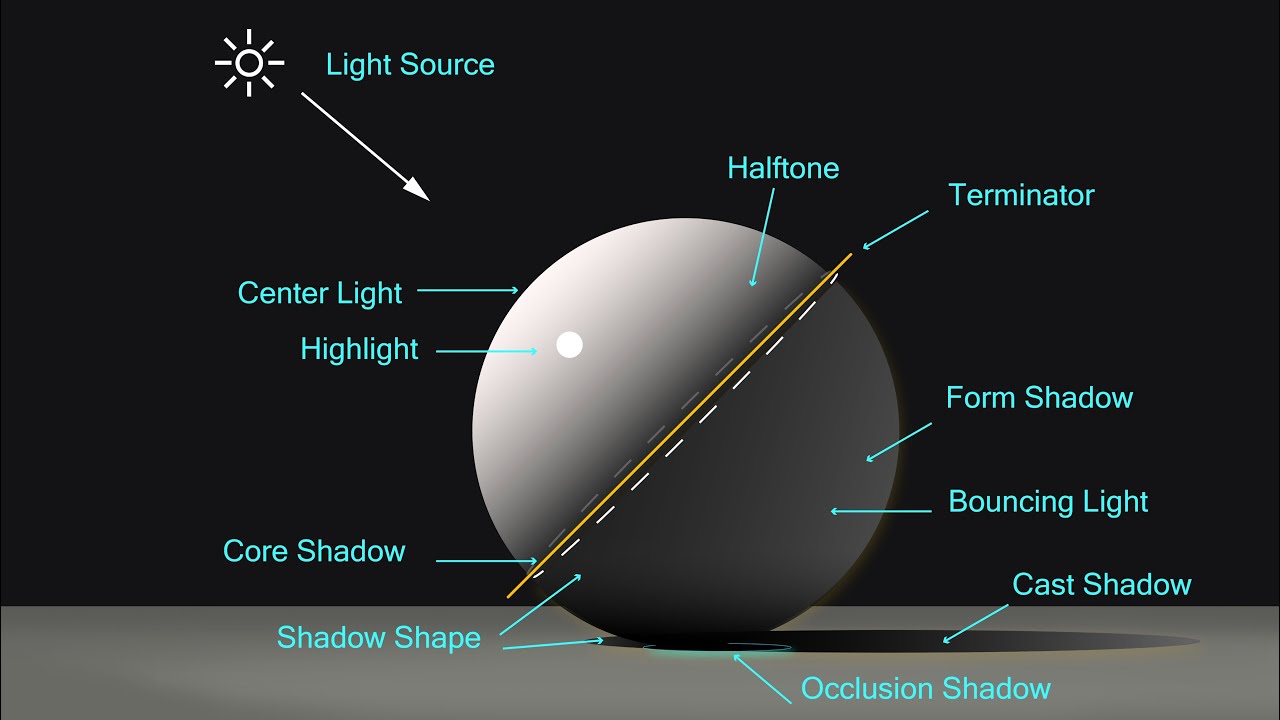
In this clip from "Go From Flat to Realistic Shading! Here’s How," Proko breaks down a lit sphere into its fundamental components. This will give you the vocabulary you need for your analysis.
Watch the segment from 02:20 to 04:13. Focus on understanding the definition and location of each of these key terms: Terminator: The edge separating the light side from the shadow side. Form Shadow & Cast Shadow: The two primary types of shadow. Core Shadow: The darkest part of the form shadow. Reflected Light: How light from the environment bounces back into the shadows. Highlight: The reflection of the light source itself.
To help you remember these terms, here is a diagram that lays them all out. Refer to this as your "cheat sheet" as you analyze your references.
3. The Method: Shadow Mapping
Now that you can see values as shapes and have the vocabulary to describe them, you can learn the practical method of shadow mapping.
The goal of shadow mapping is to simplify your complex reference into just two families: the light family and the shadow family. You do this by drawing a clear line that separates them. This line is the terminator on the form and the outer edge of the cast shadow.
This is a powerful technique used by artists to ensure their drawings have a strong, readable light effect before they get lost in rendering details.
The article "Shadow Mapping" from Muddy Colors introduces this concept perfectly. It's about committing to simple, graphic shadow shapes.
Read the first two paragraphs of this article. Notice how the artist uses a marker to simply block in all the shadows as one flat mass. This forces a clear separation between light and dark.
So, how do you create this map on your own drawing? This next reading provides a simple, step-by-step process.
How to Draw Lights and Shadows
The article "How to Draw Lights and Shadows" gives us a clear, actionable workflow for mapping values.
Read the section titled "Mapping Values." It outlines a simple 4-step process that you will use in today's exercise. The key is to lightly draw the shapes of the different value areas before you start shading.
4. Practice Exercise: Creating a Shadow Map
Estimated Time: 25-30 minutes
It's time to put this all together. In the last lesson, you created structural deconstructions of a few objects. Now, you will perform the second phase of analysis on one of them.
Your Task:
-
Choose one of the reference photos you used in the previous lesson's exercise. You should already be familiar with its 3D forms.
-
On a new sheet of paper, lightly sketch the basic outlines of the object again. Don't worry about the internal construction lines this time, just the main contours.
-
Now, create a shadow map by following these steps:
- Step 1: Analyze the Light Source. Look at your reference and determine the direction the main light is coming from.
- Step 2: Squint! Squint your eyes at the reference until the shadows merge into a few simple, dark shapes.
- Step 3: Map the Cast Shadow. Using a light pencil line, draw the outline of the shadow the object casts onto the ground or other surfaces.
- Step 4: Map the Form Shadow. Find the terminator line on the object itself and draw its shape. This line encloses the form shadow.
- Step 5: Separate the Families. Take your pencil and fill in the entire shadow area (both cast and form shadows) with a single, flat, light tone. This visually groups everything in the "shadow family."
- Step 6: Map the Highlight. Look for the brightest spot on the object. Lightly draw the outline of this highlight shape. This area will remain the pure white of the paper.
Your finished drawing should clearly show three distinct value zones: the white highlights, the light gray lit side, and the darker gray shadow mass. There should be no gradients or detailed rendering. You are creating a map, not a finished drawing.
Conclusion
Fantastic work. Today you've learned to complete the analytical phase of the drawing process. By combining the structural breakdown from last lesson with the shadow map you created today, you now have a complete blueprint that describes your subject in terms of both form and light.
Key Takeaways:
- See Shapes, Not Things: Use the squinting technique to overcome your brain's assumptions and see the abstract shapes of light and shadow.
- The Terminator is Key: The most important line in your shadow map is the terminator, which defines the border between the lit side and the shadow side of an object.
- Map Before You Render: Shadow mapping is the process of simplifying a scene into clear areas of light and shadow before you add detail. This ensures a strong foundation of light and form.
- Light & Shadow Families: Thinking in terms of two groups—the light family and the shadow family—is the fundamental principle for creating drawings with convincing volume.
Preview of the Next Lesson:
You now have all the information you need to begin the final drawing. In our next lesson, you'll learn how to create a structural underdrawing that establishes accurate forms and proportions. You will synthesize your analysis of form, perspective, proportion, and shadow into a clean line drawing that is ready for the final stages of rendering and refinement.