Introduction
Welcome to the final lesson of our module on Head and Face Construction! Over the past few lessons, you have systematically built a powerful set of skills. You started with the Loomis method to construct the basic form of the head, then you learned to sculpt each individual feature—the eyes, nose, mouth, and ears—as three-dimensional objects. In our last lesson, you practiced integrating these features into a cohesive whole, focusing on the transitional planes that connect them.
Today, you will bring everything together. The goal of this lesson is to produce a complete portrait sketch from reference, applying all the construction and feature drawing skills you've acquired. This is the capstone project for this module, where you move from practicing individual components to creating a unified and recognizable portrait.
This is the process we're aiming for: starting with a reference photo, building a solid underlying structure, and finishing with a clean, confident line drawing that captures a likeness.

The Professional's Workflow: A Complete Walkthrough
Before you begin your own drawing, it's incredibly valuable to see how a professional artist approaches the same task. The fundamental principles are the same, but seeing them applied with a high level of skill helps solidify the concepts and reveals a deeper layer of thinking.
The following video provides a comprehensive, step-by-step demonstration of constructing a portrait. The artist, Stan Prokopenko, thinks like a sculptor, constantly considering the forms, planes, and underlying anatomy. This aligns perfectly with your preference for understanding the "why" behind the techniques.
Step by Step Portrait Construction
In this video, "Step by Step Portrait Construction" from the Proko channel, you'll see a complete workflow for building a head. It's a detailed and insightful look at moving from the initial gesture to the subtle forms that create a likeness.
Watch the entire video from the beginning to end (00:00 - 18:41). It's a bit long, but it serves as a masterclass that synthesizes everything we've discussed. As you watch, pay attention to how each step builds upon the last: Gesture (0:00-2:04): Notice how he starts not just with a sphere, but with the overall pose and attitude of the head and neck. Construction (2:04-4:45): See how he establishes the jaw, centerline, and brow line to define the head's angle in space. Proportions (4:45-7:31): Observe his use of halves and thirds to map out the locations for the features. Sculpting the Form (7:31-13:44): This is the key part. Pay close attention to how he 'cuts' into the initial sphere to create the side planes, cheekbones, and jaw. This is a practical application of the 'smooth transitions' we discussed last lesson. Adding Feature Structures (13:44-end): Finally, see how he builds the structures for the eye sockets, nose, and mouth, always considering them as forms sitting on the larger structure of the head.
Your Turn: Sketching a Portrait from Reference
Now it's time for you to apply this entire process. You will select a reference photo and create your own portrait sketch from start to finish. We'll use a more streamlined video as a guide for the practical steps.
Estimated Time for this Exercise: 40-50 minutes
Part A: Choose and Analyze Your Reference
First, find a good reference photo.
- Source: Websites like Pinterest, Unsplash, or Pexels are great. Search for "portrait photography" or "character portrait."
- Criteria: Choose a clear, well-lit photograph. A three-quarter view is ideal because it shows the most three-dimensional information. Avoid photos with very dramatic top-down or bottom-up lighting for now.
Once you have your photo, take a few minutes to analyze it before you draw. Don't skip this step! As in software development, good planning prevents problems later. Look at your reference and ask:
- What is the main tilt or angle of the head?
- Where is the centerline? Is it curved?
- Where does the brow line sit? Is it tilting up or down?
- Roughly map out the Loomis ball and the cut for the side plane. The article from GVAAT, "The Loomis Method of Drawing the Head," specifically recommends this practice of analyzing photographs to internalize the method.
Part B: The Sketching Process
We'll use a clear, concise video demonstration to guide your drawing process. It shows the application of the classic Loomis method from start to finish.
Mastering Facial Drawing with the LOOMIS METHOD in Just 8 Minutes!!
The video "Mastering Facial Drawing with the LOOMIS METHOD in Just 8 Minutes!!" by One Pencil drawing is a great, practical guide. Watch it once through to get a feel for the flow.
Watch the entire video (0:00 - 7:46) to see the complete process. Then, grab your pencil and paper and follow the steps below, applying them to your chosen reference photo.
Follow these stages to build your portrait. Use a light pencil (like an HB) for all construction lines and a slightly darker one (like a 2B) for final lines.
1. The Foundation (10-15 minutes)
- Start by drawing the Loomis head, carefully matching the angle and perspective of your reference. Draw the main ball, establish the brow and center lines, and slice off the side plane.
- Define the general shape of the jaw and place the ear.
- Use this infographic as a quick static reference for the construction steps.
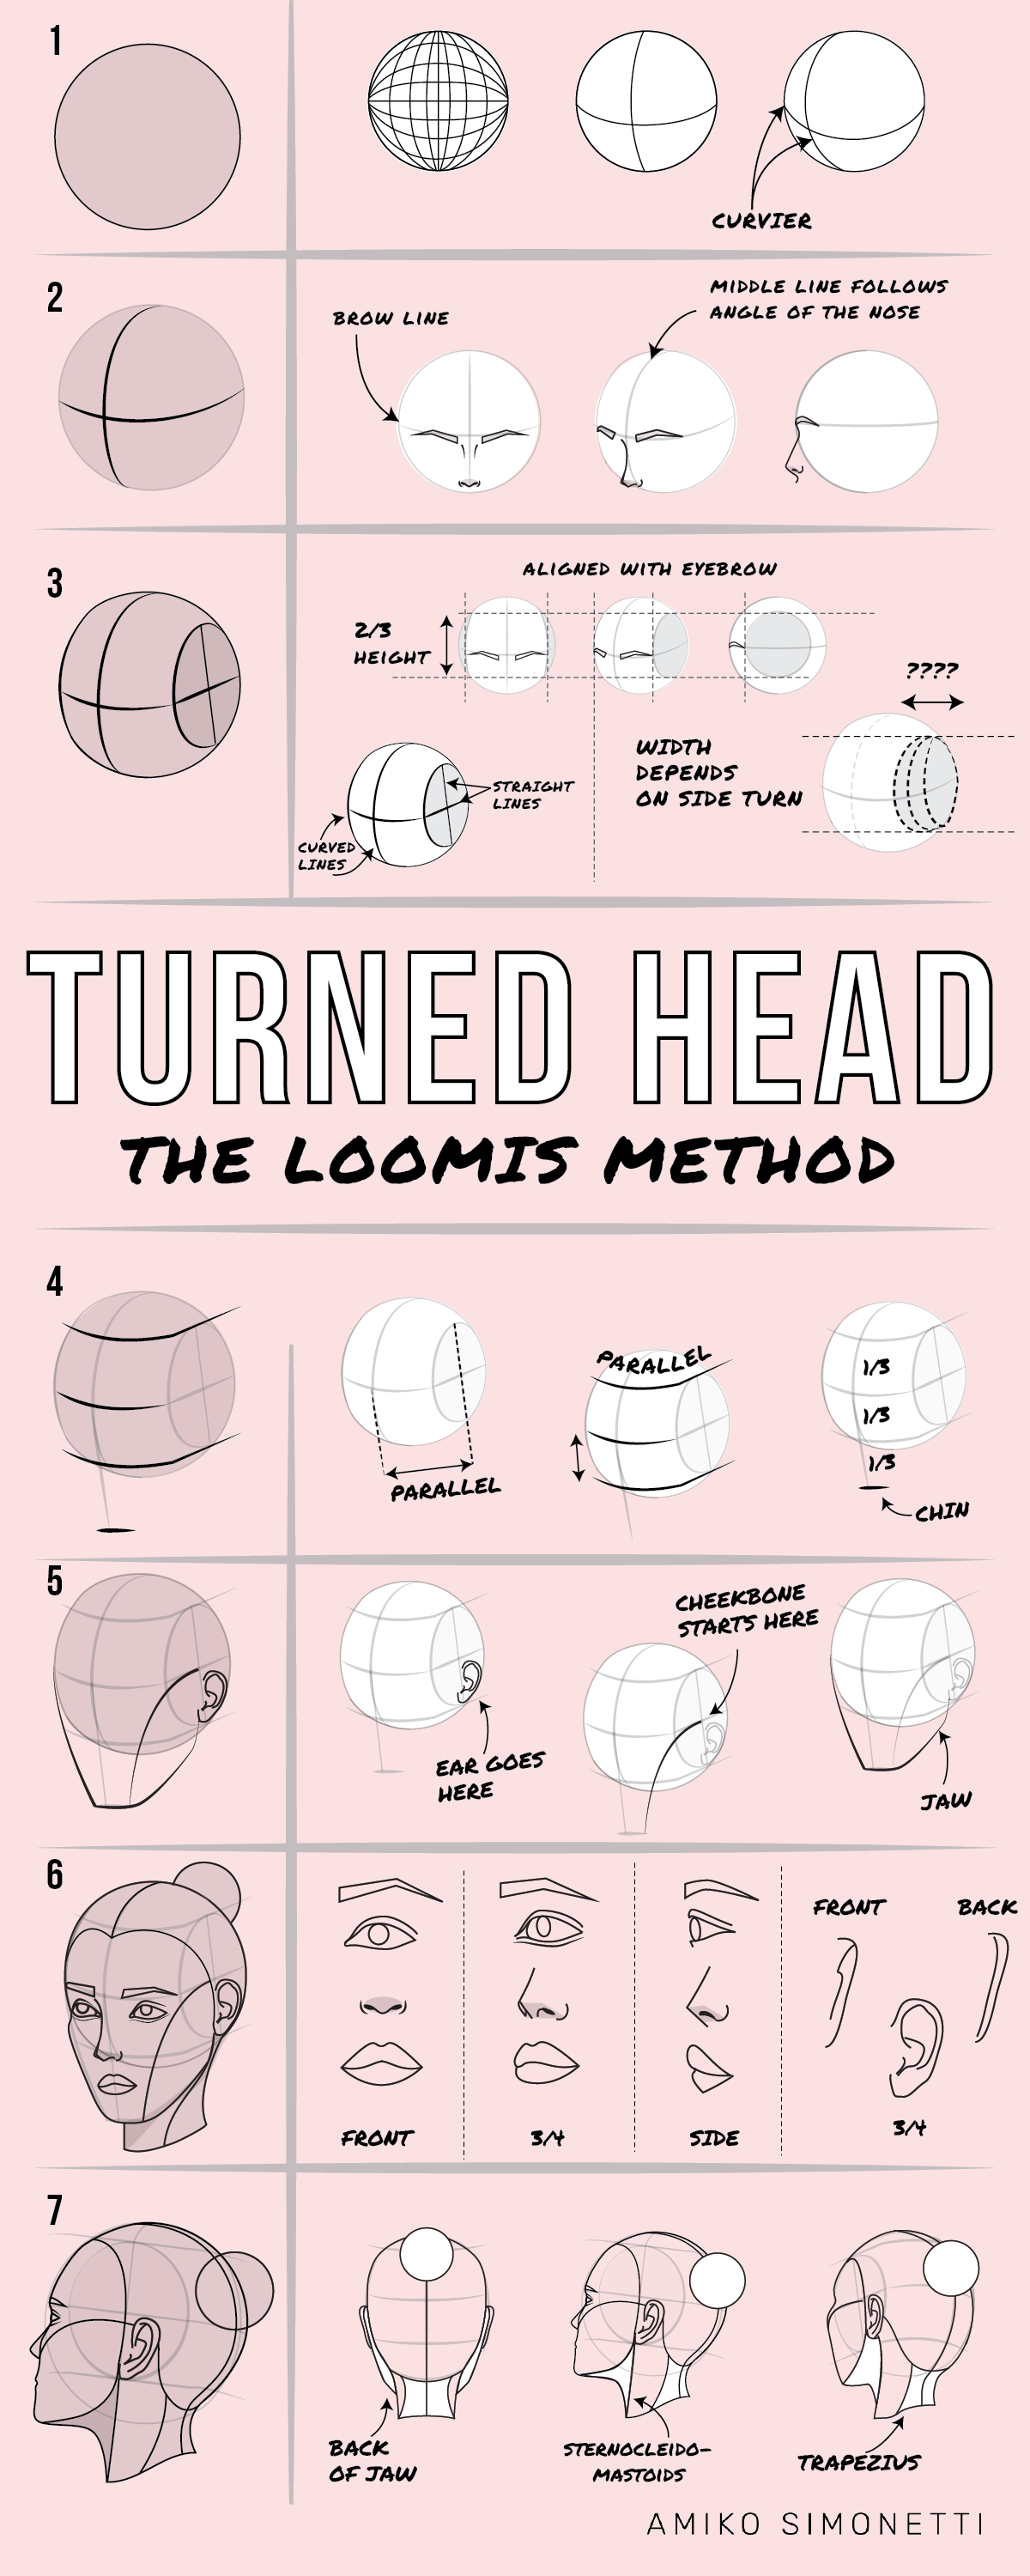
2. Placing and Refining Features (20 minutes)
- Using your guidelines, lightly sketch in the placement and basic shapes of the eyebrows, eyes, nose, and mouth.
- Remember the lessons on individual features: the eye is a sphere in a socket, the nose is a series of planes, and the lips wrap around the curve of the teeth.
- Constantly look back and forth between your drawing and your reference. Use the comparative measurement techniques you learned in Module 4 to check relationships. Is the width of the nose correct relative to the space between the eyes? Does the corner of the mouth line up with the center of the eye?
3. Finalizing Contours and Adding Hair (10-15 minutes)
- Refine the contours of the face. The initial jawline was a general guide; now, adjust it to match the specific shape of your reference's face. Define the cheekbones and chin.
- Block in the hair. Treat the hair as one large, volumetric shape that sits on top of the cranium, not flat against it. Focus on the overall outline and the main flow, not individual strands.
- Erase your initial construction lines where they are no longer needed, and strengthen the final lines of your portrait.
At the end of this process, you should have a complete line drawing that successfully captures the structure and likeness of your reference.
Conclusion
Congratulations on completing not just a drawing, but the entire "Head and Face Construction" module! By producing a full portrait from reference, you have demonstrated your ability to synthesize all the skills we've covered. This is a significant achievement.
Key Takeaways:
- Process Over Product: A successful portrait relies on a structured process: from general gesture and construction to specific features and details.
- Construction is the Key to Likeness: Accurate placement and proportion, established through the Loomis method, are more crucial for capturing a likeness than rendering details.
- Analysis is Half the Battle: The ability to observe and deconstruct a reference photo before you draw is a critical skill that informs every mark you make.
- The Head is a Unified Form: You've learned to see the head not as a collection of separate parts, but as an integrated, three-dimensional object.
Preview of the Next Module:
You have now mastered the architectural blueprint of a portrait. In our next and final module, The Complete Drawing Process, we will take what you've built and learn how to finish it. We will move beyond line art to explore light, shadow, and rendering. You will learn how to analyze a light source, map out shadow shapes, and use shading techniques to create drawings with depth, texture, and realism. Today was about building the structure; next, we learn to bring it to life with light.