In our previous lesson, we demystified the layout of the keyboard, learning how to navigate its repeating pattern of keys and pinpoint Middle C as our central reference. Now that you know your way around the instrument, it's time to prepare your body to interact with it.
This lesson focuses on the physical foundation of playing the piano. Our goal is to demonstrate the correct seated posture, hand position, and finger numbering. Mastering these physical aspects from the very beginning is crucial. It not only prevents physical strain and potential injury but also allows for greater control, speed, and expression in your playing. Think of it as establishing the correct operating system for your body before you start running complex programs (the music).
Part 1: Foundational Posture
Before your fingers ever touch the keys, your overall posture sets the stage for everything that follows. A stable, relaxed posture provides the support structure for your arms and hands, enabling them to move freely and efficiently.
This short video provides an excellent visual overview of the essential points for correct seated posture.
Watch this video, "Proper Posture At The Piano" from the Pianote channel. It's a quick but comprehensive guide to setting up your body correctly at the instrument.
Watch the entire video from start to finish. It will cover your back, feet, knees, and arm position in under two minutes.
As you saw in the video, good posture is a combination of several key elements. Let's break them down and add a bit more detail. The following infographic provides a great summary of these points.

This infographic from Hoffman Academy provides a visual checklist for correct playing posture, from your head and shoulders down to your feet and fingers.
Let's use this as a guide to check your own posture. Sit at your keyboard now and we'll go through the most important aspects.
- Bench Height and Distance: Adjust your bench so your forearms are roughly parallel to the floor when your hands are on the keys. Your elbows should be at or slightly above the level of the white keys.
- Back and Shoulders: Your back should be straight but not stiff—maintain the natural curve of your spine. Your shoulders should be relaxed and down, not hunched up towards your ears. This is crucial for allowing the natural weight of your arm to contribute to the sound.
- Feet: Your feet should be flat on the floor, providing a stable base. If they don't reach, use a small stool or a stack of books.
The article "9 Essential Tips to Help You Maintain Good Piano Posture" offers further explanation on why these points are so important.
9 Essential Tips to Help You Maintain Good Piano Posture – Liberty Park Music
This article reinforces the principles we've just discussed, explaining the "why" behind each postural tip.
Please read these three sections to solidify your understanding: Tip 2 explains the importance of relaxed shoulders for controlling dynamics. Tip 3 covers maintaining a straight but natural spine. Tip 8 discusses the role of your feet in providing balance.
Part 2: Hand and Finger Position
With your body correctly positioned, we can now zoom in on your hands and fingers. The goal is to create a hand shape that is both strong and relaxed, allowing each finger to move independently and efficiently.
This next video is a fantastic, focused guide on achieving the ideal hand position. It introduces several practical exercises you can use to develop the right feel and muscle memory.
The Only Piano Hand Position Video You’ll Ever Need (5-Minute Fix)
This video, "The Only Piano Hand Position Video You’ll Ever Need" from South Shore Piano School, provides a 5-minute fix for common hand position issues.
Watch the following segments carefully: Seating check: This reinforces our first section on posture and distance. Thumb position: Learn about the "thumb perch" and how it supports your wrist. Finger shape: Discover the "spider exercise" for creating a stable, curved finger shape. Fingertip contact: Understand which part of your finger should touch the key. Bonus tip: A simple trick to find your natural, relaxed hand position.
Let's summarize the key takeaways for your hand position:
- Wrist: Your wrist should be flexible, straight, and level with your forearm—never dropped below the keyboard.
- Fingers: Your fingers should be naturally curved, as if you were holding a ball. The joints should be firm, not collapsing when you press a key.
- Thumb: Your thumb should be relatively straight and positioned slightly ahead of your other fingers, ready to play on its side/corner.
- Contact Point: You play with the fleshy tips of your fingers, not the flat pads or your fingernails.
To find this natural curve, try the exercise from the video: let your arm hang relaxed at your side. The shape your hand naturally assumes is very close to the ideal playing position. Simply bring that relaxed hand up and place it on the keys.
Part 3: Finger Numbering
Finally, to follow musical instructions efficiently, we use a standard numbering system for the fingers. This system is universal in Western piano music and provides a simple shorthand for indicating which finger should play which note.
The system is straightforward and symmetrical for both hands.
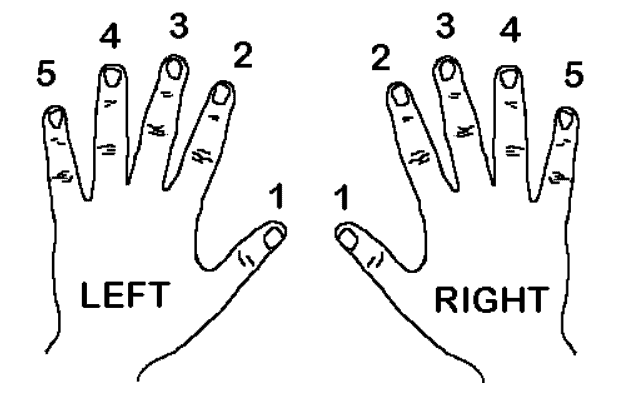
Standard finger numbering for the piano. For both the left and right hand, the thumb is finger 1, the index finger is 2, the middle finger is 3, the ring finger is 4, and the pinky is 5.
As the image shows:
- Thumb = 1
- Index Finger = 2
- Middle Finger = 3
- Ring Finger = 4
- Pinky Finger = 5
This is the same for both the right hand and the left hand. Memorizing this is non-negotiable for reading sheet music and will become second nature very quickly.
This last video offers a quick, interactive way to test your knowledge of the finger numbers.
Piano Finger Number System for Beginners | Hoffman Academy | Hoffman Academy
Watch this short clip, "Piano Finger Number System for Beginners" from Hoffman Academy. The instructor will quiz you to help you memorize the numbers.
Follow along with the instructor from the beginning to the quiz section. Try to wiggle the correct finger before he shows you the answer.
Your Practice Session (25-30 minutes)
Now, let's translate this theory into practice. Spend the remainder of your time away from this lesson, at your keyboard, focusing on the physical feeling of these positions.
-
Posture Setup (5 minutes):
- Sit at your keyboard. Deliberately go through the posture checklist:
- Is your bench at the right height? (Forearms parallel to the floor).
- Are your feet flat on the floor?
- Is your back straight but relaxed?
- Are your shoulders down and loose?
- Adjust your position until you can answer "yes" to all of these.
-
Hand Position Exercises (10 minutes):
- Perform the "bonus tip" exercise from the hand position video: relax your arms at your sides, then gently bring your naturally curved hands up to the keyboard. Do this 5-10 times, getting used to the feeling of a relaxed approach.
- On a flat surface (like the closed keyboard lid or a table), practice the "spider exercise." Place your hand in a fist, then slowly open it until you are "standing" on your fingertips with stable joints. Gently push on the joints with your other hand to feel the sensation of stable resistance without tension.
- Practice the "circle exercises," touching the tip of your thumb to the tip of each finger, one by one, forming a clear circle. This helps you identify the correct contact point.
-
Finger Numbering Drill (10 minutes):
- Place your right hand on the keyboard in the correct position (over any five white keys).
- Without looking, silently call out a finger number (e.g., "3"). Lift only that finger slightly off the key, keeping the others resting gently.
- Do this in random order for all five fingers of the right hand (e.g., 3, 1, 5, 2, 4, 1, 3...).
- Repeat the entire exercise with your left hand. The goal is to build the mental connection between the number and the specific finger, without needing to think about it.
Conclusion
In this lesson, you have established the complete physical foundation for playing the keyboard. You've learned how to sit with a supportive and ergonomic posture, how to shape your hands for optimal control and relaxation, and the standard finger numbering system we will use from now on. These fundamentals are your best tool against strain and will allow you to play with greater ease and precision as you progress.
In our next lesson, we will finally put it all together. With your knowledge of the keyboard layout and your newly established posture, you will play your very first musical pattern: the C Major five-finger scale with your right hand.