Welcome to your third lesson. In our first two sessions, we mapped out the keyboard to find our bearings and established the physical foundation of good posture and hand position. You now have all the component parts needed to start playing.
Today, we will combine these skills to achieve a significant milestone: playing your first musical pattern. The goal of this lesson is to play the C Major five-finger pattern (C-D-E-F-G) with your right hand, using the correct fingering. This is the fundamental building block upon which countless melodies are built, and mastering it will give you your first real feel for creating music at the keyboard.
Part 1: Finding Your Position
Before we play, let's get your hand in the correct starting position. In our last lesson, you learned the finger numbering system. Now, we'll apply it.
The position we'll use is often called the "C Position." It's a natural and comfortable placement for your hand.
- Locate Middle C: Find the C key that is closest to the center of your keyboard.
- Place Finger 1: Place your right-hand thumb (finger 1) on Middle C.
- Set Your Hand: Allow your other four fingers to rest naturally on the next four consecutive white keys. Your hand should be relaxed and curved, as you practiced in the previous lesson.
This single action aligns each finger with a specific note:
- Thumb (1) on C
- Index (2) on D
- Middle (3) on E
- Ring (4) on F
- Pinky (5) on G
The following image illustrates this exact placement.

This image shows the correct right-hand placement for the C Major five-finger pattern. Your thumb (1) is on Middle C, and each subsequent finger rests on the next white key: D, E, F, and G.
Take a moment to place your hand in this position. Lift it away, shake it out to ensure it's relaxed, and then place it back in the C Position. Repeat this a few times to build muscle memory for finding this crucial starting point.
Part 2: Playing the Five-Finger Pattern
With your hand in position, you are ready to play. The goal is to press each key deliberately, one at a time, to produce a clear sound. We will play the pattern both up (ascending) and down (descending).
This video from Pianote provides a perfect demonstration. The instructor will walk you through setting up your hand and playing the pattern for the first time.
How To Play Piano (Beginner Piano Lesson)
Watch this segment from the video "How To Play Piano (Beginner Piano Lesson)" on the Pianote channel. It covers the exact motion and technique we're focusing on today.
Pay close attention to the section from placing your hand to playing the pattern up and down. Notice the instructor's curved fingers, relaxed wrist, and how she calls out the finger numbers and note names.
As you saw, the process is methodical. Let's break it down:
- Ascending (going up): Play the notes in order from your thumb to your pinky: C, D, E, F, G. Use fingers 1, 2, 3, 4, 5.
- Descending (going down): Play the notes in reverse order from your pinky to your thumb: G, F, E, D, C. Use fingers 5, 4, 3, 2, 1.
The following resource provides a concise written instruction for this exercise.
This excerpt from an article on PianoTV.net reinforces the hand placement and gives you a clear textual reference for the exercise.
Read the two short paragraphs that begin here. The instruction to "try playing these notes in order, up and down" is precisely our goal for today.
A key point from the video and the previous lesson is to play from the weight of your arm, not by just pushing with your fingers. Imagine your relaxed arm is gently "falling" into each key. This creates a fuller, more controlled sound and prevents tension.
As you play, you are also taking your first step towards reading music. The five notes you are playing are the foundation of the treble clef. Here is what they look like on paper.
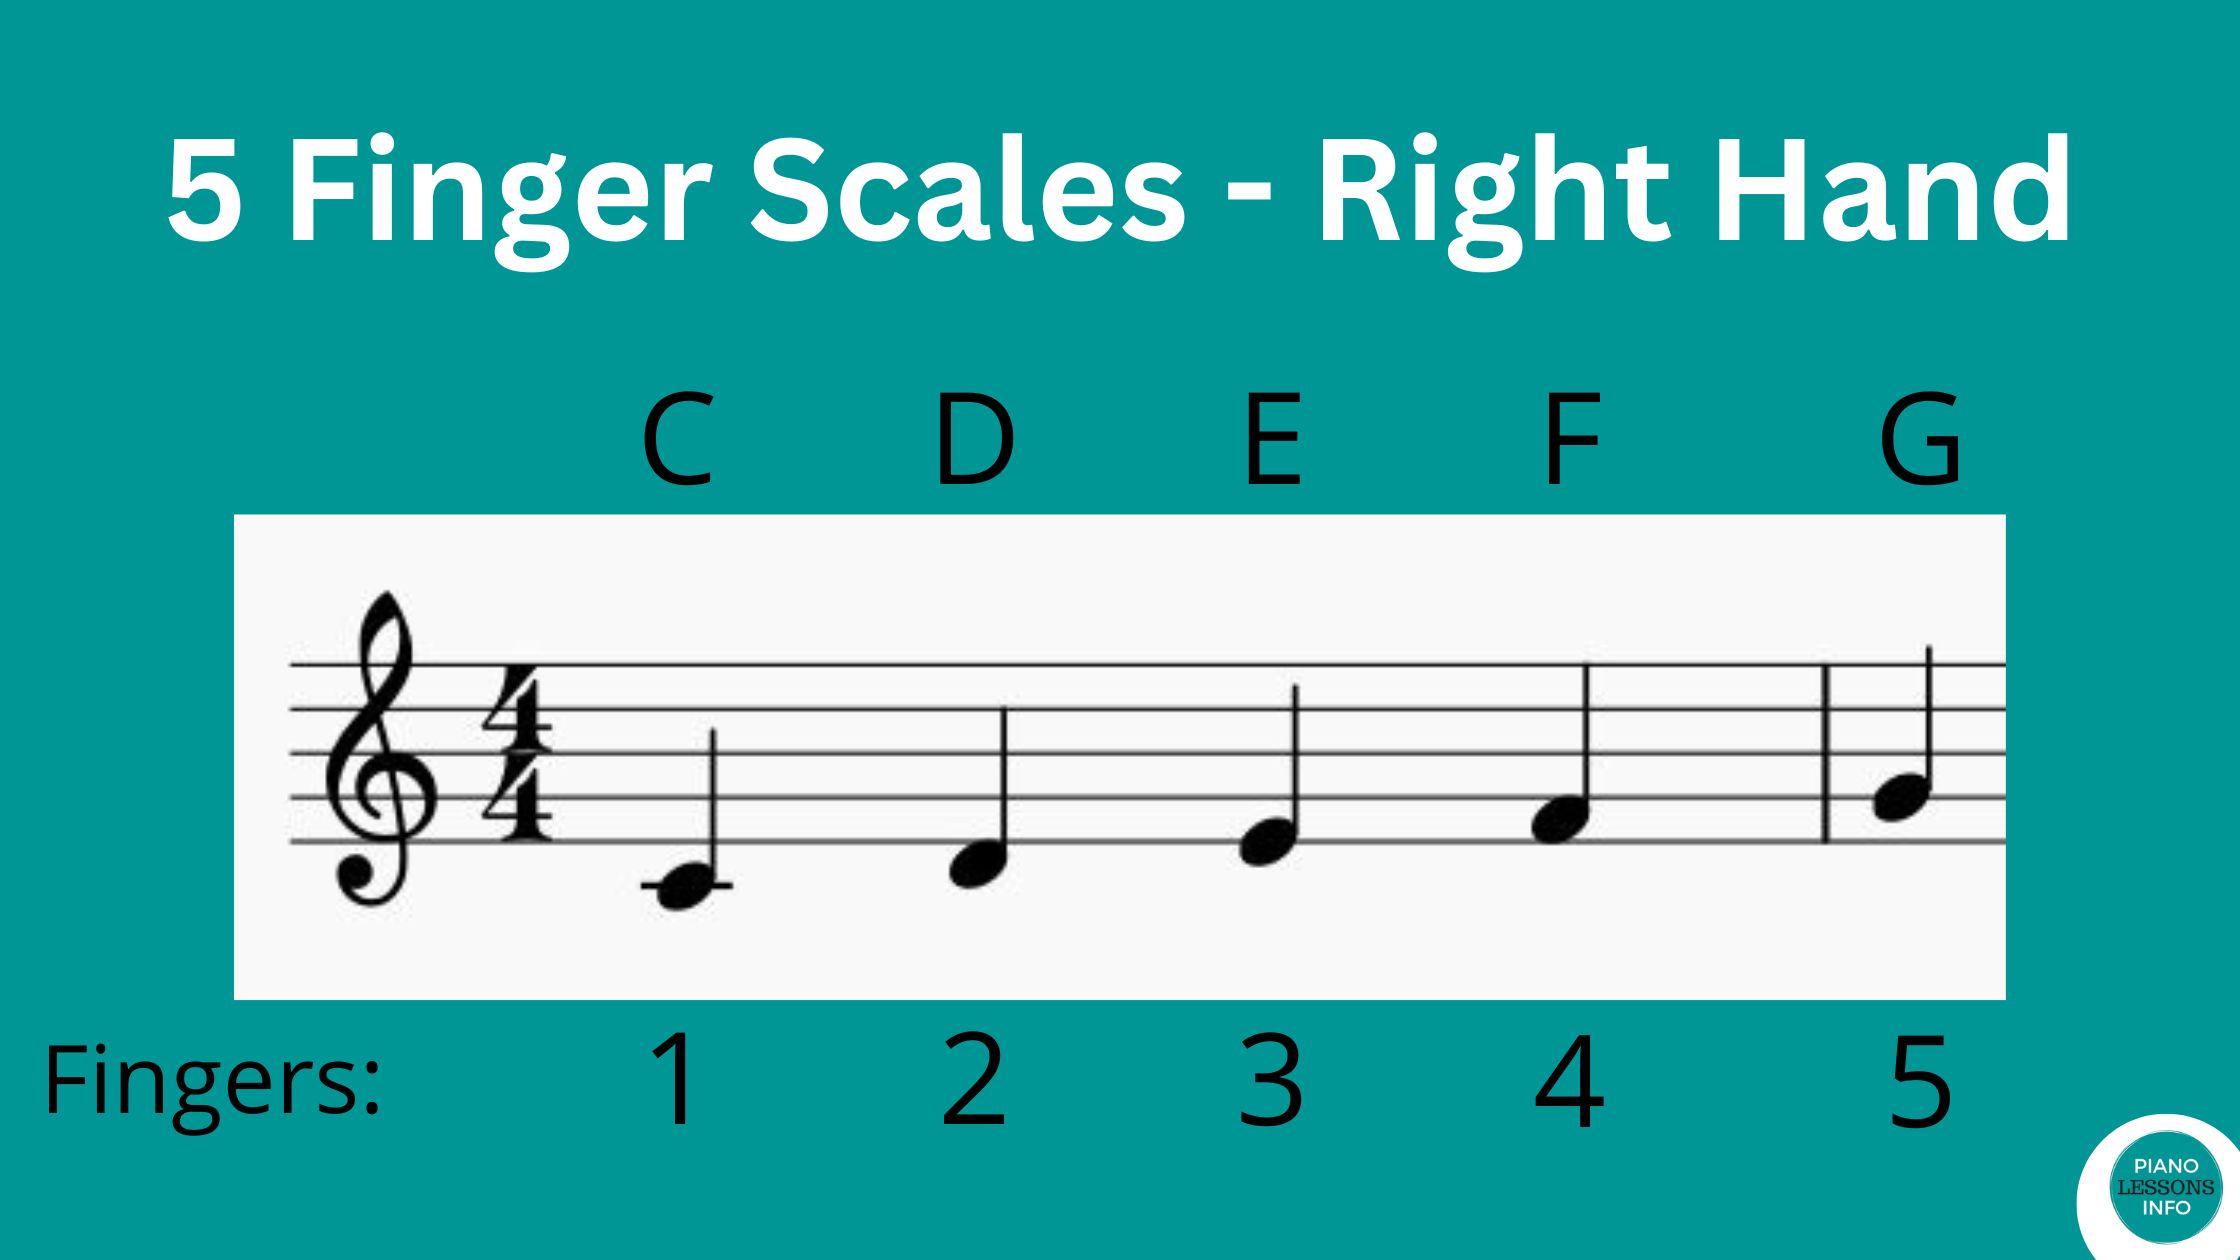
This is how the C Major five-finger pattern you are playing looks in written music. Notice the notes C, D, E, F, and G on the staff, with the corresponding finger numbers below them. This visual connection is the first step toward your goal of sight-reading.
Your Practice Session (25-30 minutes)
Now it's time to dedicate the rest of your session to hands-on practice at the keyboard. The goal is not speed, but accuracy, evenness, and relaxation.
-
Positioning Practice (5 minutes):
- Sit with correct posture.
- Find Middle C and place your right hand in the C Position.
- Check your hand shape: Are your fingers curved? Is your wrist straight and relaxed?
- Lift your hand, relax it at your side, and repeat the placement. Do this 5-10 times.
-
Note-by-Note Playing (10 minutes):
- Place your hand in the C position.
- Play C with your thumb. Release it.
- Play D with your index finger. Release it.
- Continue this slowly all the way up to G (finger 5) and then back down to C.
- Focus on making each note sound clear and separate. Try to give each note the same volume.
-
Pattern Repetition (10 minutes):
- Now, try to play the pattern more smoothly, both up and down: C-D-E-F-G, then G-F-E-D-C.
- First Pass: As you play, say the finger numbers out loud (1, 2, 3, 4, 5... 5, 4, 3, 2, 1). This reinforces the connection between the number and the physical action.
- Second Pass: Now, say the note names out loud (C, D, E, F, G... G, F, E, D, C). This builds your note recognition on the keyboard.
* Repeat this exercise for the remainder of your time. If you notice tension building in your hand or shoulder, stop, shake your hand out, and restart.
Conclusion
Congratulations on completing this crucial lesson. You have successfully transitioned from learning about the keyboard to actively playing it. By mastering the C Major five-finger pattern, you have laid the groundwork for finger independence, coordination, and the muscle memory required for more complex music.
Key Takeaways:
- The C Position for the right hand places fingers 1-5 on the notes C-D-E-F-G, starting on Middle C.
- Correct technique involves a relaxed, curved hand and using the natural weight of your arm.
- Practice should be slow and deliberate, focusing on producing a clean, even sound for each note.
- Alternating between saying finger numbers and note names helps build two different, but equally important, mental maps.
In our next lesson, we will shift our focus to the left hand and learn to play the same five-finger pattern, preparing you to eventually coordinate both hands together.