Welcome to the first lesson of your keyboard journey! We'll begin by getting you comfortable with the layout of the instrument itself. The goal for this session is to learn how to navigate the keyboard by recognizing its fundamental patterns. Specifically, by the end of this lesson, you will be able to identify the repeating sequence of white and black keys and locate the single most important reference point for any beginner: Middle C.
Mastering this first step is the key that unlocks the entire keyboard, providing a reliable map that you will use in every piece of music you learn, whether it's a Western melody or a Carnatic exercise.
The Keyboard's Repeating Pattern
At first glance, a piano keyboard can look like a daunting expanse of keys. However, it's built on a very simple, repeating pattern. The key to understanding this pattern lies not with the white keys, but with the black ones.
Notice how the black keys are arranged in alternating groups of two and three.
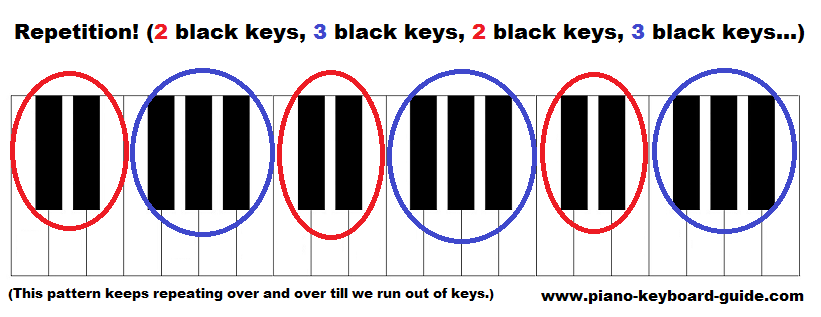
The black keys are consistently grouped in sets of two and three. This pattern repeats across the entire length of the keyboard.
This 2-3-2-3 pattern is your primary landmark. It's consistent across every type of keyboard, from a small 49-key model to a full 88-key grand piano. Once you see this pattern, the layout is no longer intimidating; it's a predictable system.
Naming the White Keys
The white keys represent the "natural" musical notes, named after the first seven letters of the alphabet: A, B, C, D, E, F, and G. This sequence repeats up and down the keyboard. The black key pattern is what helps us identify exactly which white key is which.
The following video provides an excellent walkthrough of the entire keyboard layout. It will show you how to use the black key groups to find not only the note 'C' but all the other white keys as well.
Piano Keyboard Layout and Key Names - A Lesson For Beginners. Learn to Play Piano Lesson 3
Watch this segment from the video "Piano Keyboard Layout and Key Names" by Piano Lessons On The Web. The instructor clearly explains how the black key pattern relates to the names of all the white keys.
Focus on the section from this explanation. Pay close attention to the rule for finding 'C' and how the other notes (D, E, F, G, A, B) follow in alphabetical order.
As you just saw, the most important rule to memorize is:
The note 'C' is always the white key immediately to the left of a group of two black keys.
Since this pattern of two black keys appears multiple times, there are multiple 'C's on your keyboard. Being able to find any 'C' quickly is a crucial first skill.
Finding Middle C
Among all the 'C's on the keyboard, one is given a special name: Middle C. This note serves as a central anchor point. In sheet music and beginner exercises, Middle C is often the starting point and acts as a general dividing line between the notes you'll play with your right hand and those you'll play with your left.
So, how do you find it? As the name suggests, it is the 'C' that is closest to the physical center of your keyboard.
The image below shows the location of Middle C on the most common keyboard sizes. Find the diagram that matches the number of keys on your instrument.
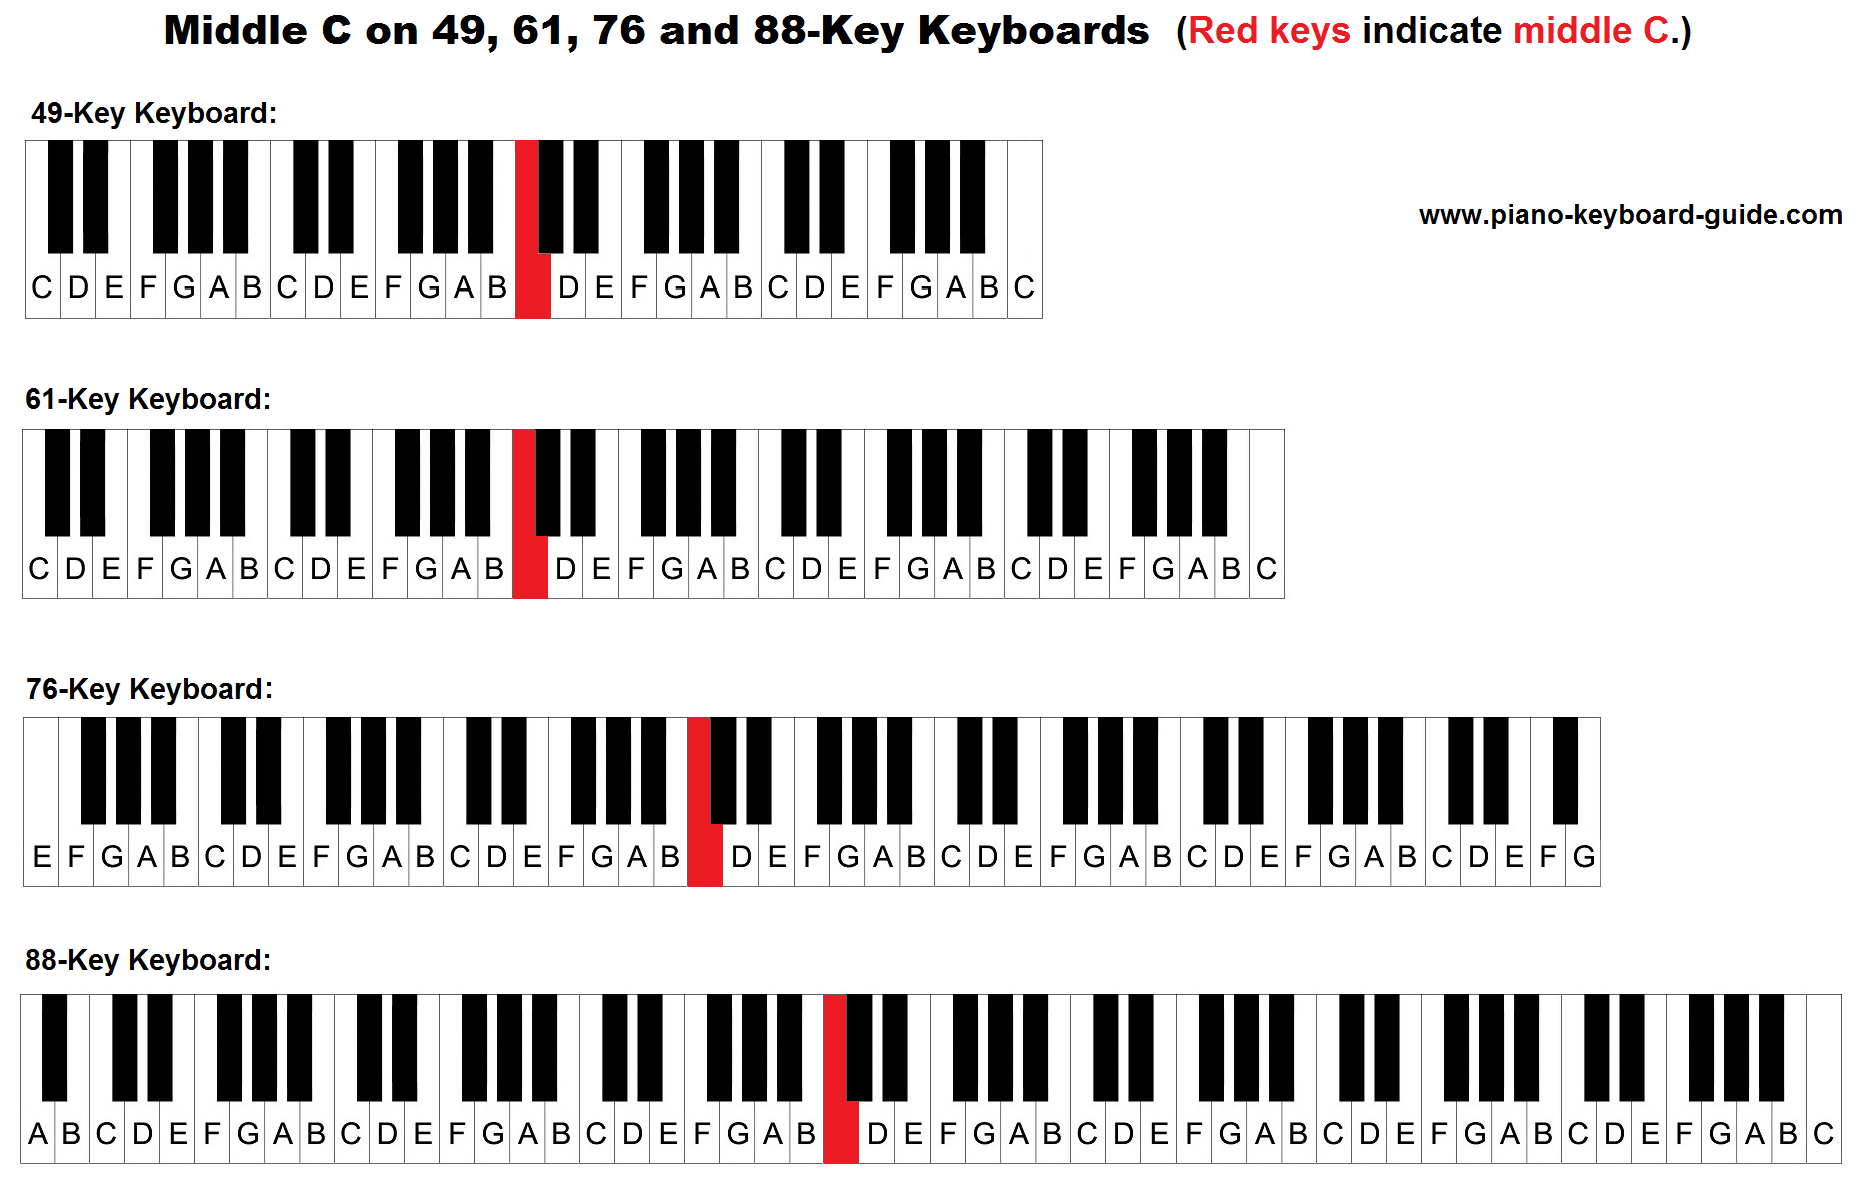
The location of Middle C on 49, 61, 76, and 88-key keyboards. The red key in each diagram indicates Middle C.
To be absolutely certain you've found the correct note, you can also count the keys. The following reading provides a clear, concise rule for finding Middle C depending on your keyboard's size.
Beginner Piano Lesson: A Very Important Note You Should Know About
This text reinforces the concept of Middle C and gives you a precise method to locate it by counting.
Please read the section that begins with the question about identifying Middle C. This will confirm its location based on the size of your keyboard.
Your First Practice Session
Now it's time to apply what you've learned on your own keyboard. For the practice portion of your session today, spend about 20-30 minutes on the following exercises. The goal is not speed, but confident and correct identification.
- Trace the Pattern: With the power off, gently run your fingers along the black keys, feeling the
2-3-2-3pattern from the lowest end of your keyboard to the highest. Do this a few times to build a tactile memory of the layout. - Find All the 'C's: Turn your keyboard on. Start at the left end and find the first group of two black keys. Play the white key immediately to its left. That's your first 'C'. Move up the keyboard and find and play every single 'C'.
- Locate Middle C: Using both the visual center of your keyboard and the counting rule you learned (e.g., the 3rd 'C' from the left on a 61-key keyboard), find Middle C. Play it a few times to remember its sound and location. This is your home base.
- Explore the Neighbors: Once you are confident finding Middle C, try finding the notes next to it. Using the alphabetical sequence, can you find D, E, F, and G above it? Can you find the B and A below it?
Take your time with these steps. The more comfortable you become with the keyboard's geography now, the easier every subsequent step will be.
Conclusion
In this introductory lesson, you've learned the fundamental layout of the keyboard. You now know that the keyboard is not random but is organized by a simple, repeating pattern of two and three black keys. You can use this pattern to identify any white key, and most importantly, you can now confidently locate Middle C, your primary reference point for all future playing.
In our next lesson, we will move from the keyboard itself to your own body. We will cover the correct posture for playing, how to position your hands, and the standard numbering system for your fingers. This will prepare you to play your very first notes cleanly and without strain.