Hello! In our last lesson, we built the theoretical foundation for trunking, exploring why we need it and how 802.1Q frame tagging works. Now, it's time to apply that knowledge directly to your project by getting hands-on with the Cisco IOS command-line interface.
Today's goal is to configure and verify 802.1Q trunk links between switches. We'll move from theory to practice, focusing on the specific commands that establish these crucial connections. By the end of this lesson, you will be able to set up a trunk link, confirm it's operational, and understand the best practices for deploying them securely and reliably.
From Theory to Practice: Configuring a Static Trunk
In the previous lesson, we discussed how a trunk link acts as a multi-lane highway for your VLANs. To create this highway, we need to explicitly tell the switch port to operate in trunk mode. The best practice in any production network, and for your project, is to configure trunks statically. This avoids ambiguity and enhances security by preventing unintended trunk formation.
The core commands are straightforward. Let's look at a concise guide that outlines the essential steps.
Mastering VLAN Trunking with 802.1Q in Enterprise Networks
This section from the NWKings article provides a clear, no-nonsense breakdown of the commands needed to configure a trunk port on a Cisco switch.
Read the section "Configuring 802.1Q Trunking on Cisco Switches". Focus on the first two commands listed: switchport mode trunk and switchport trunk encapsulation dot1q. The other two commands will be covered in later lessons.
As you just read, the primary command is switchport mode trunk. However, there's an important detail regarding the encapsulation command.
A Note on Encapsulation
On some older Cisco switches (and many simulators like Packet Tracer), the switch port might be capable of using either the modern dot1q standard or the obsolete Cisco-proprietary ISL. On these devices, you must manually set the encapsulation type to dot1q before you can set the mode to trunk.
If you try to set the mode first, you'll see an error like this:Command rejected: An interface whose trunk encapsulation is "Auto" cannot be configured to "trunk" mode.
Therefore, the reliable sequence of commands on any switch is:
- Enter interface configuration mode:
interface <interface_name> - Set the trunking encapsulation (best practice, even if not strictly required on modern switches):
switchport trunk encapsulation dot1q - Set the interface mode to trunk:
switchport mode trunk
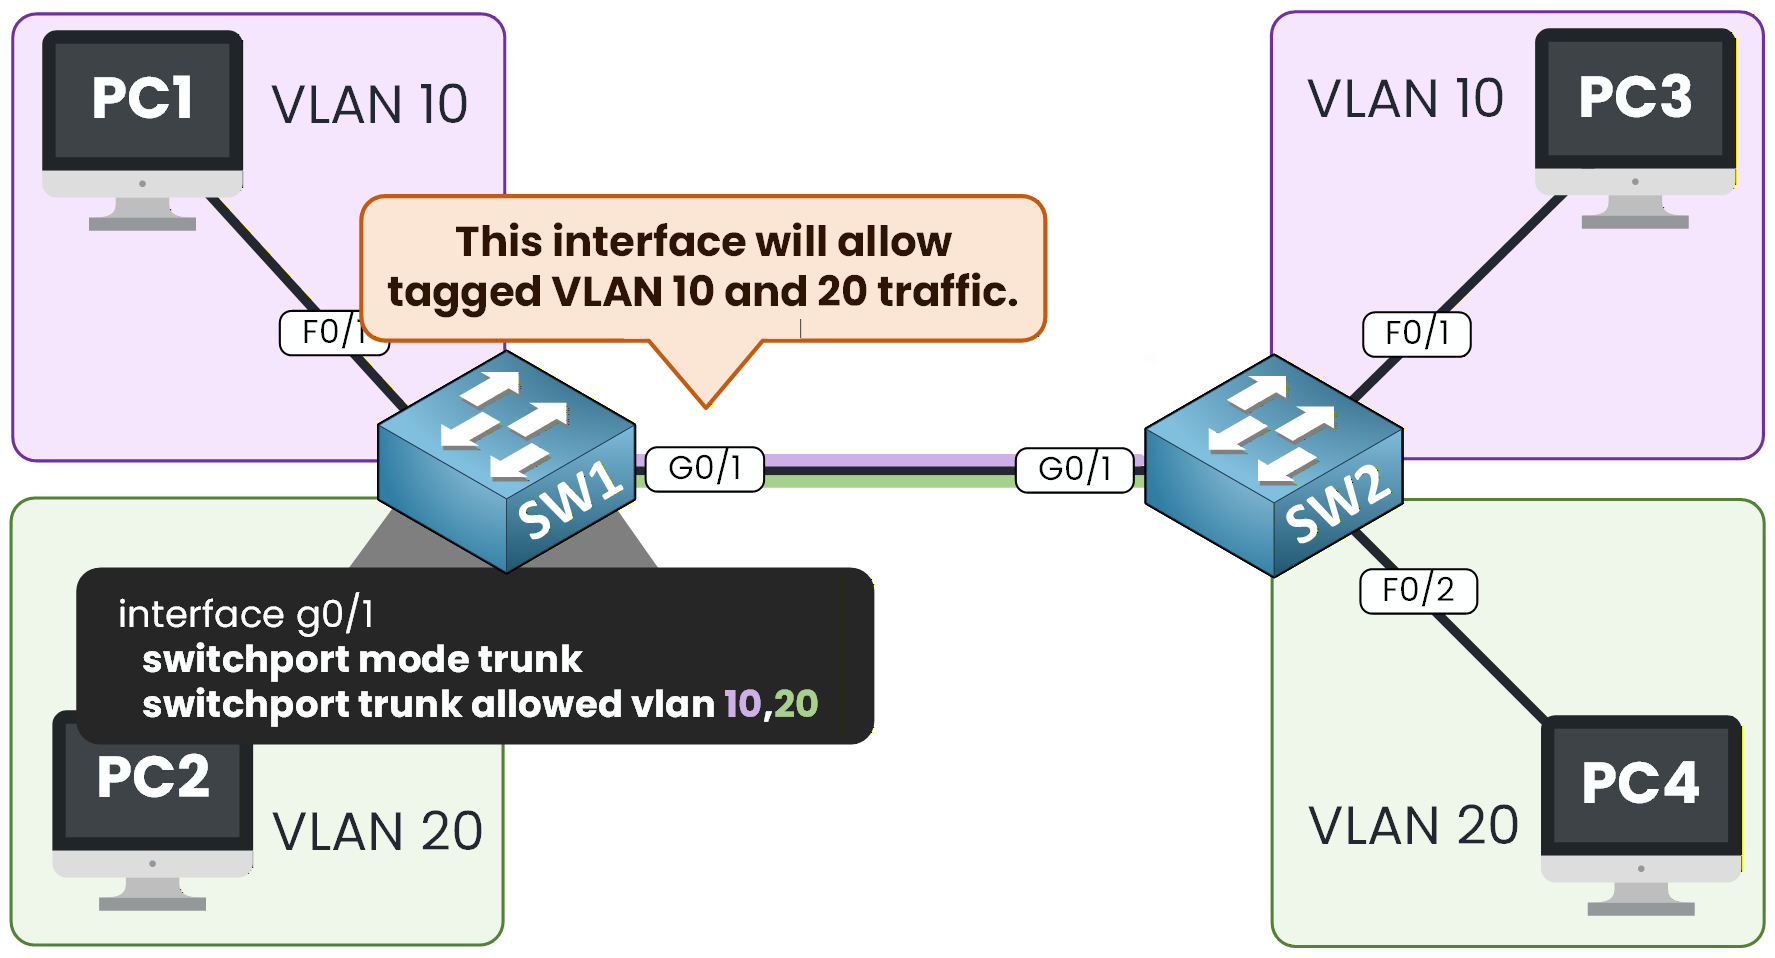
Let's see this in a typical topology.
Dynamic Trunking Protocol (DTP): The "Auto" Mode to Avoid
You might wonder if there's an automatic way for switches to form a trunk. There is, and it's called the Dynamic Trunking Protocol (DTP). It's a Cisco-proprietary protocol that allows two connected switches to negotiate whether their link should become a trunk. While this can be convenient in a lab, it's considered a security risk in production environments because it could allow an unauthorized device to trick a switch into forming a trunk.
Given your security background, it's important to understand DTP's behavior primarily so you know how to disable it.
CCNA (200-301): Ethernet Trunking and VLAN Pruning
This video from Kevin Wallace Training clearly explains the different DTP modes and how they interact.
Watch the segment on DTP modes. Pay close attention to the table at the end that summarizes the outcomes: dynamic auto: Passive. Will become a trunk only if the other side is a trunk or dynamic desirable. This is the default on many switches. Two auto ports will not form a trunk. dynamic desirable: Active. Actively attempts to form a trunk.
The key takeaway is that DTP can lead to unpredictable behavior. The industry best practice is to always configure trunks statically (switchport mode trunk) and disable DTP negotiation entirely using the switchport nonegotiate command.
Security Best Practice:
Switch(config)# interface <interface_name>
Switch(config-if)# switchport mode trunk
Switch(config-if)# switchport nonegotiate
Verifying the Trunk Link
Configuration is only half the battle. You must always verify that the trunk is up and operating as expected. The single most important command for this is show interfaces trunk.
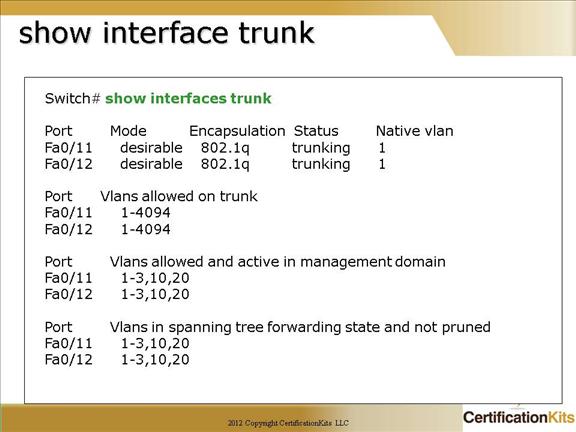
Let's break down the key columns in this output:
- Port: The interface acting as a trunk.
- Mode: Shows how the trunk was formed.
on: Statically configured withswitchport mode trunk. This is what you want to see.desirable/auto: Negotiated via DTP.
- Encapsulation: The trunking protocol in use. You should see
802.1q(sometimes shown asn-802.1qfor negotiated). - Status: The operational state. Should be
trunking. - Native vlan: Shows the ID of the native VLAN (default is 1). As we discussed, this must match on both ends of the link.
Now, let's watch a full lab demonstration that puts all these pieces together.
Configure VLANs and Trunking - Lab18 | Free CCNA 200-301 Lab Course
The "Configure VLANs and Trunking" video from Tech Acad provides a complete walkthrough in Packet Tracer, from configuration to verification.
Watch the section on trunk configuration and verification. Notice how after configuring S1, the S2 port becomes a trunk automatically due to DTP. The presenter then correctly configures S2 manually. Focus on the output of the show interface trunk command and how it changes from auto to on.
Practical Exercise
Time to apply these commands. If you have Packet Tracer, build this simple topology. If not, you can write out the commands as if you were configuring the devices.
Topology:
- Two 2960 switches, S1 and S2.
- Connect
GigabitEthernet0/1on S1 toGigabitEthernet0/1on S2. - Connect a PC (PC-IT) to
FastEthernet0/1on S1. - Connect a PC (PC-HR) to
FastEthernet0/13on S1. - Connect a PC (PC-IT2) to
FastEthernet0/1on S2. - Connect a PC (PC-HR2) to
FastEthernet0/13on S2.
Tasks:
- On both S1 and S2, create VLAN 10 (name IT) and VLAN 20 (name HR).
- On both S1 and S2, configure port
Fa0/1as an access port in VLAN 10 and portFa0/13as an access port in VLAN 20. - On both S1 and S2, configure interface
Gi0/1as a static 802.1Q trunk. - On both switches, use
show interfaces trunkto verify that the link istrunking, the mode ison, and the encapsulation is802.1q. - Assign appropriate IP addresses to the PCs (e.g., 192.168.10.x for VLAN 10, 192.168.20.x for VLAN 20).
- Test connectivity: Can PC-IT ping PC-IT2? Can PC-HR ping PC-HR2? Can PC-IT ping PC-HR? (The first two should work; the last should fail).
This exercise confirms that your trunk is correctly passing traffic for multiple VLANs while keeping them separate.
Conclusion
In this lesson, you've bridged the gap between trunking theory and practice. We've moved to the command line to build the essential links that will allow your project's VLANs to communicate across the entire network.
Key Takeaways:
- A trunk is created using the
switchport mode trunkcommand on an interface. - On some devices, you must first specify the encapsulation with
switchport trunk encapsulation dot1q. - The
show interfaces trunkcommand is your essential tool for verifying a trunk's operational status, mode, and encapsulation. - For security and predictability, always configure trunks statically and disable DTP with the
switchport nonegotiatecommand.
Now that you can successfully configure and verify a basic trunk link, our next lesson will delve deeper into verification and control. We'll examine the show vlan and show interfaces trunk commands in more detail and learn how to manage exactly which VLANs are permitted to cross a trunk link.