Hello! In our last session, you learned how to create VLANs and assign switch ports to them, effectively segmenting a single switch into multiple broadcast domains. But for your project, you'll need these VLANs to span across multiple switches. This lesson addresses the "how" behind that.
Today, we will dive into the core concepts that make multi-switch VLAN communication possible. We'll explore the purpose of 802.1Q trunking, the industry-standard method for passing traffic from multiple VLANs over a single link. We will also demystify the native VLAN, a critical and often misunderstood component of trunking. Understanding this theory is essential before we move on to hands-on configuration.
Why Do We Need Trunking?
Imagine you have two switches, each with devices in VLAN 10 (Sales) and VLAN 20 (Engineering). How do you connect the switches so that a PC in Sales on Switch 1 can communicate with a server in Sales on Switch 2?
You could run one physical cable between the switches for VLAN 10 and a second cable for VLAN 20. This works, but it's inefficient and doesn't scale. If you add a third VLAN, you need a third cable. This is where trunking comes in. A trunk link is a single physical connection that can carry traffic for multiple VLANs simultaneously.
To see why this is a more scalable solution, watch the first part of the following video.
VLAN Trunk Links | Network Fundamentals Part 13
This video from the Network Direction channel provides a clear introduction to the problem that trunking solves.
Watch the segments that explain the scalability problem and differentiate between access and trunk ports. Focus on the core idea: using one link to carry many VLANs.
The Mechanism: 802.1Q Frame Tagging
So, if traffic from different VLANs is mixed on one trunk link, how does the receiving switch know which frame belongs to which VLAN?
The answer is frame tagging. When a frame from a specific VLAN is about to cross a trunk link, the sending switch inserts a small piece of data—a "tag"—into the Ethernet frame header. This tag identifies the frame's original VLAN. The receiving switch reads the tag, knows which VLAN the frame belongs to, removes the tag, and forwards the frame to the correct destination port.
The standard protocol that defines this process is IEEE 802.1Q (often called "dot1q"). It is the universal standard supported by all modern network equipment vendors.
The 802.1Q Tag
The 802.1Q tag is a 4-byte (32-bit) field injected into the Ethernet frame. This image shows where it fits.

For a deeper look at the tag itself and the process, the following resources are very helpful.
Mastering VLAN Trunking with 802.1Q in Enterprise Networks
This section from an NWKings article provides a concise breakdown of the 802.1Q tag's structure.
Read the section "How 802.1Q Tagging Works". Pay close attention to the four components of the tag, especially the VID (VLAN Identifier), which is the 12-bit field that actually carries the VLAN number.
Now, let's watch a video that visualizes the entire journey of a tagged frame.
VLAN Trunk Links | Network Fundamentals Part 13
This segment from Network Direction illustrates the tagging and de-tagging process step-by-step.
Watch from the tagging process. Note how the end devices (like PCs) are completely unaware of the tagging; it's a process that happens exclusively between switches.
The Native VLAN: Handling Untagged Traffic
We've established that on an 802.1Q trunk, frames are tagged with their VLAN ID. But what about frames that don't have a tag? This is where the native VLAN comes in.
The native VLAN is a special configuration on a trunk port. It is the one VLAN whose traffic is sent untagged across the trunk link. Conversely, any untagged traffic received on a trunk port is assumed to belong to the native VLAN.
By default on Cisco switches, the native VLAN is VLAN 1.
The original purpose of the native VLAN was for backward compatibility with simple devices like hubs that don't understand VLAN tags. While less common now, the concept is fundamental to 802.1Q and has important security implications.
The following diagram and video provide an excellent illustration of this concept in action.
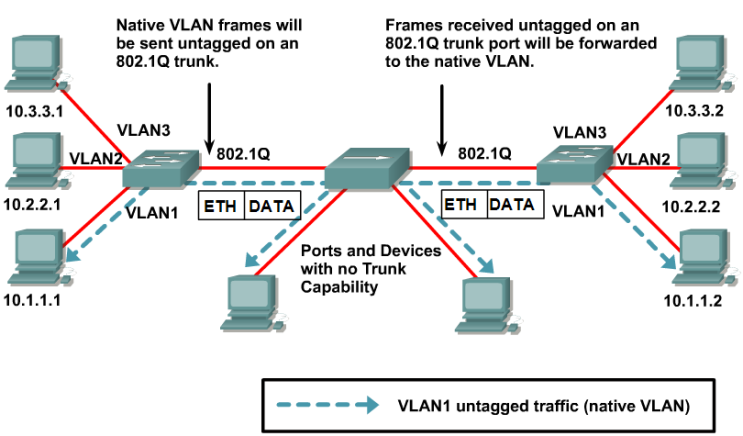
Now for a practical demonstration. The following video uses Wireshark to capture packets on a trunk link, showing you exactly what tagged and untagged frames look like.
Native VLAN - the DEFINITIVE illustration
This video from Practical Networking offers a definitive, hands-on look at how the native VLAN works.
First, watch how normal tagged traffic appears on the wire from the initial packet capture. Notice the VLAN ID column in Wireshark. Next, see what happens when the native VLAN is changed to 33. Watch the new capture from the untagged traffic demo. Observe that traffic for VLAN 33 no longer has a tag, while VLAN 22 traffic is still tagged. Finally, watch the summary which crystallizes the concept.
Critical Considerations
Understanding the native VLAN is crucial for both functionality and security. Here are two key points to remember for your project and beyond.
-
Native VLAN Mismatch: Both switches on either end of a trunk link must be configured with the same native VLAN. If Switch A has native VLAN 10 and Switch B has native VLAN 20, untagged traffic sent from Switch A (VLAN 10) will be received by Switch B and placed into its native VLAN (VLAN 20). This is a misconfiguration called a "native VLAN mismatch" and can cause traffic to "hop" between VLANs, creating a security hole and unpredictable connectivity issues. Cisco switches will generate log messages when they detect such a mismatch via CDP.
-
Security Best Practice: Leaving the native VLAN as the default (VLAN 1) is a security risk. It's a well-known configuration that can be exploited. The best practice is to:
- Change the native VLAN on all trunk ports to a dedicated, unused VLAN ID (e.g., VLAN 999).
- Do not assign any user devices to this dedicated native VLAN.
This is discussed clearly in the "The Native VLAN" section of the nwkings.com article (resource ID LINK).
Conclusion
In this lesson, we established the conceptual foundation for extending VLANs across a network. You've learned how 802.1Q trunking uses frame tagging to carry traffic for multiple VLANs over a single link and how the native VLAN handles any untagged traffic.
Key Takeaways:
- Trunking allows a single link to carry traffic for multiple VLANs, solving the scalability problem of using one link per VLAN.
- 802.1Q is the industry-standard protocol that works by inserting a 4-byte tag into Ethernet frames to identify their VLAN.
- The native VLAN is a specific VLAN on a trunk whose traffic is transmitted untagged. By default, this is VLAN 1 on Cisco switches.
- It is critical that the native VLAN matches on both ends of a trunk link.
- For security, the best practice is to change the native VLAN to an unused VLAN and not place any end devices in it.
Now that you understand the "what" and "why" of trunking, our next lesson will focus on the "how." We'll move to the command line to configure and verify 802.1Q trunk links on Cisco switches.