Hello! In our previous lesson, we explored how Rapid Spanning Tree Protocol (RSTP) prevents loops in a switched network. While STP and RSTP are essential for managing redundant paths within a single Layer 2 broadcast domain, modern networks require a way to divide that domain into smaller, isolated segments. This is where Virtual LANs, or VLANs, come in.
This lesson will focus on the fundamental, practical skill of configuring VLANs on a Cisco switch. You will learn how to create these logical network segments and assign specific switch ports, known as access ports, to them. Mastering this is a crucial first step for organizing the network in your project and is a foundational concept in switched networking.
The "Why" of VLANs: A Quick Refresher
You've mentioned you have some familiarity with VLANs, so we'll start with a brief conceptual review. In a traditional flat network, all devices are in one large broadcast domain. This means a broadcast frame (like an ARP request) from one device is sent to every other device, which can hurt performance and pose security risks.
VLANs solve this by creating multiple, isolated broadcast domains on a single physical switch. Devices in one VLAN cannot communicate directly with devices in another VLAN at Layer 2; they behave as if they are on entirely separate networks.
The following video provides an excellent visual summary of this concept.
Free CCNA | VLANs (Part 1) | Day 16 | CCNA 200-301 Complete Course
This segment from Jeremy's IT Lab explains how VLANs segment a network and why this is beneficial.
Watch from the introduction to VLANs. Focus on how the switch handles broadcast traffic differently once VLANs are configured and note the role of the router in allowing communication between VLANs.
As the video illustrates, VLANs are configured on the switch interfaces. A port assigned to a single VLAN is called an access port. These ports are typically connected to end devices like PCs, servers, or printers.
Configuring VLANs and Access Ports
Configuring an access port is a two-part process:
- Create and name the VLAN on the switch.
- Assign the switch port to the newly created VLAN and set its mode to
access.
Step 1: Create and Name the VLAN
Before you can assign a port to a VLAN, the VLAN must exist in the switch's database. While some switches automatically create a VLAN if you assign a port to it, it is a crucial best practice to create and name it manually first. This ensures consistency and makes your configuration much easier to troubleshoot.
Configuring VLANs on Cisco Switches
This article from Practical Networking .net clearly outlines the command-line process.
Read the section titled Creating the VLAN in the VLAN Database. Pay attention to the two simple commands used: one to create the VLAN and another to give it a descriptive name.
The commands are executed from global configuration mode:
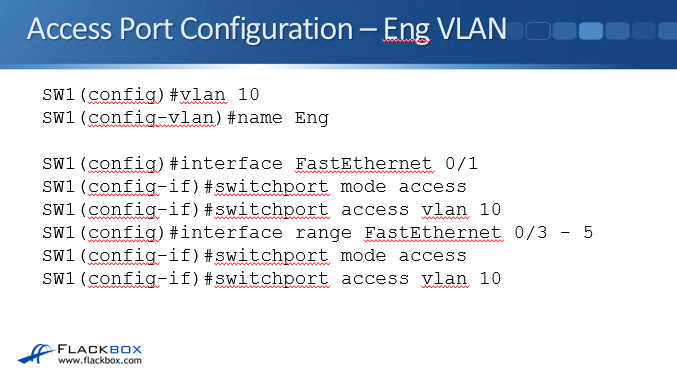
vlan <vlan-id>- This command creates the VLAN and enters VLAN configuration mode. Replace<vlan-id>with a number (e.g.,vlan 10).name <vlan-name>- This optional but highly recommended command assigns a descriptive name (e.g.,name ENGINEERING).
Step 2: Configure the Access Port
Once the VLAN exists, you can assign an interface to it. This involves telling the port two things: that it should operate as an access port and which VLAN it belongs to.
The commands are executed from interface configuration mode:
switchport mode access- This statically sets the interface to be an access port.switchport access vlan <vlan-id>- This assigns the access port to the specified VLAN.
The image below shows these commands in a real configuration.
Putting It All Together: A Full Demonstration
Now let's watch a complete configuration sequence that combines creating VLANs, naming them, and assigning single and multiple interfaces. This video walks through the entire process, including the vital step of verifying your work.
Free CCNA | VLANs (Part 1) | Day 16 | CCNA 200-301 Complete Course
This clip from Jeremy's IT Lab provides a full walkthrough of basic VLAN and access port configuration.
Watch from the configuration demo. As you watch, pay close attention to: The initial state shown by show vlan brief, where all ports are in VLAN 1. The use of interface range to configure multiple ports simultaneously. The system message that appears when a port is assigned to a non-existent VLAN. The final verification using show vlan brief to confirm the new VLANs and port assignments.
The Key to Confidence: Verification
As with any network configuration, changes are not complete until they are verified. The single most useful command for this is:
show vlan brief
This command provides a concise table showing:
- The VLAN ID and name.
- The status of the VLAN (e.g.,
active). - The list of interfaces assigned to that VLAN.
By default, all ports on a Cisco switch reside in VLAN 1. After your configuration, you should see your newly created VLANs listed, with the correct interfaces assigned to them. Any ports you haven't configured will remain in VLAN 1.
For your project, get into the habit of running show vlan brief after every VLAN-related change to ensure the switch's state matches your design.
Conclusion
You now have the practical knowledge to segment a physical switch into multiple logical broadcast domains. This ability to create VLANs and assign devices to them via access ports is a fundamental building block for creating secure, scalable, and efficient networks.
Key Takeaways:
- VLANs logically divide a switch into multiple broadcast domains, improving security and performance.
- An access port is a switch interface that belongs to a single VLAN.
- The configuration process involves two main steps:
- Create the VLAN (
vlan <id>) and name it (name <name>). - Configure the interface as an access port (
switchport mode access) and assign it to the VLAN (switchport access vlan <id>).
- Create the VLAN (
- The
interface rangecommand is a powerful tool for configuring multiple ports at once. - Always verify your configuration using
show vlan brief.
In this lesson, we focused on ports connected to end devices within a single switch. But what happens when you need to connect two switches and allow devices in the same VLAN to communicate across them? That requires a special type of port configuration, which we'll cover in our next lesson on 802.1Q trunking.