Hello! In our last lesson, we established that while routers automatically learn about directly connected networks, they need to be explicitly told how to reach remote networks. We identified static routes as the manual way to provide these instructions.
Today, we'll move from theory to practice. This lesson is all about the hands-on configuration of these routes. You will learn the specific Cisco IOS commands to create and verify both static routes for specific networks and default routes, which act as a gateway of last resort. Mastering these commands is a fundamental step toward building the network for your project.
1. Planning and Configuring Static Routes
Before configuring any routes, it's crucial to plan. A common mistake is forgetting that network communication is a two-way street. For PC1 to communicate with PC4, not only does PC1's traffic need a path to PC4, but PC4's reply traffic must have a path back to PC1. This means every router along the path needs to know how to get to both the source and destination networks.
Let's watch a segment that walks through planning the necessary routes and then demonstrates their configuration.
Free CCNA | Static Routing | Day 11 (part 2) | CCNA 200-301 Complete Course
This video from Jeremy's IT Lab clearly demonstrates the thought process behind static routing before diving into the command line.
First, watch the section on planning the routes. Pay close attention to how the next-hop IP address is determined for each router to ensure two-way reachability. Next, watch the configuration and verification. This part covers the core commands you'll be using.
The ip route Command
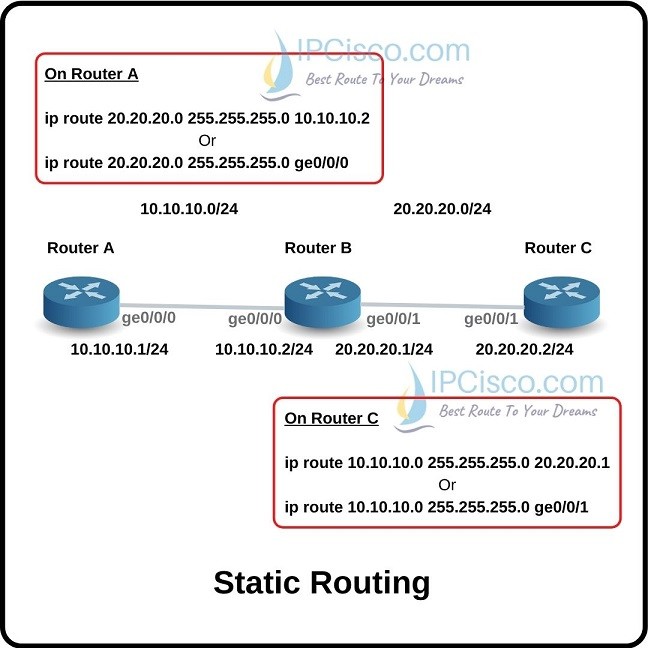
As you saw, the command to create a static route is executed from global configuration mode and follows this syntax:
Router(config)# ip route <destination-network> <subnet-mask> <next-hop-ip>
destination-network: The network address of the remote network you want to reach.subnet-mask: The subnet mask of that remote network.next-hop-ip: The IP address of the very next router's interface along the path. This router must be directly reachable.
Verifying Your Configuration
After configuration, you must verify that the routes are active and that connectivity works.
-
Check the Routing Table: Use the
show ip routecommand. You should see a new entry with an 'S' code, indicating a static route.S 192.168.4.0/24 [1/0] via 192.168.13.3
The[1/0]represents the Administrative Distance and the metric of the route. We will cover Administrative Distance in detail in our next lesson, but for now, just know that1is the default for a static route. -
Test Connectivity: Use the
pingcommand from an end device (like a PC) to a device on the remote network. A successful ping confirms two-way connectivity. The video below demonstrates this final verification step.
Free CCNA | Static Routing | Day 11 (part 2) | CCNA 200-301 Complete Course
Let's confirm that our configuration worked.
Watch this short segment on testing reachability. This demonstrates that a successful ping requires the return path to be correctly configured as well.
2. Alternative Static Route Syntax
Besides using a next-hop IP address, you can also specify the local router's exit interface.
ip route <network> <mask> <exit-interface>ip route <network> <mask> <exit-interface> <next-hop-ip>
While all three syntax options are valid, using just the next-hop IP is the most common and recommended method for Ethernet networks. The video below briefly explains these alternatives.
Free CCNA | Static Routing | Day 11 (part 2) | CCNA 200-301 Complete Course
This segment covers the other ways to define a static route.
Watch from alternative methods to understand how specifying an exit interface or both an exit interface and a next-hop IP affects the routing table entry.
3. Configuring a Default Route
What happens if a router receives a packet for a destination that isn't in its routing table? By default, it drops the packet. In many scenarios, especially for routers connected to the internet, it's more efficient to create a default route.
A default route, or "Gateway of Last Resort," tells the router where to send any packet for which it does not have a specific route. It's a catch-all route.
The configuration is similar to a static route, but you use 0.0.0.0 0.0.0.0 as the destination network and mask, which matches all possible IP addresses.
Router(config)# ip route 0.0.0.0 0.0.0.0 <next-hop-ip>
This next video explains the concept and shows the configuration and verification.
Free CCNA | Static Routing | Day 11 (part 2) | CCNA 200-301 Complete Course
This video from Jeremy's IT Lab explains how a default route acts as the gateway of last resort.
Watch the section on default routes. Notice how the output of show ip route changes: a "Gateway of last resort" is now set, and the route itself is marked with an asterisk (S*).
4. Lab Demonstration: Putting It All Together
Now, let's watch a practical lab that combines these concepts. This walkthrough will show you how static and default routes are configured in a branch office to headquarter scenario, and it excellently demonstrates the troubleshooting process when a return route is missing.
CCNA 200-301 Lab | Chapter 3 IP Connectivity | Lab 026 IPv4 Default & Static Route Config & Verify
This lab walkthrough from IEE brings together the concepts of static and default routing in a practical context.
Follow these key configuration and verification steps: First, see how a default route is configured on the Branch router to send all unknown traffic to the Headquarter router. Next, observe the troubleshooting process. A ping from the branch to the HQ LAN fails. A traceroute shows the packet reaches the HQ router, but the HQ router doesn't have a route back to the branch LAN. This highlights the need for a return static route, which is then configured. Finally, watch as a default route is added to the HQ router to provide internet access, followed by successful ping and traceroute tests from a branch PC to an internet server.
This lab reinforces the critical importance of ensuring a complete, two-way path for traffic flow.
Conclusion
In this hands-on lesson, you've learned the essential commands for manually guiding traffic through a network. This is a core skill for any network engineer and is directly applicable to your upcoming project.
Key Takeaways:
- Static Route Command:
ip route <network> <mask> <next-hop-ip>is used to create a path to a specific remote network. - Default Route Command:
ip route 0.0.0.0 0.0.0.0 <next-hop-ip>creates a gateway of last resort, typically for internet-bound traffic. - Verification is Key: Always use
show ip routeto check that your route is in the table andpingortracerouteto confirm end-to-end connectivity. - Two-Way Traffic: Remember that routes are needed for both the initial request and the return reply. A missing return route is a common cause of connectivity failure.
In our next lesson, we will explore the concept of Administrative Distance (AD). You've seen it as the first number in the [1/0] brackets. AD is the mechanism a router uses to decide which route to trust when it learns about the same destination from multiple sources (e.g., a static route and a dynamic protocol).