Hello!
In our previous lesson, we explored why EtherChannel is such a powerful tool in modern networks—it allows us to bundle links to increase bandwidth and provide redundancy, overcoming the limitations of Spanning Tree Protocol. Now, it's time to move from the "why" to the "how."
This lesson will focus on the practical application of this knowledge. Your goal is to learn how to configure a Layer 2 EtherChannel using the Link Aggregation Control Protocol (LACP). This is an essential, hands-on skill for building the robust and high-performance network required for your project. We'll cover the negotiation modes of LACP, the specific Cisco IOS commands to build the channel, and the key command to verify that it's working correctly.
LACP: The Industry Standard for Link Aggregation
While Cisco has its own proprietary protocol (PAgP), the industry has largely adopted the open standard LACP (IEEE 802.3ad). This ensures interoperability between devices from different vendors. LACP dynamically negotiates the creation and maintenance of an EtherChannel by exchanging LACP packets between switches.
To get a clear overview of LACP and how it compares to other methods, let's start with a short video segment.
Free CCNA | EtherChannel | Day 23 | CCNA 200-301 Complete Course
This video from Jeremy's IT Lab introduces the three methods for creating an EtherChannel and positions LACP as the preferred choice.
Watch from the three methods. Focus on understanding why LACP is the recommended protocol.
LACP Negotiation Modes
LACP uses two main modes to negotiate whether an EtherChannel should be formed:
- Active: In this mode, a port actively sends LACP packets to its neighbor, initiating negotiations to form an EtherChannel.
- Passive: In this mode, a port does not initiate LACP negotiation. It only responds to LACP packets it receives from a neighbor.
For an EtherChannel to be successfully formed, the modes on the connected ports must be compatible. A channel will form if the combination is:
- Active – Active
- Active – Passive
However, a channel will not form if both sides are set to Passive, as neither port will ever initiate the negotiation.
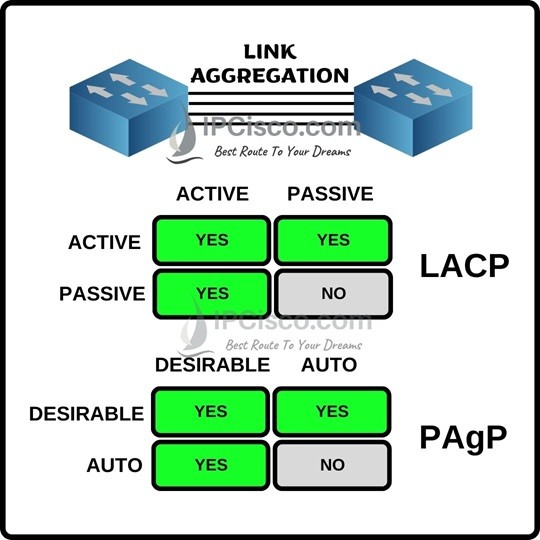
For simplicity and reliability, it's a common best practice to configure both sides as Active.
Configuration Prerequisites
Before you start bundling interfaces, it's critical to ensure they are configured identically. If the settings don't match, the channel will fail to form correctly. All physical interfaces within an EtherChannel bundle must have the same:
- Speed and Duplex settings (e.g., all 1 Gbps, full-duplex).
- Switchport Mode (either all
accessor alltrunk). - VLAN Configuration:
- If they are trunk ports, they must have the same native VLAN and the same list of allowed VLANs.
- If they are access ports, they must be assigned to the same access VLAN.
Configuring a Layer 2 LACP EtherChannel
Configuring an LACP EtherChannel is a two-step process: you first assign the physical interfaces to a channel group, which creates a logical port-channel interface. Then, you apply your Layer 2 configurations to that logical interface.
Let's walk through the commands.
Step 1: Assign Physical Interfaces to a Channel Group
First, you need to select the physical interfaces you want to bundle and assign them to a channel group using the channel-group command. We'll use the interface range command to configure multiple ports at once, which is an efficient practice.
Switch(config)# interface range GigabitEthernet0/1 - 2
Switch(config-if-range)# channel-group 1 mode active
Let's break down that command:
channel-group 1: This command adds the interfaces to a channel group. The number (1in this case) identifies the group. This number is locally significant, meaning it doesn't have to match on the neighboring switch, but all interfaces on this switch that are part of the same bundle must be in the same group. This command automatically creates the logicalPort-channel1interface.mode active: This sets the LACP mode toactive, causing the ports to actively negotiate the EtherChannel.
Step 2: Configure the Logical Port-Channel Interface
After creating the channel group, all Layer 2 configurations (like setting up a trunk) should be applied to the logical port-channel interface, not the individual physical ports. This ensures consistency across all links in the bundle.
Switch(config)# interface port-channel 1
Switch(config-if)# switchport mode trunk
Switch(config-if)# switchport trunk native vlan 100
Switch(config-if)# switchport trunk allowed vlan 10,20,30
You would then apply a matching configuration on the neighboring switch.
The following resource provides a step-by-step walkthrough of this exact process.
The "Configuring and Verifying LACP EtherChannels" section from HowToNetwork.com provides a clear, command-by-command guide to setting up LACP.
Focus on the configuration examples for Switch-1 (using mode active) and Switch-2 (using mode passive). Note how the interface range command is used, followed by the channel-group command. Then, notice how trunking is configured on the Port-channel interface itself.
Demonstration and Verification
Watching a live demonstration can help solidify these steps. The CertBros video below offers a concise and practical config example.
EtherChannel Explained | Concept & Configuration
This video, "EtherChannel Explained," provides a very clear demonstration of both configuration and verification.
First, watch the configuration section from LACP config demo. Notice the use of interface range and channel-group 1 mode active. Next, watch the verification section from verification commands. Pay close attention to the output of the show etherchannel summary command. This is the single most important command for checking the status of your EtherChannel.
The show etherchannel summary command gives you a quick, high-level view of all port channels on the switch. A healthy Layer 2 LACP EtherChannel will look like this:
Group  Port-channel  Protocol    Ports
------+-------------+-----------+-----------------------------------------------
1      Po1(SU)       LACP        Gi0/1(P)    Gi0/2(P)
Here's how to interpret the flags:
Po1(SU):S: Indicates this is a Layer 2 EtherChannel.U: Means the port channel is in use (i.e., it's up and running).
Gi0/1(P):P: Means the port is bundled in the port-channel and is operating correctly.
If you see these flags, your EtherChannel is working! Any other flags (like D for down or s for suspended) indicate a problem, which we will cover in a future lesson on troubleshooting.

Conclusion
In this lesson, you have moved from theory to practice by learning how to configure a Layer 2 EtherChannel with LACP. This is a fundamental skill for building resilient and high-bandwidth links between core devices in your network designs.
Key Takeaways:
- LACP is the industry-standard protocol for negotiating EtherChannels and uses
activeandpassivemodes. To form a channel, at least one side must beactive. - Configuration is a two-part process:
- Bundle physical interfaces using the
channel-group <number> mode activecommand. - Apply Layer 2 settings (like trunking) to the newly created logical
interface port-channel <number>.
- Bundle physical interfaces using the
- All physical interfaces in a bundle must have matching configurations (speed, duplex, VLANs).
- The primary command to verify the status of your EtherChannel is
show etherchannel summary. Look for the(SU)and(P)flags to confirm it is operational.
In our next lesson, we will dive deeper into verification by exploring additional show commands that provide more detailed information. We'll also begin to look at how to interpret different status flags to troubleshoot common EtherChannel configuration issues.