Hello! In our last lesson, we diagnosed specific, isolated IP addressing errors like incorrect gateways and duplicate IPs. You learned the "what" and "why" behind these common problems.
Today, we'll build on that by learning a systematic process for troubleshooting. When faced with a real-world network failure, you won't know the exact cause in advance. A structured methodology allows you to logically and efficiently narrow down the possibilities, saving valuable time on your project. Our goal is to apply a formal troubleshooting framework to resolve a simulated connectivity problem, moving from ad-hoc checks to a professional, repeatable workflow.
1. The General Troubleshooting Framework
Experienced network engineers don't just guess; they follow a structured process. While the exact names for the steps may vary, the core logic is universal: define the problem, gather data, form a hypothesis, test it, and document the solution.
This flowchart illustrates a typical high-level workflow.

One popular way to remember these steps is the "FIXIT" framework. The following video provides a concise overview of this five-step methodology.
Network Troubleshooting for Beginners - 3 commands , 1 framework, 3 methods
This video from "IT k Funde" introduces a memorable five-step framework for troubleshooting any kind of technical issue, which we'll apply to networking.
Watch the section from the FIXIT framework. Pay attention to how each step logically follows the last, from finding the problem to tracking the solution.
This general framework is formalized in the industry. Cisco, for example, promotes a very similar methodology. The following reading outlines the official Cisco approach. As you read, notice how the steps align with the FIXIT framework you just watched.
The Cisco Troubleshooting Methodology - FlackBox
This article from FlackBox details the official Cisco troubleshooting methodology and explains why a structured approach is crucial, especially for new network engineers.
Read the first major section, "The Cisco Troubleshooting Methodology". Focus on the seven steps presented in the flowchart: Define the problem Gather information Analyze information Eliminate potential causes Propose a hypothesis Test the hypothesis Document the solution Take note of the emphasis on documentation. For your project, keeping a log of issues and solutions can prevent you from solving the same problem twice.
2. OSI-Based Troubleshooting Strategies
The general framework tells you what to do (gather info, test, etc.), but it doesn't tell you how to do it for a network problem. For that, we use the OSI model as our guide. By testing layer by layer, we can systematically isolate the fault.
There are three primary strategies for this.
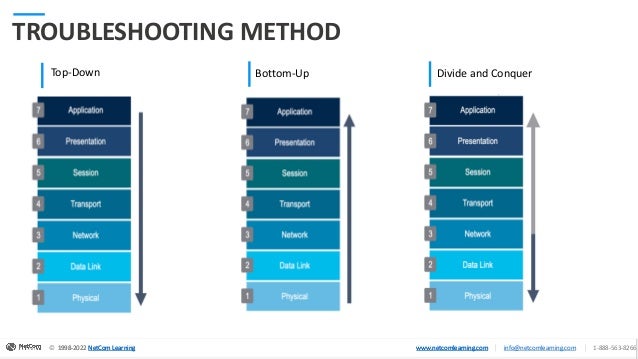
The next video explains these three core strategies and when to use each one.
Network Troubleshooting for Beginners - 3 commands , 1 framework, 3 methods
Continuing with the "IT k Funde" video, this next segment explains how to apply the OSI model to your troubleshooting process.
Watch the section covering three strategies. The key is to understand the trade-offs: Top-Down: Starts at Layer 7. Best for application-specific issues (e.g., "I can ping the web server, but the website won't load"). Bottom-Up: Starts at Layer 1. Best for total connectivity failure (e.g., "The network is completely down"). Hybrid (Divide and Conquer): Starts at Layer 3. This is the most common and efficient method for network engineers.
The Divide and Conquer approach is your most powerful tool. You start by testing Layer 3 connectivity with a ping.
- If the
pingsucceeds, you know Layers 1, 2, and 3 are working. The problem must be in the upper layers (4-7). - If the
pingfails, you know the problem is in the lower layers (1-3).
Another highly effective technique, often used with Divide and Conquer, is the Follow-the-Path approach. You use a tool like traceroute to map the hop-by-hop path from source to destination, allowing you to see exactly where connectivity fails.
3. Applying the Methodology: A Simulated Problem
Now, let's put it all together. The following practical example from the FlackBox article walks through resolving a real-world scenario where multiple things are broken. This is where a systematic methodology truly shines.
The Cisco Troubleshooting Methodology - FlackBox
This section of the FlackBox article presents a complete troubleshooting lab scenario. It perfectly demonstrates how to apply the principles we've just discussed to solve a complex connectivity issue step-by-step.
Please read the entire section titled "The Cisco Troubleshooting Methodology Configuration Example". Follow the logic of the troubleshooter closely. Don't just look at the commands; understand why each step was taken.
Let's break down the logic used in that example:
- Define Problem: Users report that DNS is not working.
- Initial Hypothesis & Test: The problem might be the DNS service on the server. Test with
telnet 10.10.10.10 53(port 53 is for DNS). The connection times out. - New Hypothesis (Divide and Conquer): The timeout suggests a more fundamental connectivity issue. The problem is likely at Layer 3 or below.
- Test Layer 3:
ping 10.10.10.10. It fails. This confirms a Layer 1-3 problem. - Follow the Path:
traceroute 10.10.10.10. The trace reaches router R2 (10.10.20.2) but fails after that. The problem is either on R2 or between R2 and the server. The scope is now drastically narrowed. - Investigate R2: Log into R2 and check its interfaces with
show ip interface brief. The output showsFastEthernet0/0is "administratively down". This is a Layer 1/2 issue on R2. - Implement Fix & Verify: Enable the interface with
no shutdown. Re-run the test:ping 10.10.10.10from R3. It now succeeds. Basic connectivity is restored. - Return to Original Problem: Is DNS fixed? Test again from R3:
ping R1. It fails again, but with a new error message. This is progress! The messageTranslating "R1"...domain server (10.10.10.1)shows R3 is using the wrong DNS server IP. - Implement Fix & Verify: On R3, remove the wrong name server and add the correct one (
ip name-server 10.10.10.10). Test again. Still fails. - Final Hypothesis (Top-Down): With Layers 1-3 verified and the client configuration correct, the problem must be at the application layer on the server itself.
- Investigate Server & Implement Final Fix: Check the DNS server's service configuration. The service is turned off. Turn it on.
- Final Verification: Test
ping R1from R3 one last time. It succeeds! - Document: The problem was caused by three separate issues: a disabled interface on R2, an incorrect DNS server setting on R3, and a disabled DNS service on the server.
Without a structured approach, finding all three of these interacting issues would have been very difficult and time-consuming.
Conclusion
In this lesson, you've moved beyond fixing individual faults to learning a professional framework for solving complex network problems. This skill is essential for efficiently completing your project and for any future network engineering work.
Key Takeaways:
- A systematic methodology involves defining the problem, gathering information, analyzing it, forming and testing a hypothesis, implementing a solution, and documenting the process.
- The OSI model provides a logical structure for testing. The Divide and Conquer approach, starting with
pingat Layer 3, is usually the most efficient. - The Follow-the-Path approach, using
traceroute, is invaluable for pinpointing the location of a failure in a routed network. - A single reported symptom can often be the result of multiple underlying faults, which is why a methodical process of testing, fixing, and re-testing is crucial.
In our next lesson, we will begin our deep dive into IP Routing Fundamentals. You've now seen how tools like traceroute follow a path; next, you will learn how a router builds its routing table and uses it to decide which path to take in the first place.