Hello! Welcome back.
In our last lesson, we focused on training your ears to identify the effects of a compressor's four main controls: threshold, ratio, attack, and release. You learned how each parameter shapes a sound and practiced hearing these changes with extreme settings.
Today, we'll apply that knowledge to a core task in music production: controlling the dynamic range of a vocal performance. The goal is to make a vocal sit consistently in a mix, ensuring that every word is clear and present, from the quietest whispers to the loudest belts. This is one of the most common and crucial uses of compression, especially for the modern vocal styles you're interested in.
1. The Goal: Vocal Consistency
A raw vocal performance is naturally dynamic. This is a good thing—it's what gives the performance emotion and life. However, in the context of a full mix with drums, bass, and synths, the quietest vocal phrases can get lost, while the loudest parts can jump out and sound harsh.
Our job is to use compression to reduce this dynamic range, making the vocal level more consistent without sacrificing the performance's energy.
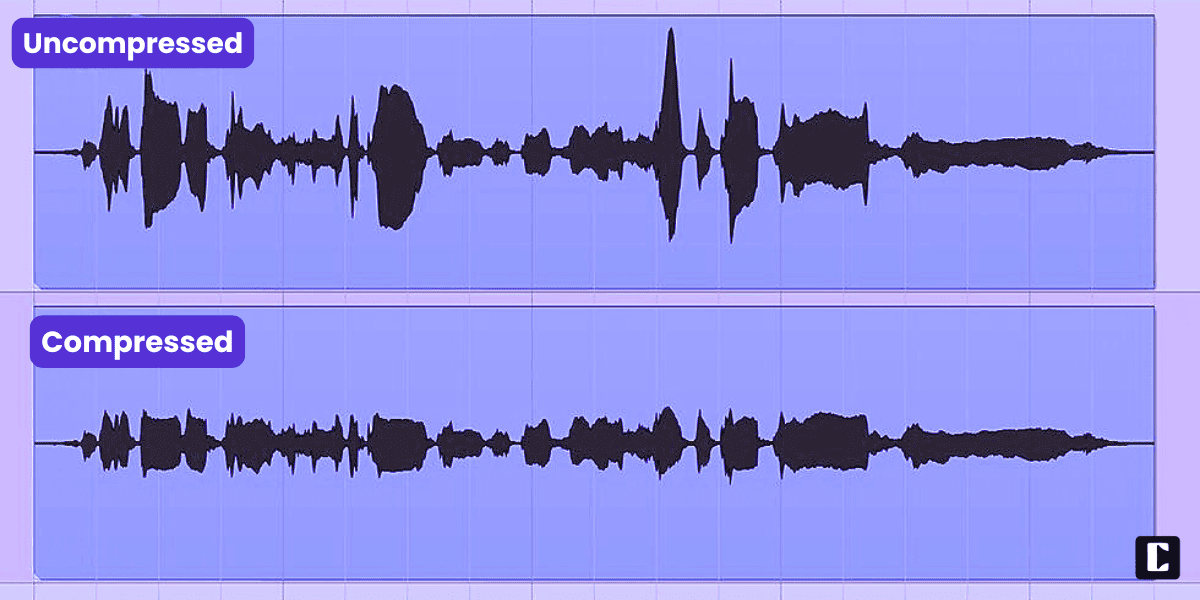
To start, let's establish a clear framework for why and how we approach vocal compression.
Vocal Compression: Dialing In The Perfect Voice
The article 'Vocal Compression: Dialing In The Perfect Voice' by Kiive Audio provides a great overview of the different mindsets when compressing vocals.
Read the sections 'The Art of Vocal Compression' and 'Compression Approaches for Vocals'. Focus on understanding the three main goals (enhancing delivery, providing consistency, adding character) and the three practical approaches (Transparent, Dynamic Control, Character & Color). For this lesson, we are focusing primarily on 'Dynamic Control'.
As the article highlights, "Dynamic Control" is key for modern genres where the vocal needs to stay front and center. Let's build the process for achieving this step-by-step in FL Studio.
2. Setting the Core Controls: Threshold and Ratio
The first step is to tell the compressor when to start working and how much to reduce the volume. This is handled by the threshold and ratio.
- Find the average loud parts: Play the vocal track and watch the meter on its mixer channel. Identify the level of the loudest phrases.
- Set the Threshold: Set your threshold just below this level. This ensures the compressor only acts on the parts of the vocal that are jumping out.
- Set the Ratio: The ratio determines how aggressively the compressor will turn the volume down. For modern pop or rap vocals, a higher ratio is common.
- Apply Makeup Gain: Compression turns the loudest parts down, so the overall signal becomes quieter. Use the makeup gain control to bring the compressed vocal back up to its original level. This is essential for a fair A/B comparison.
This video demonstrates this exact workflow in FL Studio and is a great practical guide.
The Ultimate Vocal Compression Tutorial for Beginners
The video 'The Ultimate Vocal Compression Tutorial for Beginners' by XDizzle provides a simple, clear method for setting your initial compression levels.
Watch from 01:20 to 04:31. Pay close attention to how he uses the mixer's meter to set the threshold, then adjusts the ratio to get the desired amount of compression. Notice how he uses the 'Gain' knob to level-match the vocal after compressing it.
A good starting point for modern vocals is a ratio between 4:1 and 6:1. This is aggressive enough to provide solid control without completely squashing the life out of the performance.
3. Shaping Clarity and Punch: Attack and Release
Once you've set your threshold and ratio, the attack and release times are where you truly shape the character of the vocal.
-
Attack: For vocals, the attack time is crucial for intelligibility. The initial consonants of words ('p', 'k', 't') are transients.
- A fast attack (< 5ms) will clamp down on these consonants, making the vocal sound smoother and thicker, but potentially "mushy."
- A slow attack (10-30ms) will let these consonants poke through before the compression kicks in, which makes the vocal sound punchier and easier to understand in a dense mix.
-
Release: The release time should be set so that the compressor stops working before the next word or phrase begins.
- A fast release can add energy but might sound unnatural or create "pumping" artifacts.
- A slow release is smoother, but if it's too slow, it will continue compressing the start of the next phrase, making the vocal feel "choked" and lacking energy. A good starting point is to try and time the release so it "breathes" with the tempo of the song.
The following video is an excellent, practical demonstration of dialing in these settings on a modern rap vocal in FL Studio.
How to Compress Your Vocals PERFECTLY (easy method)
In 'How to Compress Your Vocals PERFECTLY', the presenter from Mix Elite gives fantastic advice on setting attack and release for clarity.
Watch from 03:10 to 07:19. He gives a brilliant demonstration of how a very fast attack can make a vocal mushy, while a slower attack around 30ms lets the consonants through and improves clarity. He also provides a simple guideline for setting the release.
Test your understanding!
You are mixing a fast-paced rap vocal for a drill track. The rapper's words are getting lost in the busy beat. To improve the vocal's clarity and make each word more distinct, would you generally lengthen or shorten your compressor's attack time?
Show answer
You would generally lengthen the attack time (make it slower). A slower attack (e.g., 20-30ms) allows the initial sharp consonants of the words to pass through uncompressed, enhancing their punch and making the lyrics more intelligible against the beat.
4. Practical Exercise: Compressing a Vocal in FL Studio
Now, let's put it all together. Open a project in FL Studio with a raw vocal track. Load the Fruity Compressor on its mixer channel.
Goal: Achieve about 5-8 dB of gain reduction on the loudest phrases, making the vocal sound consistent and clear.
Step-by-Step Guide:
-
Set the Foundation (Dynamic Control):
- Ratio: Start with a ratio of 6:1, a common setting for modern vocals.
- Threshold: Loop the loudest part of the vocal performance. Pull the threshold down until the gain reduction meter shows you are consistently reducing the level by about 5-8 dB.
-
Dial in the Clarity (Attack):
- Attack: Start with the attack at its fastest setting (e.g., 1ms). The vocal might sound a bit thick but maybe indistinct.
- Slowly increase the attack time towards 30ms. Listen carefully as the consonants ('t', 'k', 'sh') start to become more defined and punchy. Find the sweet spot where the vocal cuts through without sounding overly harsh.
-
Set the Groove (Release):
- Release: Start with a medium release around 100ms. Listen to the space between vocal phrases.
- Shorten the release time. If you hear unnatural "pumping" or distortion, it's too fast.
- Lengthen the release time. If the vocal starts to sound "choked" or loses energy, it's too slow. Try to find a setting (often between 50ms and 150ms) where the compressor recovers naturally before the next phrase.
-
Level Match (Makeup Gain):
- Gain: The vocal is now quieter due to the compression. Bypass the compressor on and off. Use the 'Gain' knob to increase the level of the compressed signal until its perceived volume matches the uncompressed signal.
- Now when you A/B the compressor, you're not just hearing a volume change; you're hearing the effect of the dynamic control you've applied.
For a deeper dive, the article "Vocal Compression: Learn How to Mix Like the Pros" offers excellent starting-point settings for two different compression goals.
Vocal Compression: Learn How to Mix Like the Pros
This article from mastering.com gives specific recipes for 'Tonal Compression' and 'Dynamic Compression'. Our exercise above is a form of Dynamic Compression.
Review the sections 'How to Get Light Tonal Compression' and 'How to Get Great Dynamic Compression'. Compare their suggested settings (Ratio, Attack, Release) to what you found in your exercise. These are fantastic starting points for future mixes.
Conclusion
You have now moved from understanding compression in theory to applying it with a specific, practical purpose. By controlling a vocal's dynamic range, you can ensure it remains the central focus of your song.
Key Takeaways:
- Vocal compression for consistency aims to reduce the volume difference between the loudest and quietest words.
- Start with a moderate-to-high ratio (4:1 - 6:1) and set the threshold to catch only the loudest peaks, aiming for 5-8 dB of gain reduction.
- Use a slower attack (10-30ms) to allow vocal consonants to cut through, enhancing clarity.
- Set the release time to "breathe" with the song, recovering before the next phrase begins.
- Always use makeup gain to level-match your compressed and uncompressed signals for a fair comparison.
In our next lesson, we'll shift our focus from consistency to character. You will learn how to use compression to shape the transient and sustain of a drum sound, adding punch or body, a technique that is fundamental to creating a powerful rhythm section.