Hello! Welcome to the next lesson in your sound engineering journey.
In our last session, we explored how to create separation in a mix using static and dynamic EQ. You learned how to use a sidechain to make an EQ cut on one instrument that is triggered by another—a powerful, specific use of dynamic control.
Today, we're going to dive into the most fundamental tool for controlling dynamics: the compressor. A compressor is essentially an automatic volume controller that can make your tracks sound more consistent, punchy, and professional. This lesson focuses on the core skill of ear training. By the end, you'll be able to identify the audible effects of a compressor's four main settings: threshold, ratio, attack, and release. Mastering this is crucial for all the mixing and mastering work that lies ahead.
1. What is Compression and Why Do We Use It?
At its heart, compression reduces the dynamic range of an audio signal. Dynamic range is simply the difference between the loudest and quietest parts of a performance. A vocalist might get very loud on some words and trail off quietly on others. A compressor "tames" those loud peaks and can help bring up the quiet parts, resulting in a more consistent and controlled sound.
To begin, let's hear what this sounds like. This video provides an excellent before-and-after example on a vocal track, which directly relates to your interest in vocal production.
How To HEAR COMPRESSION - Music Production
The video 'How To HEAR COMPRESSION' from the channel In The Mix starts with a perfect demonstration of the problem compression solves.
Watch from the beginning to 01:38. Listen to the uncompressed vocal and notice how some words are much louder than others. Then, listen to how the compressed version sounds more even and 'forward'.
As you heard, compression made the vocal performance feel more solid and consistent. The fundamental controls that allow us to achieve this are the threshold and ratio.
2. The 'How Much' Controls: Threshold and Ratio
The Threshold and Ratio work together to determine when the compressor starts working and how much it reduces the volume.
- Threshold (dB): This is the volume level an audio signal must exceed for the compressor to activate. Think of it as a tripwire. Any part of the signal that is louder than the threshold will be compressed.
- Ratio: This determines the amount of volume reduction applied once the signal crosses the threshold. A ratio of 4:1, for example, means that for every 4 decibels the signal goes over the threshold, the output will only be allowed to increase by 1 decibel.
Since you're comfortable in FL Studio, let's see how these parameters work within the Fruity Limiter plugin, which has a great built-in compressor.
How To Use Compressor Like a PRO | Easy FL Studio Guide
The 'How To Use Compressor Like a PRO' video by Mix Elite gives a fantastic walkthrough of the compressor in FL Studio's Fruity Limiter.
Watch from 01:51 to 04:25. The presenter clearly demonstrates how the Threshold sets the point of compression and how the Ratio controls the intensity. Pay attention to the visual feedback in the plugin as he adjusts the knobs.
To train your ear specifically on these two parameters, the following article provides isolated audio examples. The settings are exaggerated on purpose to make the effect obvious.
Hearing Effects: Dynamics, Part 1 - Compressors
The article 'Hearing Effects: Dynamics, Part 1 - Compressors' from Musical-U offers clear definitions and excellent audio examples for ear training.
First, read the 'Threshold' section and listen to the audio examples to hear how a lower threshold causes more of the signal to be compressed. Then, read the 'Ratio' section and listen to its examples to hear how higher ratios result in more aggressive compression and can even change the character of the sound.
3. The 'How Fast' Controls: Attack and Release
While threshold and ratio control the amount of compression, Attack and Release control the speed. They shape the character and envelope of the sound.
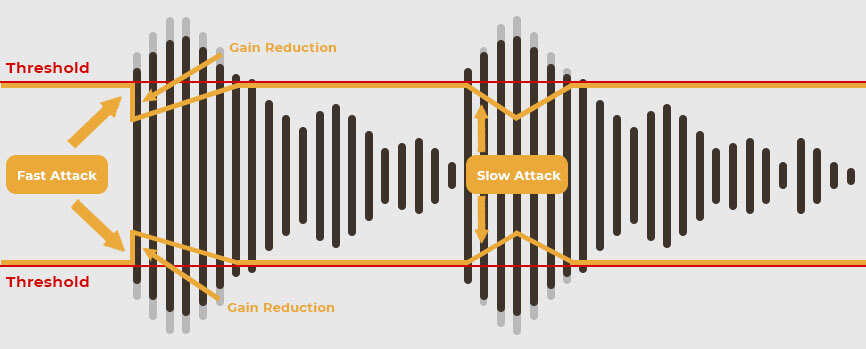
- Attack (ms): This determines how quickly the compressor starts reducing the volume once the signal crosses the threshold.
- A fast attack clamps down almost instantly, taming the initial transient (the "punch" or "click") of a sound. This can make a sound smoother and feel further back.
- A slow attack lets the initial transient pass through before the compression kicks in, which can enhance the punch and impact of a sound, like a kick or snare drum.
- Release (ms): This determines how quickly the compressor stops working after the signal falls back below the threshold.
- A fast release lets the sound return to its uncompressed level quickly. This can make the compression sound energetic but can also cause an audible "pumping" artifact if set too fast.
- A slow release holds onto the sound for longer, resulting in smoother, more transparent compression. If set too slow, it might compress the beginning of the next sound, making the mix feel lifeless.
Let's turn back to our video resources to hear these in action.
How To HEAR COMPRESSION - Music Production
The 'In The Mix' video has excellent, focused examples for hearing attack and release.
First, watch the section on Attack from 11:51 to 13:33. Listen carefully to how the 'pluck' of the guitar becomes less defined as the attack time is shortened. Next, watch the section on Release from 04:24 to 05:33. Notice how a long release makes the vocal sound 'mushy' and indistinct, while a well-set release maintains clarity between words.
Test your understanding!
You are compressing a snare drum to make it punchier and more aggressive. Would you generally choose a faster or slower attack time? Why?
Show answer
You would generally choose a slower attack time. This allows the initial sharp "crack" of the snare (the transient) to cut through the mix uncompressed, before the compressor clamps down on the body of the sound. This exaggerates the punch of the drum.
4. Practical Exercise: Training Your Ears in FL Studio
Now it's time to put this all together and start training your ears. The best way to learn the sound of these parameters is to use extreme settings first, and then dial them back.
For this exercise, open an FL Studio project and find a vocal track or a drum loop. Assign it to a mixer channel and load Fruity Limiter. Switch to the 'COMP' tab.
Follow these steps, inspired by the "Vocal Compression Settings For Beginners" guide:
-
Exaggerate the Settings:
- Set the Ratio to a high value, like 8:1 or 10:1.
- Set a fast Attack (turn the knob to the left, around 1-5ms).
- Set a medium Release (around 50-100ms).
- Play your track and pull the Threshold knob down until you see and hear significant compression (around 10-15 dB of gain reduction shown on the meter). The sound should be obviously "squashed."
-
Listen to the Attack:
- Loop a section of the audio.
- Slowly turn the Attack knob to the right (slower attack). Listen to how the initial transient of the sound starts to poke through. For a vocal, you'll hear the consonants get sharper. For a drum, you'll hear the initial "hit" become more prominent. Sweep back and forth between fast and slow to internalize the sound.
-
Listen to the Release:
- Set the Attack back to a medium setting.
- Now, sweep the Release time from fast (left) to slow (right). With a very fast release, you might hear "pumping" or distortion, especially on sustained sounds. With a very slow release, the sound will feel "choked" and lack energy. Try to find a release time that breathes in time with the music.
-
Dial it Back:
- Once you have a feel for the attack and release, ease back on the Threshold and/or Ratio until the compression feels more natural. A good target for general control is 3-6 dB of gain reduction on the loudest parts.
-
Level Match with Gain:
- Compression reduces the volume of the peaks. Use the Gain knob (the output gain) to bring the overall level of the compressed signal back up so it matches the volume of the uncompressed signal. This is crucial for a fair A/B comparison (bypassing the plugin on and off) to judge if your settings have actually improved the sound.
Conclusion
You've just taken your first major step into the world of dynamic control. You've learned that a compressor is more than just a volume knob; it's a powerful tool for shaping the character and energy of a sound.
Key Takeaways:
- Threshold sets the level at which compression begins.
- Ratio controls how much compression is applied.
- Attack shapes the initial transient of a sound, affecting its punch and perceived placement.
- Release shapes the sustain and body of a sound, affecting its smoothness and energy.
- To truly hear compression, start with extreme settings and then dial them back to a more musical level.
In our next lesson, we will apply this knowledge directly to one of your primary interests: controlling the dynamic range of a vocal performance for consistency. You'll learn how to set a compressor to ensure every word of a vocal can be heard clearly in a mix.