Hello! Welcome back to your second lesson.
In our first session, we established the most important rule in digital audio: the master track must never exceed 0 dBFS to avoid permanent, harsh digital clipping. Now, before we even think about recording levels, we need to correctly set up the digital "canvas" on which we'll create our music.
This lesson focuses on the next step in our foundation: setting up a new project in FL Studio with an appropriate sample rate and bit depth. These two parameters are the fundamental building blocks that define the resolution and quality of your digital audio. Getting them right from the start ensures your project is built on solid ground, ready for professional recording and mixing.
What are Sample Rate and Bit Depth?
Think of digital audio recording as taking a series of rapid snapshots of a sound wave.
- Sample Rate is the number of snapshots taken per second. It's measured in Hertz (Hz) or kilohertz (kHz). A higher sample rate means more snapshots per second, which allows for the accurate capture of higher frequencies.
- Bit Depth is the amount of detail captured in each individual snapshot. A higher bit depth provides a greater range of possible values for the loudness of the snapshot, resulting in a larger dynamic range (the difference between the quietest and loudest possible sounds) and a lower noise floor.
To get a clear, practical understanding of these concepts and bust some common myths, the following video is an excellent resource.
What SAMPLE RATE Should You Record At? | Why HIGHER Can Be WORSE!
This video from PresentDayProduction clearly explains what sample rate and bit depth are, using helpful analogies and debunking the common misconception that 'higher is always better'.
Watch from 01:51 to 11:11. Focus on the core definitions of sample rate and bit depth, and how they relate to frequency range and dynamic range, respectively.
As the video explains, thanks to a principle called the Nyquist theorem, we don't need infinitely high sample rates to perfectly capture all the frequencies humans can hear. Similarly, modern bit depths give us more dynamic range than our equipment can even use.
This brings us to the key practical question: what settings should you actually use?
The Professional Standard: Recommendations for Your Projects
While there are many options available, the modern standard for music production is straightforward and provides a great balance of quality, compatibility, and performance.
For most music projects, use 24-bit / 48 kHz.
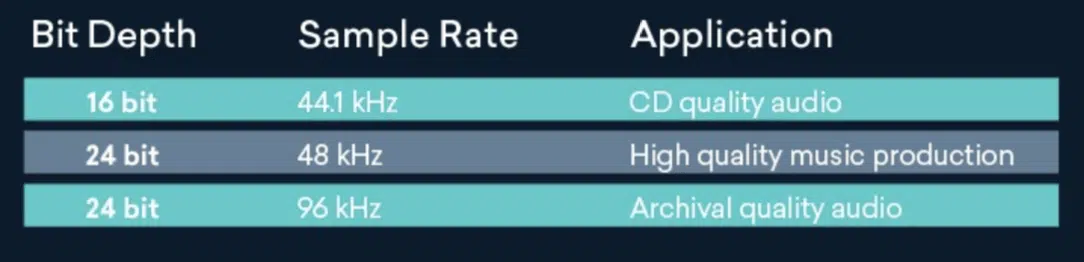
Here’s why this is the recommended standard:
- 24-bit depth: This gives you a theoretical dynamic range of 144 dB. In practical terms, this means an extremely low noise floor and massive headroom. You can record signals at a comfortable, low level without worrying about background hiss, which is incredibly useful when it's time to mix. 16-bit (CD quality) is often sufficient for playback, but 24-bit is far superior and more forgiving for recording and mixing.
- 48 kHz sample rate: While 44.1 kHz is the standard for CDs, 48 kHz has become the standard for digital video and is now the preferred rate for major streaming platforms like Apple Music and Spotify. Working at 48 kHz from the start ensures your project meets modern delivery specifications without needing to be converted later.
"But why not record at 96 kHz or even 192 kHz?"
As you saw in the video, higher sample rates don't necessarily lead to better audible quality for music. In fact, on some consumer or pro-sumer audio interfaces, they can sometimes introduce unwanted distortion. Furthermore, they dramatically increase file sizes and the load on your computer's CPU, with little to no audible benefit for the final listener.
For a practical musician and engineer, 24-bit / 48 kHz is the sweet spot.
How to Set Up Your Project in FL Studio
Now, let's apply this in FL Studio. You are already comfortable with the DAW, so this should be straightforward. Setting these parameters involves two key places: the FL Studio Audio Settings and your computer's sound settings.
First, open the Audio Settings by pressing F10 on your keyboard or going to Options > Audio settings.
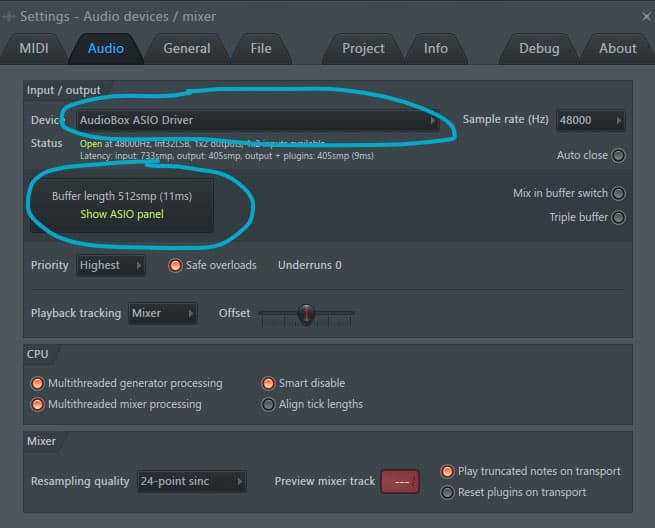
Step 1: Select the Correct Audio Driver
Before you can set anything else, you must select the correct driver. As you're focused on recording, you need a low-latency driver.
- In the Device dropdown menu, select the ASIO driver for your audio interface (e.g., "Focusrite USB ASIO", "Universal Audio Thunderbolt", etc.).
- If you don't have an external audio interface and are using your computer's built-in sound card, select "FL Studio ASIO". This driver is designed to give you better performance than the default Windows drivers.
The first minute of this next video gives a great overview of why this is so important.
The Last FL Studio AUDIO SETTINGS Video You'll Need | Audio Settings Explained (Fix Latency Issues)
The channel Scale Audio provides a focused walkthrough of the FL Studio audio settings. This first part reinforces the importance of using an ASIO driver.
Watch the first minute (00:00 - 01:00). The key takeaway is to always select an ASIO driver for recording and performance, rather than the 'Primary Sound Driver'.
Step 2: Set the Sample Rate
This is set directly within FL Studio's Audio Settings window.
- Look for the Sample Rate dropdown menu.
- Select 48000 Hz (or 44100 Hz if you have a specific reason).
Your project's playback engine will now operate at this rate.
Step 3: Set the Bit Depth
This is the part that trips up many new users. Bit depth for recording is not set in the main FL Studio audio settings panel. It's determined by your audio driver's settings, which are configured through Windows.
The official FL Studio manual provides the most direct instructions for this.
The FL Studio Manual clearly explains where to set the bit depth for your recording input.
Find the bullet point for 'Bit depth (16, 24)' and read the instructions for Windows. It will guide you to your sound control panel. The section 'FL Studio ASIO' also contains a note on setting the Sample Rate and Bit Depth for your recording device in Windows.
To summarize the steps from the manual for Windows:
- Right-click the speaker icon in your Windows taskbar and open your Sound settings.
- Find and open the Sound Control Panel.
- Go to the Recording tab.
- Find your audio interface input, select it, and click Properties.
- Go to the Advanced tab.
- In the dropdown menu, select a 24-bit, 48000 Hz option. Click Apply.
Your system is now configured to record audio at the professional standard quality.
Test your understanding!
You are starting a new project to record vocals for a song that will be released on Spotify and Apple Music.
- What Sample Rate and Bit Depth should you choose?
- Where do you configure each of these two settings?
Show answer
- You should choose 48 kHz for the sample rate and 24-bit for the bit depth.
- The Sample Rate (48000 Hz) is set in FL Studio's Audio Settings (F10). The Bit Depth (24-bit) is set in the Windows Sound Control Panel, under the advanced properties for your recording device.
Conclusion
Great work! You've now configured the technical foundation of your project. Setting these parameters correctly from the beginning prevents issues with quality, compatibility, and performance down the line.
Here are the key takeaways from today's lesson:
- Sample Rate defines the frequency range of your audio, while Bit Depth defines the dynamic range.
- The recommended professional standard for modern music production is 24-bit / 48 kHz.
- In FL Studio, you must select an ASIO driver for low-latency recording.
- The Sample Rate is set within FL Studio's Audio Settings, but the Bit Depth for recording is configured via your audio device's properties in the Windows Control Panel.
In our next lesson, we will build directly on this and the previous lesson. Now that your project is set up and you understand the danger of clipping, we'll learn how to calibrate your input and output levels using peak and RMS meters. This is the core practice of gain staging and will ensure your recordings are clean, healthy, and ready for mixing.