Hello! Welcome back.
In the last two lessons, we established our foundational rules: we must never clip our master track above 0 dBFS, and we've set up our FL Studio project to the professional standard of 24-bit/48 kHz. Now, we'll dive into one of the most crucial skills in all of audio engineering: gain staging.
This lesson is all about controlling the level of your audio at every single point in its journey, from the initial sample all the way to the master output. Proper gain staging is the secret to clean, professional-sounding recordings and mixes. It ensures your plugins work correctly and prevents the subtle distortion and noise that can ruin a track. Today, you will learn to calibrate input and output levels using peak and RMS meters to establish proper gain staging.
The What and Why of Gain Staging
At its core, gain staging is the process of managing the volume—or more accurately, the gain—of a signal at each step in the signal chain. Think of it as a relay race: for a clean handoff, each runner needs to receive the baton at the right speed. If it's too fast, they might drop it (distortion); if it's too slow, they lose momentum (noise).

To do this properly, we first need to understand the critical difference between gain and volume.
- Gain is the level of the signal at the input of a device (like a mixer channel or a plugin).
- Volume is the level of the signal at the output, typically controlled by a fader.
This distinction is vital because in a DAW like FL Studio, your plugins (EQs, compressors, etc.) process the signal after the initial gain but before the channel's main volume fader. This means the fader can't fix a signal that is already distorting your plugins.
This video from Mix With Jerry provides an excellent, practical demonstration of the signal flow inside FL Studio and why this gain vs. volume distinction is so important.
This video, 'Gain Staging in FL Studio', walks you through the exact signal path in your DAW. It clearly shows where you can control the level and why using the mixer fader to set your initial levels can be misleading.
Watch from 00:27 to 03:01 and then from 06:58 to 10:41. Pay close attention to the order of operations: Channel Rack/Playlist -> Plugins -> Fader. Notice how the plugins react to the signal coming into the mixer, not the level set by the fader.
As you just saw, to get a clean mix, we need to control the gain before it hits our plugins. To do that, we need the right tools for measurement.
Your Eyes on the Sound: Peak vs. RMS Meters
So far, we've focused on the standard meter in your FL Studio mixer. This is a peak meter.
- Peak Meters show the highest, instantaneous level of a signal. Their main job is to help you prevent clipping by showing you the absolute loudest points.
- RMS (Root Mean Square) Meters show the average level of a signal over a short period. This is much closer to how our ears perceive loudness.
A track can have high peaks (like a sharp snare hit) but a low average (RMS) level, making it sound quiet overall. Conversely, a track with controlled peaks but a high RMS level (like a sustained, compressed bassline) will sound very loud.
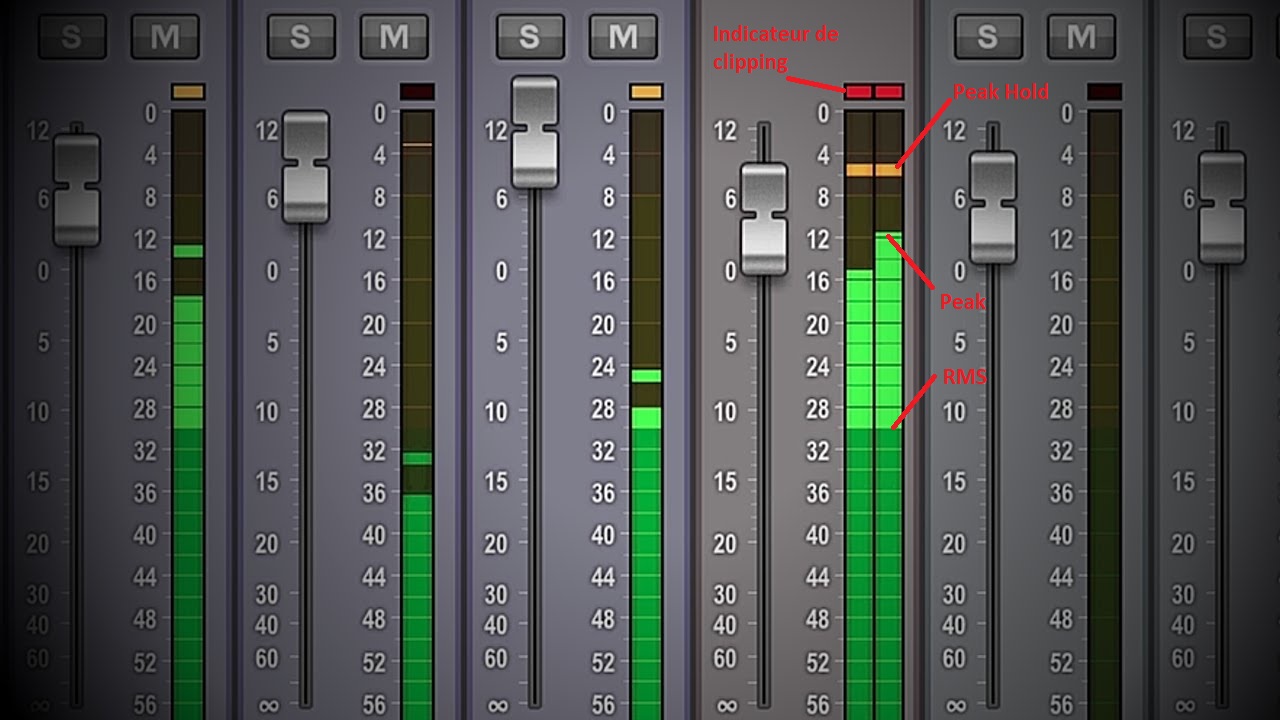
For effective gain staging, you need to pay attention to both.
- Use the peak meter to ensure you leave enough headroom (the space between your loudest peak and 0 dBFS).
- Use the RMS meter to judge the perceived loudness and energy of your tracks.
Let's read a short article that details how to use an RMS meter in FL Studio to achieve a mix with proper headroom.
Using a RMS Meter to Create A Mix with Head Room | FL Studio
This article, 'Using a RMS Meter to Create A Mix with Head Room', focuses on the practical application of RMS metering in FL Studio using the built-in 'Wave Candy' plugin.
Read the introduction and the sections 'Understanding RMS and Why It Matters' and 'Step One: Insert Wave Candy on the Master Channel'. This will solidify the concept of RMS and show you how to set up the tool we'll be using.
A Practical Workflow for Gain Staging in FL Studio
Now, let's put this all together into a step-by-step process you can use in every project. Our goal is to set the initial level of each track to a "sweet spot" that leaves plenty of headroom and allows our plugins to work optimally.
Target Levels:
- Peak on Individual Tracks: Aim for peaks to hit somewhere between -12 dBFS and -6 dBFS. This gives you a ton of headroom before you even think about clipping.
- RMS on the Master Bus: When all your tracks are playing during the loudest part of the song, aim for an average RMS level of around -12 dBFS. This is a common target that provides a healthy level for mixing, leaving space for later mastering.
Step 1: Set Up Your Metering
Following the article you just read, go to your Master channel in the FL Studio mixer and add an instance of Wave Candy. In its settings, change the Mode to Meter. You can also right-click the meter display and set it to show Peak & RMS.
Step 2: Set Initial Levels (The Right Way)
Start with your core elements, usually the kick and bass.
- Drag your kick drum sample into the Playlist.
- Find the Clip Gain control on the audio clip itself (it's the small knob icon that appears when you hover over the clip). This is your primary gain control, as it happens before the mixer.
- Play the kick and look at its mixer channel's peak meter. Adjust the Clip Gain until the kick is peaking around -10 dBFS.
- Now, bring in your bass. Adjust its Clip Gain so it sits nicely with the kick. Look at your master channel—the combined peak level should still be well below 0 dBFS.
- As you add more instruments, continue to use Clip Gain (for audio clips) or the Channel Volume knob in the Channel Rack (for virtual instruments) to set their initial levels. Do not use the main mixer faders for this initial balancing.
Step 3: Manage Gain Through Your Plugins
Let's say you've set your vocal track to peak at -9 dBFS. Now you add an EQ to boost the high frequencies for more air. That boost adds gain, and now your vocal is peaking at -2 dBFS, or maybe even clipping.
This is where plugin gain staging comes in. Most plugins have an output gain knob. After you make your EQ or compression adjustments, use the plugin's output knob to turn the signal back down so its peak level is the same as it was before you added the plugin. This is called level matching. It allows you to judge if the plugin is actually improving the sound, or just making it louder.
Test your understanding!
You add a synth to your project. Its level is too high, peaking at -2 dBFS on its mixer track before you've added any plugins. You want to turn it down to about -12 dBFS before you start processing it.
Which of these is the best tool for the job?
- The main fader on the synth's mixer channel.
- The synth's "Clip Gain" knob in the Playlist.
- The output knob on an EQ plugin you plan to add later.
Show answer
The best tool is #2, the synth's "Clip Gain" knob. You want to adjust the gain before it hits the mixer and any plugins. The mixer fader adjusts the level after the plugins, so it wouldn't fix a hot signal that might be distorting them. The plugin's output knob is used to compensate for gain changes within that plugin, not for setting the initial track level.
Conclusion
You've just learned a technique that separates amateur producers from professionals. By consciously managing your signal levels at every stage, you build a clean, dynamic, and robust foundation for your mix.
Here are the key takeaways from today's lesson:
- Gain staging is the process of setting optimal audio levels at every step in your signal chain to avoid noise and distortion.
- Gain is the input level that affects your plugins, while Volume (the fader) is the final output level. Always set initial levels with gain controls (Clip Gain, Channel Rack Volume), not the mixer faders.
- Use Peak meters to avoid clipping, aiming for peaks on individual tracks to stay around -12 to -6 dBFS.
- Use RMS meters to judge perceived loudness, aiming for an overall mix RMS around -12 dBFS on your master channel during the loudest sections.
- Always level-match when using plugins by adjusting their output gain to compensate for any changes in level they introduce.
In our next lesson, we'll complete our foundational setup by learning how to organize a project using naming, color-coding, and grouping. With your levels set and your project organized, you'll have a clean and efficient template ready for the creative work of recording and mixing.