Hello! Welcome back to our mixing journey.
In the last lesson, we successfully sculpted our synthesizers and keyboards, using EQ, compression, and stereo imaging to ensure they fit perfectly within the instrumental. We established a key workflow: grouping related sounds onto a bus for cohesive processing and using stereo width to create space.
Today, we'll apply and expand on these concepts to tackle one of the most important parts of a modern vocal production: the background vocals and harmonies. Our learning outcome is to blend background vocals and harmonies with the lead vocal using volume, panning, and effects. The goal is to make them add energy, width, and emotional impact without overpowering the lead or cluttering the mix. By the end of this lesson, you'll know how to make your backing vocals sit perfectly in the background, supporting the main performance.
1. The Core Strategy: Grouping for Control
Just like with our layered synths, it's rare to have just one or two background vocal (BV) tracks. You'll often deal with dozens of doubles, harmonies, and ad-libs. Trying to mix each one individually is inefficient and can lead to an incoherent sound. The solution, once again, is bussing.
By grouping related BV tracks onto buses (or submixes), you can control them as a single unit. A common professional strategy is to categorize BVs by their function or harmonic part.
Mixing Background Vocals // Joe Carrell
To start, let's watch a segment from the video 'Mixing Your Background Vocals // Joe Carrell'. He explains the challenge of dealing with high track counts and introduces his strategy of organizing them into a few manageable subgroups.
Watch from 01:15 to 05:20. Focus on the core idea: instead of getting lost in dozens of tracks, he simplifies the problem by routing them to three main 'background vocal' buses in his template. This organizational step is the foundation for everything that follows.
A great way to implement this is to create separate buses for different harmony parts. For example, you could have:
- A bus for all the high harmony parts.
- A bus for all the mid-range harmony/doubles.
- A bus for all the low harmony parts.
This allows you to process each harmonic layer cohesively.
Mixing Your Background Vocals Pro Technique
Now, let's see this specific routing in practice. In the video 'Mixing Your Background Vocals Pro Technique', the presenter, Help Me Devvon, demonstrates exactly how he routes his individual harmony tracks into separate buses.
Watch from 08:04 to 10:05. Observe how he sends his 'high od 1' and 'high od 2' tracks to a 'high bus', his 'mid' tracks to a 'mid bus', and so on. This is the practical setup you'll use in FL Studio.
This grouping strategy is your starting point. Before you even reach for an EQ, organize your BV tracks into logical buses.
2. Creating Depth and Separation: Volume and Panning
With your buses set up, the first and most effective tools for blending are volume and panning. The goal is to create a clear space in the center of your mix for the lead vocal.
Volume Balancing
Background vocals should live "underneath" the lead vocal. A common mistake is to mix them too loudly, which creates competition. Start by pulling the fader on your BV bus down, then slowly bring it up until the BVs provide support without demanding attention.
A useful tip for doubled parts is to favor the strongest take.
10 Tips for Mixing Background Vocals
The article '10 Tips for Mixing Background Vocals' from The Pro Audio Files offers a simple but effective tip for handling doubled tracks.
Read Tip #3: Favor the Strongest Takes. The idea is that not all tracks need to be at the same volume. Making the best performance the loudest in a stack will make the entire part sound tighter.
Panning for Width
Panning is your primary tool for moving BVs out of the way of the lead vocal. A standard technique is to keep the lead vocal panned center and spread the harmonies and doubles out to the sides. This creates a wide, immersive sound and leaves the center of the stereo field open.
These diagrams provide excellent visual examples of common panning strategies:
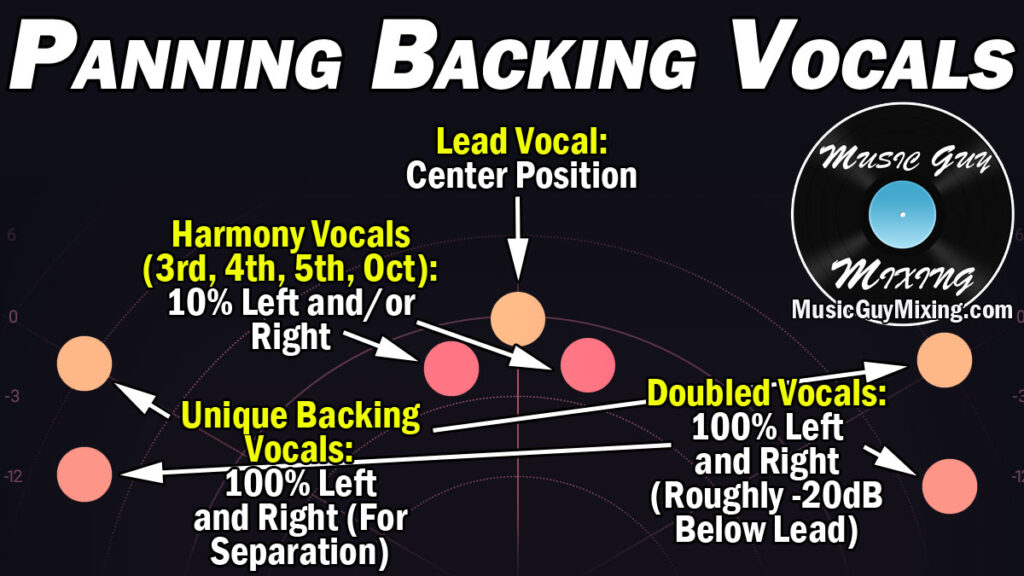
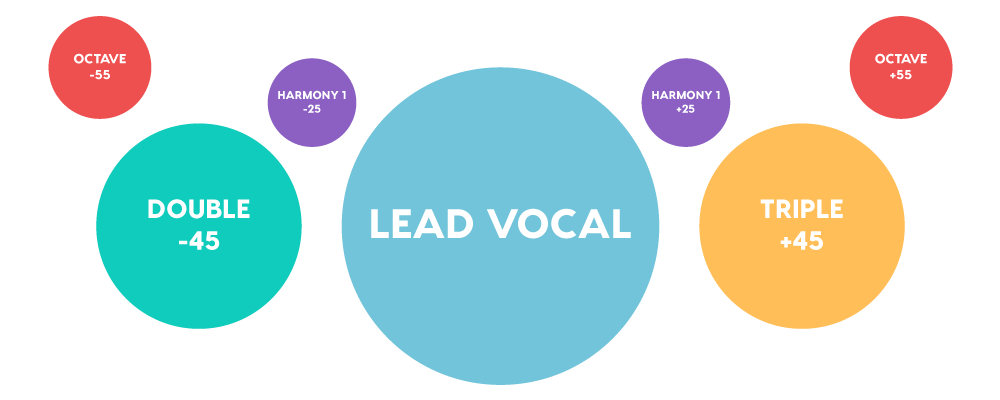
General Panning Strategy:
- Lead Vocal: Center (Pan = 0)
- Main Harmonies: Pan a pair left and right (e.g., -30 and +30).
- Wide Doubles/Ad-libs: Pan these even wider (e.g., -60 to -100 and +60 to +100) to create a sense of envelopment.
By creating a "pan plan," you strategically place each vocal element where it can be heard without causing clutter.
3. Processing for Cohesion and Character
Now that your BVs are organized and placed, you can use processing on your buses to shape their tone and dynamics, ensuring they blend seamlessly.
EQ: Carving out Space
The main role of EQ on background vocals is subtractive. You need to remove frequencies that compete with the lead vocal and other key instruments.
- High-Pass Filter (HPF): This is non-negotiable. BVs rarely need the low-end body that the lead vocal has. Use a HPF to aggressively roll off everything below 150-250 Hz, or even higher, to eliminate mud and create space for the bass and kick.
- Mid-Range Cuts: The lead vocal's clarity and presence live in the midrange. Cut these same frequencies from your BVs to help them sit behind the lead. Common areas to cut on BVs are:
- 200-500 Hz: To reduce "boxiness" or "muddiness".
- 1-4 kHz: To reduce "presence" and "articulation", making way for the lead's intelligibility.
Mixing Your Background Vocals Pro Technique
Let's return to Help Me Devvon's tutorial. He gives a fantastic demonstration of using EQ on a BV bus to make it sit back and differentiate it from the lead vocal.
Watch from 11:20 to 14:20. Pay close attention to how drastically he rolls off the low end (around 300 Hz) and how he explains this choice is to make the BVs sound different from the lead. He also scoops out other problematic frequencies.
Compression: Controlling Dynamics
Compression on a BV bus helps to "glue" all the layers together into a tight, consistent block of sound. Because BVs are a supporting element, you can often use more aggressive compression than you would on a lead vocal.
The article 'How to Mix Background Vocals' from Sage Audio explains this concept well.
Read the first section, 'Aggressive Smooth Compression'. The key takeaway is that since BVs are meant to be blended, heavy compression (even up to 8dB of gain reduction) can work very well to smooth them out and make them denser without negative side effects.
A good starting point for a BV bus compressor is a medium attack, a release timed to the song's rhythm, and a ratio of 4:1. Adjust the threshold to get consistent gain reduction that evens out the performance.
Effects: Creating Depth and Texture
Effects are the final touch to push your BVs into their own space. Use sends and return tracks for this, just as we've done before.
-
Reverb: A combination of reverbs often works best.
- Short Reverb (Room or Plate): Use a short reverb (decay time < 1 second) to "glue" the voices together, making them sound like they were recorded in the same space.
- Long Reverb (Hall or Cathedral): Blend in a longer, more noticeable reverb to push the BVs further back in the mix and add a lush, atmospheric tail.
-
Delay: A simple stereo or ping-pong delay timed to the track can add rhythmic interest and depth.
-
Doublers & Wideners: These effects are excellent for making a few vocal tracks sound like a much larger group and for enhancing stereo width.
Mixing Your Background Vocals Pro Technique
Help Me Devvon's video provides a masterclass in using multiple effects to create a rich, professional BV sound.
Watch these three segments: Width with a Doubler (16:58 - 18:09): See how he uses a doubler plugin directly on the bus to instantly add fullness and width. Creating Space with Reverb (20:08 - 23:45): Notice his use of two separate reverbs on sends: a short one for stereo feel and a long one for a 'ghostly' tail. Advanced Width with a Send (24:18 - 25:47): He uses another doubler on a send track, followed by a stereo imager, to push the BVs out to the absolute sides of the mix. This is a powerful technique for creating space in the center.
Test your understanding!
You have a lead vocal, and you've recorded two harmony parts (a high harmony and a low harmony). The harmonies sound dry, are competing with the lead vocal for space in the center, and feel disconnected from each other.
Briefly outline a 4-step process to blend these harmonies into the mix, mentioning a specific tool or technique for each step.
Show answer
- Grouping: Route both harmony tracks to a single stereo "Harmony Bus" to process them together.
- Panning: Pan the high harmony to the left (e.g., -40) and the low harmony to the right (e.g., +40) to create width and clear the center for the lead.
- EQ: On the Harmony Bus, use a high-pass filter to remove low-end mud below ~200Hz and make a cut in the midrange (around 2kHz) to create space for the lead's articulation.
- Effects: Set up a send from the Harmony Bus to a reverb (e.g., a plate or hall reverb) to give the harmonies a sense of shared space and push them behind the lead vocal.
Conclusion
Blending background vocals is an art of creating support and texture without causing distraction. By following the workflow from this lesson, you can transform a stack of raw vocal tracks into a cohesive, polished, and powerful backing element for your song.
Key Takeaways:
- Group First: Always route your BVs to buses based on their function (e.g., high/mid/low harmonies) for efficient and cohesive processing.
- Pan for Space: Use panning to spread your BVs across the stereo field, leaving the center open for the lead vocal.
- EQ Subtractively: The main goal of EQ for BVs is to cut frequencies (especially lows and mids) that clash with the lead.
- Compress for Glue: Use bus compression to control dynamics and make all the BV layers feel like a single, unified group.
- Use Effects for Depth: Reverb, delay, and doublers are essential tools for pushing BVs back in the mix and giving them a professional sense of space and character.
Preview of Next Lesson:
We have now mixed all the core elements of our track—drums, bass, synths, and vocals. The mix is complete! The next and final stage is mastering. In our next lesson, we will begin our final module by exploring the fundamental question: What is mastering? We will learn its primary goals by comparing a final mix to a commercially released master, setting the stage for you to learn how to finalize your own tracks for delivery.