Hello! Welcome back to the course.
In our last lesson, we focused on processing the bass to give it both weight and clarity, ensuring it translates across all speaker systems. With our low-end foundation now solid and working in harmony with the kick drum, we can move up the frequency spectrum to the melodic and harmonic core of the instrumental.
Today, our goal is to sculpt synthesizers and keyboards to fit in the mix using EQ, compression, and stereo imaging. Synths and keyboards can easily dominate a mix or sound disconnected if not treated properly. By the end of this lesson, you'll have a practical framework for making them sound cohesive, clear, and perfectly placed within your track.
1. Carving Space with EQ: Layering and Clarity
In modern production, it's rare for a synth sound to be just one instrument. More often, producers layer multiple synth patches to create a single, rich, and complex texture. While this is a powerful technique, it's also a common source of muddiness if not handled correctly.
The key is to think of your layers like a puzzle, where each piece occupies its own space in the frequency spectrum.
How To Layer Leads Properly (Mixing Tutorial)
The video 'How To Layer Leads Properly' by FireWalk provides an excellent demonstration of this concept. It explains why simply stacking similar sounds causes problems and shows how to use EQ to make different layers complement each other.
Watch from the beginning to 06:24. Focus on: The core principle: choosing sounds that fill different parts of the frequency spectrum (lows, mids, highs). The practical EQ demonstration where he uses a high-pass filter on the 'high' layer and rolls off highs on the 'low-mid' layer. This is the fundamental technique of carving space.
As the video shows, the first step is always to remove conflicting frequencies. A great starting point for any synth or keyboard is to use a high-pass filter to cut out unnecessary low-end that might clash with your bass and kick.
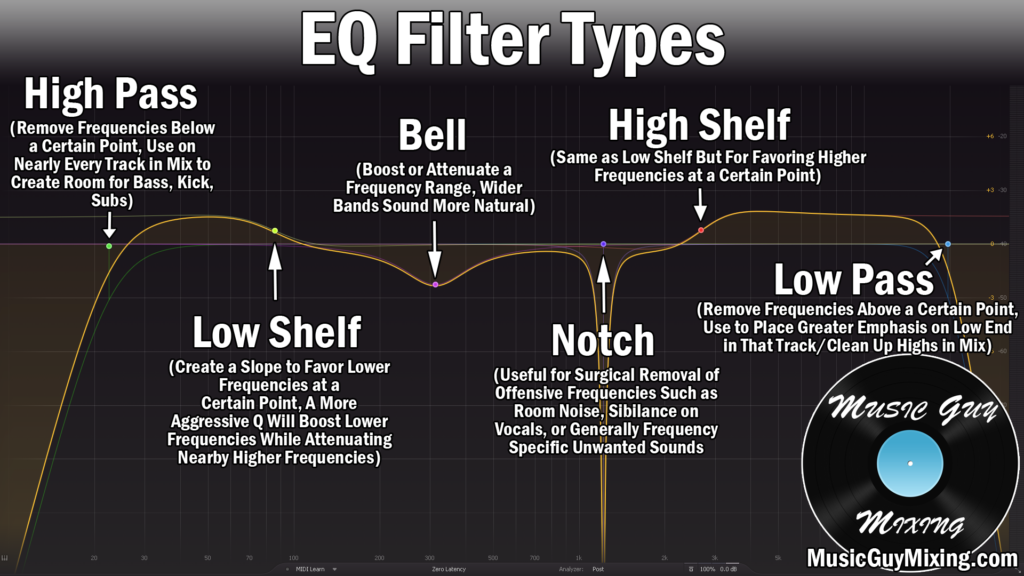
To help you find other problematic areas, you can use the following guide.
The Ultimate EQ Cheat Sheet for Every Common Instrument
This 'Ultimate EQ Cheat Sheet' from the Sonicbids blog provides a fantastic, practical reference for common frequency areas to look at when EQing synths.
Read the subsection titled 'Synths'. It gives you a great starting point for where to look for common issues.
Based on that reading, here are the key areas to investigate in your synth sounds:
- 400-600 Hz (Thickness/Mud): This range can make synths sound muddy and unclear, especially when you have multiple layers. A cut here can often open up the sound surprisingly well.
- 1-2 kHz (Cut/Bite): This is where a synth's character often lives. If a synth is too aggressive or masking vocals, a cut in this range can help tuck it back into the mix.
- 3-4 kHz (Presence/Clarity): Boosting here can add excitement, but be careful. Too much can make a synth sound harsh or painful.
2. Dynamic Control and Cohesion with Compression
Once your synth layers are tonally balanced with EQ, the next step is to control their dynamics and "glue" them together so they feel like a single instrument. This is where compression comes in. By routing all your synth layers to a single bus (or a "submix" as it's called in the video), you can process them as one unit.
Let's return to the FireWalk video to see this in action.
How To Layer Leads Properly (Mixing Tutorial)
Picking up where we left off, the video now demonstrates how to use a submix for unified processing, including compression, to make the layers cohesive.
Watch from 08:28 to 12:00. Notice how he routes the individual synth tracks to a new mixer track and then applies compression to that group. This is a crucial workflow technique.
The video mentions FL Studio's Soundgoodizer, and correctly points out that it's just a simplified interface for Maximus, FL Studio's powerful multiband compressor. Since you're comfortable in FL Studio, learning to use Maximus directly will give you far more control.
A compressor on a synth bus is typically used to achieve two things:
- Tame Transients: Smooth out any sharp, spiky attacks that might be poking out of the mix too much.
- Add Glue: By compressing the grouped signal, you reduce the overall dynamic range, making the layers feel more connected and powerful.
The official FL Studio manual for Maximus contains excellent tutorials. While a manual can be dense, the diagrams and explanations of how compression works are incredibly clear. We'll use this as a reference.
Skim the section titled 'Compression'. Don't worry about memorizing it. Focus on the diagrams that show the compression curve (the input vs. output graph). This visual representation is the key to understanding any compressor, not just Maximus. See how a flat line at the top creates 'Limiting', while a gentler curve creates 'Compression'.
Practical Steps for Synth Bus Compression in FL Studio:
- Route your layered synth tracks to a new, empty mixer track (this is your bus).
- Load
Fruity Limiter(in 'COMP' mode) orMaximusonto the bus. - Start with a low ratio (2:1 or 3:1) and a medium attack (10-20ms).
- Lower the threshold until you see about 2-4 dB of gain reduction on the loudest parts.
- Adjust the release time so the compressor "breathes" in time with the music.
- Use the makeup gain to bring the overall level back up. The goal is to control dynamics, not just make it quieter.
3. Creating Width and Space with Stereo Imaging
Now that your synths sound clear and cohesive, the final step is to place them in the mix. A common problem is having a wide synth pad or a mono lead sound clashing with the central elements of your mix, like the vocal, kick, and snare. Stereo imaging is the tool we use to create width and solve this problem.
Stereo Width Production Trick For Clarity and Space
This tutorial from In The Mix demonstrates a fantastic trick for taking a mono keyboard sound and giving it stereo width to make space for a vocal. The principle applies to any synth or keyboard part that feels too centered.
Watch from 00:00 to 04:12, and then the mono compatibility check from 04:57 to 06:39. Pay close attention to: How he uses a stereo imager plugin to widen the sound. The visualizer that shows the sound moving from mono (a vertical line) to stereo (a wider shape). The crucial step of checking the mix in mono to ensure the widened sound doesn't disappear due to phase cancellation.
The most important rule of stereo widening is to use it with purpose. Don't try to make everything wide, or you’ll end up with a blurry, unfocused mix with no center. Instead, pick one or two elements, like a synth pad or harmony part, and widen them to create contrast with your central elements.
FL Studio's Maximus has a stereo separation knob for each frequency band, and Fruity Stereo Enhancer is another great native tool for this job.
Test your understanding!
You have two layered synth pads that sound muddy together. After you use EQ to fix the muddiness, the combined sound is clear but feels dynamically inconsistent and is sitting right on top of your lead vocal, making it hard to hear.
Describe a three-step processing chain you would apply to a bus containing both synth pads to solve these remaining issues.
Show answer
- Compression: Use a compressor on the bus with a low ratio to "glue" the layers and create a more consistent dynamic range.
- Stereo Imaging: Use a stereo imager to widen the pads, moving them out to the sides and away from the center, creating space for the lead vocal.
- Mono Check: After widening, switch the master channel to mono to ensure the pads don't vanish or sound thin due to phase issues.
Conclusion
You now have a complete, three-step workflow for integrating synthesizers and keyboards into your mix. By following this process—first carving out tonal space, then controlling dynamics, and finally positioning the sound in the stereo field—you can ensure your synths support the song without overwhelming it.
Key Takeaways:
- EQ First: When layering synths, use EQ to give each sound its own frequency space. Always start with a high-pass filter to remove unneeded low-end.
- Compress for Glue: Route synth layers to a bus and apply gentle compression to control dynamics and make them feel like a single, cohesive unit.
- Widen with Purpose: Use stereo imaging to create width and separation from central elements like vocals, but always check your mix in mono to avoid phase problems.
- Workflow: The logical order of processing is generally Subtractive EQ -> Compression -> Stereo Imaging -> Additive/Tonal EQ.
Preview of Next Lesson:
We have now addressed all the core instrumental sections: the rhythm foundation (kick, snare, drums), the low-end (bass), and the harmonic content (synths/keyboards). In our next lesson, we will focus on the final instrumental element: blending background vocals and harmonies with the lead vocal using volume, panning, and effects. This will complete our instrumental mix and prepare us for the final vocal mixing stage.