Hello! Welcome to the final module of your sound engineering course.
Over the past nine modules, we have built a song from the ground up. We've set up our project, recorded and edited vocals, and then meticulously mixed every element—drums, bass, synths, and vocals—using EQ, compression, and effects to create a balanced, cohesive whole. You now have a finished mix. So, what's next?
This lesson begins our journey into mastering, the final and often misunderstood stage of audio production. Our goal today is to answer the fundamental question: what does mastering actually do? To achieve this, we will describe the primary goals of mastering by comparing a final mix to a commercial master. By the end of this lesson, you will understand what mastering aims to achieve and why it is the crucial final step before sharing your music with the world.
1. From Mixing to Mastering: A Shift in Perspective
In mixing, your focus was on the individual parts of the song—balancing the kick against the bass, carving out space for the vocal, and making sure the synths sit well together. You were working with many tracks to create a single stereo file.
Mastering is different. Here, you work with just that one stereo file—the final mix. The mindset shifts from the individual trees (the tracks) to the entire forest (the song).
A helpful analogy might be to think of your work as a supervisor at a moving company.
- Mixing is like meticulously packing individual boxes. You make sure each box has the right items, they're protected, and nothing inside is rattling around or broken.
- Mastering is like loading the truck. You take all the finished boxes (the mixes) and arrange them so the weight is balanced, everything is secure, and the entire load is ready for a safe journey to any destination—whether it's across town or across the country.
In mastering, your "destinations" are all the different playback systems: earbuds, car stereos, laptop speakers, club sound systems, etc.
To get a clearer picture of this distinction, let's hear from a professional mastering engineer.
Are You Listening? Ep. 1 | Audio Mastering Basics
The video 'Are You Listening? Ep. 1 | Audio Mastering Basics' from iZotope features mastering engineer Jonathan Wyner. He provides an excellent explanation of the different mindsets for mixing and mastering.
Watch from 03:37 to 05:51. Pay close attention to two key ideas: The Mix vs. Master Mindset (03:37 - 04:35): How mastering is about being 'zoomed out' and looking at the 'forest instead of the individual trees'. The Two Halves of Mastering (04:35 - 05:51): Mastering isn't just about changing the sound; it's also about preparing the track for distribution in the real world.
As Jonathan Wyner explains, mastering has two primary goals:
- Enhancement (The Creative Goal): This is the "last chance to change the sound." It involves making subtle adjustments to improve the overall tonal balance, dynamics, and stereo width to make the mix sound more polished, powerful, and professional. It's about making the song "shine."
- Preparation (The Technical Goal): This is about "getting it ready to go out into the world." This includes ensuring the song translates well across all playback systems, has a competitive loudness for its genre, and meets the technical specifications for streaming services, CDs, or vinyl. This is the quality control aspect.
2. Hearing the Difference: Guided Listening
The best way to understand mastering is to hear it. A finished mix can sound good, but a great master makes it feel complete. Let's listen to some before-and-after examples.
We'll start with a video that directly compares a mixing engineer's final mixes with the final mastered versions of commercially released songs. As you listen, try to identify the changes yourself before the presenter points them out.
My mixes before and after mastering
In 'My mixes before and after mastering' from Hardcore Music Studio, the presenter plays his own professional mixes back-to-back with the final masters. This provides a fantastic real-world insight into what mastering adds.
Watch from 00:40 to 10:06. The presenter compares three different songs. For each one, he first plays the mix and master at different volumes, then level-matches them to compare the tone. Track 1 (Emery, 00:40 - 05:22): Listen for how the master becomes 'warmer' and 'thicker', especially in the guitars, while the drums keep their impact. Track 2 (Auras, 06:14 - 07:59): Notice how this master is the opposite—it gets 'brighter' and more focused in the upper-mids. Track 3 (Intervals, 07:59 - 10:06): Pay attention to the snare drum. He describes the master as having a 'crunchy' and 'squashed' sound that helps it sit in the mix better.
What did you notice?
- Loudness: The most obvious difference is that the masters are significantly louder.
- Tonal Balance: The changes were different for each song. One became warmer, another brighter. This shows that mastering isn't a one-size-fits-all process; it's about what the specific song needs to sound its best.
- Dynamics: The masters often sound more controlled and "glued together." The loud parts (like snare hits) are tamed without losing their punch, making the overall track feel more powerful and cohesive.
Here is another quick comparison.
What is the difference between mixing and mastering?
The article 'What is the difference between mixing and mastering?' from iZotope provides another clear example. Listen to the two audio clips to hear the changes.
Scroll down to the section 'What does a mixed song vs. a mastered song sound like?'. Listen to the 'Mix Example' and then the 'Master Example'. The author notes that the master has 'added excitement in the drums, an additional clarity to the vocal, a new separation among the harmonic instruments'. See if you can hear these subtle improvements.
3. The Pro Technique: Using Reference Tracks
So, how does a mastering engineer know how bright, loud, or punchy to make a track? They don't just guess. They use reference tracks.
A reference track is a professionally produced, commercially released song in a similar genre and style to the one you're working on. You use it as a benchmark to guide your mastering decisions. It helps you answer questions like:
- Is my track's low-end powerful enough compared to other songs in this genre?
- Is my vocal as clear and present as it should be?
- Is my track loud enough to compete on streaming platforms?
Using a reference track keeps your ears calibrated and your decisions objective.
Mixing and Mastering with Reference Tracks
The article 'Mixing and Mastering with Reference Tracks' from Sonarworks provides a great overview of how to choose and use references.
Read these three key sections: 'How do I choose good reference tracks?': This gives you criteria for picking songs that will be genuinely helpful. 'Match the volume of the reference tracks to your mix/master': This is the single most important step. Our ears perceive louder music as sounding better (with more bass and treble), so you MUST turn the commercial reference track down to match the volume of your own mix to make a fair comparison. 'Referencing checklist': This provides a fantastic list of specific things to listen for when comparing your track to the reference.
In FL Studio, this process is simple: you just drag the high-quality audio file of your reference track onto a new audio track in the Playlist. You can then use the channel fader to turn it down and the mute/solo buttons to switch between your mix and the reference.
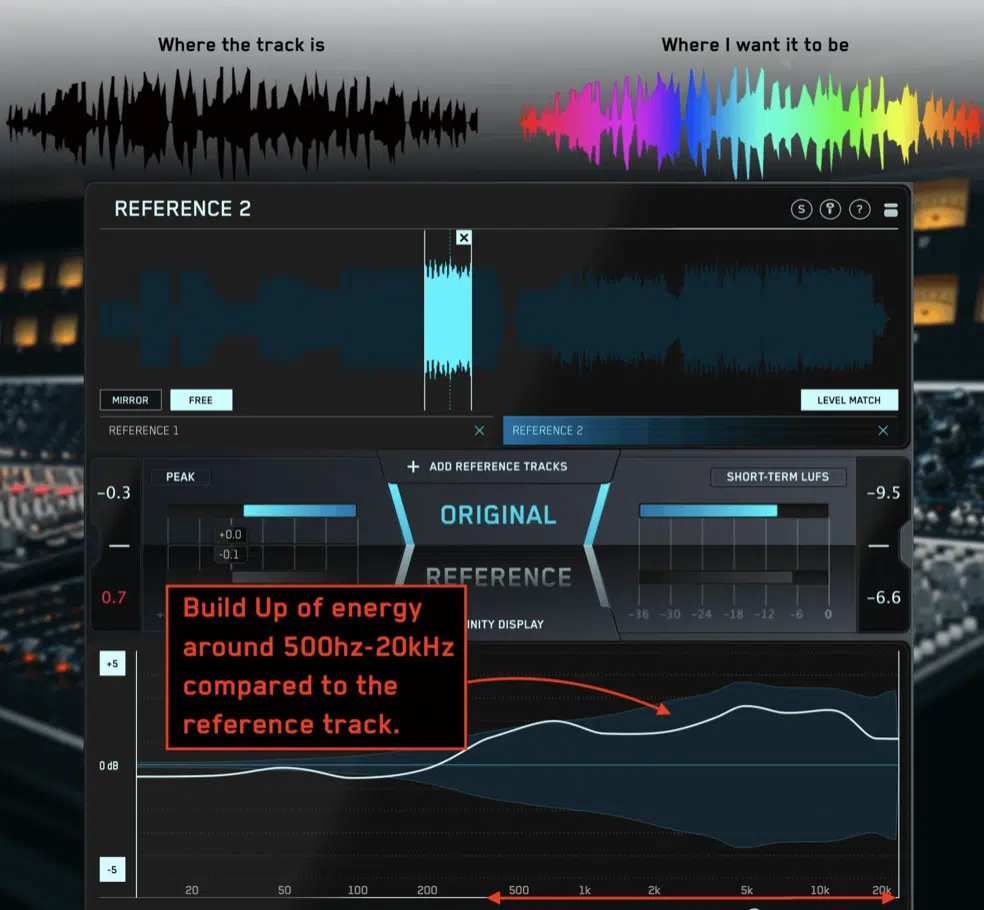
Modern plugins even have this functionality built-in, allowing for seamless A/B comparison and providing visual feedback.

Test your understanding!
You've finished a mix of an R&B song. It sounds good, but you're not sure if it will stand up against other modern R&B tracks on Spotify. What is the first thing you should do, and what is the most critical step in that process to ensure you are making a fair comparison?
Show answer
- First Thing to Do: Find 1-2 high-quality, commercially released R&B songs that have a similar vibe and instrumentation to use as reference tracks.
- Most Critical Step: Import the reference tracks into your FL Studio project and level match them. This means turning the volume of the loud, commercial tracks down to match the perceived loudness of your own, quieter mix. This removes the "louder is better" bias and allows you to make an objective comparison of tonal balance, dynamics, and width.
Conclusion
Today, we've demystified mastering by defining its core purpose. It's not about magic tricks; it's a discipline of critical listening and subtle, targeted adjustments aimed at achieving two clear goals.
Key Takeaways:
- Mastering vs. Mixing: Mixing focuses on balancing individual tracks within a song, while mastering focuses on polishing the final stereo mix as a whole.
- The Two Goals of Mastering:
- Enhancement: Making the track sound more polished, powerful, and professional through subtle EQ, compression, and stereo adjustments.
- Preparation: Ensuring the track is at a competitive loudness and translates well on all playback systems, from tiny earbuds to massive club speakers.
- The Power of Comparison: The best way to understand mastering is to compare a mix to its final master. The most important tool for guiding your own mastering decisions is the reference track.
- Level Matching is Crucial: To avoid being fooled by loudness, you must always turn down your commercial reference tracks to match the level of your own mix before comparing.
Preview of Next Lesson:
Now that you understand what mastering is, it's time to learn how to do it. In the next lesson, we will begin building our mastering chain. We will start with the first and one of the most important tools: the equalizer. You will learn how to apply subtle EQ to shape the overall tonal balance of the final mix.