Hello! Welcome back to our work on mixing the instrumental.
In the last lesson, we focused on the individual building blocks of our rhythm section, using EQ and compression to give the kick and snare their own distinct punch, body, and snap. But great drum mixing isn't just about individual sounds; it's about making the entire kit feel like a single, powerful unit.
Today, we're going to learn a classic and powerful technique to achieve just that. Our goal is to use parallel compression on a drum bus to add power and weight to the overall drum kit. This method, sometimes called "New York" compression, is a secret weapon for making drums sound bigger, fatter, and more exciting, without sacrificing the natural dynamics we worked to preserve.
1. What is Parallel Compression?
Before we dive into FL Studio, let's clarify the concept.
In the last lesson, we applied compression directly to our kick and snare tracks. This is called insert processing. Parallel compression is different. The core idea is to process a copy of the signal and blend it back in with the original.
Here's the breakdown:
- You have your original, unprocessed (or lightly processed) drum bus. We'll call this the "dry" signal. It has all the natural transients and dynamic feel.
- You create a duplicate of this signal on a separate mixer track. We'll call this the "wet" or "parallel" signal.
- You apply very heavy, aggressive compression to this wet signal, completely crushing its dynamic range.
- You then blend a small amount of this crushed wet signal back in with the original dry signal.
A Guide to Parallel Drum Compression Techniques
The article 'A Guide to Parallel Drum Compression Techniques' gives a great explanation of this 'best of both worlds' approach.
Read the sections 'What is parallel compression?' and 'What does parallel compression do to drums?'. Focus on how this technique unites the advantages of both compressed and natural recordings, preserving transients while adding body and sustain.
By doing this, you get the punchy transients and natural groove from the dry signal, plus the thickness, body, and increased perceived loudness from the heavily compressed wet signal. It's a way to add power without making the drums sound lifeless or squashed.
2. How to Set Up Parallel Compression on a Drum Bus
Let's get practical. Since you're comfortable in FL Studio, we'll walk through the exact steps to set this up.
Step 1: Create a Drum Bus
First, you need all your individual drum sounds (kick, snare, hi-hats, etc.) to be routed to a single mixer track. This is your "drum bus" or "subgroup". This allows you to process the entire kit as one cohesive element. If you haven't already, select all your individual drum tracks in the mixer, right-click an empty mixer track, and choose "Route to this track only".
Step 2: Create the Parallel Channel
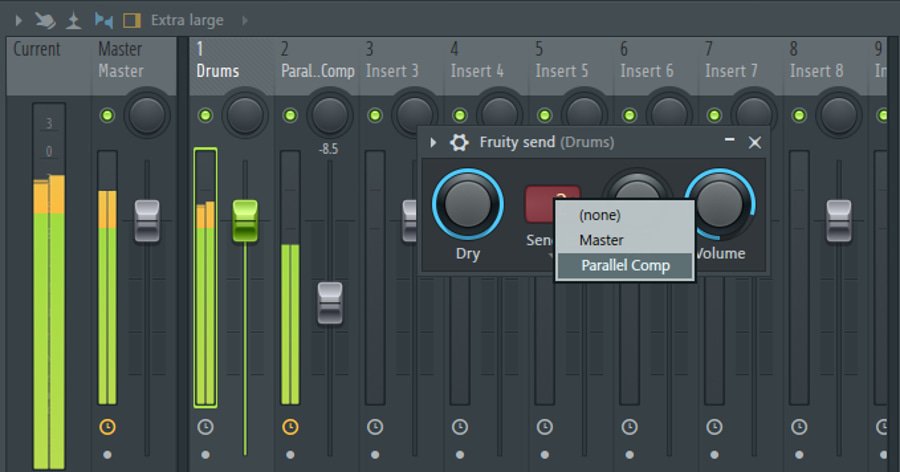
Now we need to create our "wet" channel. We'll send a copy of the drum bus signal to another empty mixer track. The LINK video and LINK article both demonstrate a great method for this in FL Studio using the Fruity Send plugin.
Parallel Compression On Drums And Vocals EXPLAINED!!! | FL Studio Tutorial
The video 'Parallel Compression On Drums And Vocals EXPLAINED!!!' shows this FL Studio workflow very clearly. We'll watch the section covering the routing and compression setup.
Watch from 01:05 to 08:05. Pay close attention to these steps: Routing the individual drums to a drum bus. Using 'Sidechain to this track' to link the drum bus to a new parallel channel (he calls it 'drum comp'). Adding the 'Fruity Send' plugin to the drum bus to send the audio to the parallel channel. Applying heavy compression to the parallel channel, first with a third-party plugin and then with the stock Fruity Limiter. Blending the compressed channel back in with the original.
To reinforce this process, here's a visual guide for the routing part using Fruity Send.
Step 3: Apply Aggressive Compression
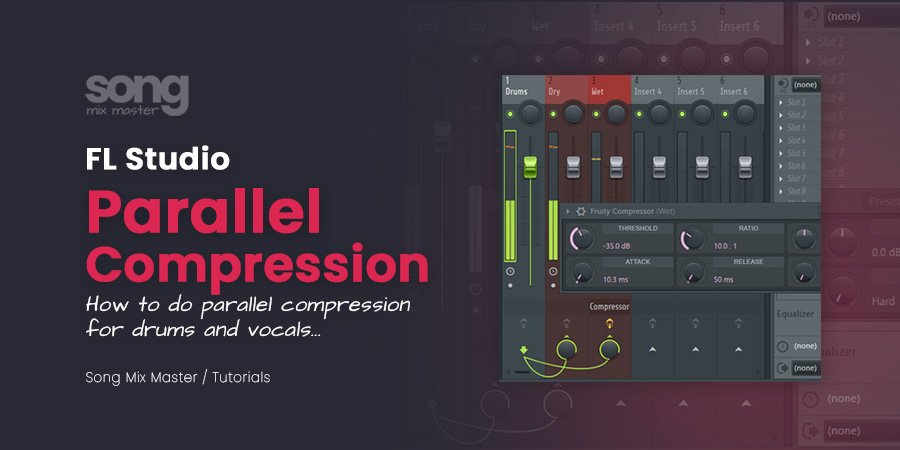
This is where the magic happens. On your new parallel channel, add a compressor. Unlike our previous compression, we are not aiming for subtlety here. We want to obliterate the dynamics.
Here are your target settings, as also mentioned in the LINK article under "What is the best setting for parallel compression?":
- Attack: Very fast (0-5 ms). We want to clamp down on the transients immediately.
- Ratio: Very high (10:1 up to 20:1 or even higher). This is often called "brick wall" compression.
- Threshold: Pull it down low until you see a large amount of gain reduction (10 dB or more is common).
- Release: Fast to medium. Tune this by ear so the compressor "breathes" in time with the track's groove.
Step 4: Blend to Taste
This is the final and most crucial step. Start with the fader for your parallel channel all the way down. While your full drum bus is playing, slowly raise the fader of the parallel channel. Listen carefully. You're looking for the point where the drums feel fuller, more powerful, and have more sustain, but before you can overtly hear the "squashed" sound of the parallel channel on its own. It's about adding weight and energy that is felt more than heard.
Test your understanding!
You've set up your parallel compression bus and are blending it in. You notice the drums sound more powerful, but the cymbals also become harsh and "washy," cluttering the mix. What could you do on the parallel channel to fix this while keeping the punch on the kick and snare?
Show answer
You could place an EQ before the compressor on the parallel channel. By using a high-pass filter to roll off some of the low-end rumble and a low-pass filter (or a high-shelf cut) to tame the high frequencies from the cymbals, you are "shaping" the signal that gets heavily compressed. This allows you to focus the parallel compression's power on the mids (where the kick's body and snare's crack live) without exaggerating unwanted hiss or rumble.
3. The "New York" Drum Trick: Compression + EQ
A famous variation of this technique, often called "New York Compression," adds an EQ to the parallel chain.
A Guide to Parallel Drum Compression Techniques
The article 'A Guide to Parallel Drum Compression Techniques' describes this popular variant.
Read the section 'New-York style of applying parallel compression'. Notice the two key EQ boosts after the aggressive compression.
The process is simple:
- Set up your parallel compression as described above.
- After the compressor on your "wet" channel, add a parametric EQ.
- Apply a significant boost in the low end (around 100 Hz) to add "thump" and a significant boost in the high end (around 10 kHz) to add "sizzle" or "air".
- Blend this compressed and EQ'd signal back in with your dry drum bus.
This exaggerates the most impactful frequencies, creating an even more punchy, exciting, and "finished" sound when blended in subtly.
Conclusion
You now have a powerful technique for adding professional weight and cohesion to your drums. By blending a heavily processed signal with your clean drum bus, you can make your rhythm section hit harder and feel more unified, all while keeping its natural dynamic life.
Key Takeaways:
- Parallel compression is about blending a heavily compressed "wet" signal with the original "dry" signal.
- The goal is to add power, body, and sustain without destroying the natural transients of the drums.
- The setup in FL Studio is straightforward: route drums to a bus, use Fruity Send to create a parallel channel, apply aggressive compression to that channel, and blend the fader to taste.
- For an even more powerful sound, try the "New York" trick by adding large low-end and high-end EQ boosts to the compressed signal before blending.
The best way to understand this is to try it. Open a project in FL Studio, set this up on your drums, and experiment with the compressor settings and the blend level. Your ears will tell you when it feels right.
Preview of Next Lesson:
Our drums now sound fantastic—powerful and glued together. Our next challenge is ensuring they don't fight with the bass, which occupies a similar low-frequency space. In the next lesson, we will learn how to carve out space between the kick drum and bass guitar using EQ and sidechain compression, creating a clean, defined, and powerful low end for your mix.