Hello! Welcome to a new module focused on mixing the instrumental.
In the previous module, we crafted a polished, professional lead vocal. We took it from a raw recording all the way to a finished element, using automation to ensure it sits perfectly in the mix. But a great vocal needs a powerful instrumental foundation to support it.
This lesson marks our first step into mixing the rhythm section, the very backbone of your track. Our goal is to learn how to apply EQ and compression to a kick drum and snare to achieve punch, snap, and body. A solid kick and snare combination provides the energy and groove that drives most modern music, so getting this right is essential. Your experience in FL Studio will allow you to put these techniques into practice immediately.
1. The Kick Drum: Building a Powerful Foundation
Before we start turning knobs, it's helpful to understand what we're listening for. A kick drum sound can be broken down into three parts:
- Transient: The initial, sharp "click" or "thwack" of the beater hitting the drum skin. This part helps the kick cut through the mix. It lives in the high-mids and highs.
- Body: The fundamental "thud" or "boom" of the drum. This is where the weight and power come from. It lives in the low-mids and bass.
- Tail: The sub-bass resonance or "rumble" that follows the body. This is what you feel in your chest. It lives in the sub-bass frequencies.
Our goal with EQ and compression is to balance these three parts to fit the song.
EQing the Kick for Punch and Body
EQ is our primary tool for tonal shaping. We'll use it to clean up unwanted frequencies and enhance the ones that give the kick its character.

The video below provides a fantastic, practical demonstration of how to EQ a kick in FL Studio. It breaks down the key frequency areas and what they contribute to the sound.
Mix Kicks Like A Pro | Full Masterclass
The video 'Mix Kicks Like A Pro' from Mix Elite provides a detailed walkthrough of kick EQ. We'll focus on the section that identifies and adjusts the most important frequency zones.
Watch from 04:55 to 10:25. As you watch, listen for how adjusting each frequency range affects the kick's character. Pay close attention to: Cutting 'muddy' or 'boxy' frequencies around the 300-600 Hz range to clean up the sound. Boosting the 'punch' around 60-150 Hz. Boosting the 'click' or 'beater attack' in the high-mids to help it cut through the mix.
As a quick reference, here are the key frequency areas to keep in mind, based on the video and the "Ultimate Drum Mixing Cheat Sheet" resource.
The Ultimate Drum Mixing Cheat Sheet
For a concise summary of these frequency areas, let's refer to the 'The Ultimate Drum Mixing Cheat Sheet'.
Find the heading 'EQ Cheat Sheet for Individual Drums' and read the subsection for the 'Kick Drum'. This provides a clear, actionable list of frequency ranges and their effects, such as 'Punch/Body (60-100 Hz)' and 'Boxiness (300-600 Hz)'.
Compressing the Kick for Punch
Once the kick's tone is right, we use compression to shape its dynamics and add punch. The key to adding punch is to use a slow attack setting on your compressor. This allows the initial transient (the "click") to pass through untouched before the compressor clamps down on the body and tail. This makes the transient relatively louder, creating the sensation of punch.
The following video gives an brilliant visual explanation of this effect.
Magic Compressor Settings for KICK & SNARE
Let's watch 'Magic Compressor Settings for KICK & SNARE' from Hardcore Music Studio. The presenter provides an incredibly clear demonstration of how a slow attack works.
Watch from 01:05 to 06:20. The core concept is explained using a snare, but it's the same for a kick. Notice how processing a simple waveform with a slow attack and makeup gain actually creates a transient visually. Then see how this is applied to both the snare and kick to make them sound punchier, like they're being 'hit harder'.
Here are some typical starting settings for compressing a kick for punch:
- Attack: Slow (30-100 ms)
- Release: Fast to Medium (50-150 ms), timed so it "breathes" with the tempo.
- Ratio: 3:1 to 6:1
- Gain Reduction: Aim for 3-6 dB of reduction on the meter.
- Makeup Gain: Adjust to match the level before compression.
2. The Snare Drum: Adding Snap and Body
The snare provides the backbeat and crack of the rhythm section. Like the kick, it has key frequency areas that define its sound:
- Body/Fatness (150-250 Hz): The fundamental tone and weight.
- Boxiness (400-900 Hz): A problem area that can make the snare sound like a cardboard box.
- Crack/Attack (3-6 kHz): The "snap" of the stick hitting the head. This is key for cutting through the mix.
- Sizzle/Wires (8-12 kHz): The brightness from the snare wires on the bottom of the drum.
EQing the Snare for Snap and Body
We'll use the same subtractive and additive EQ philosophy: cut the bad, boost the good.
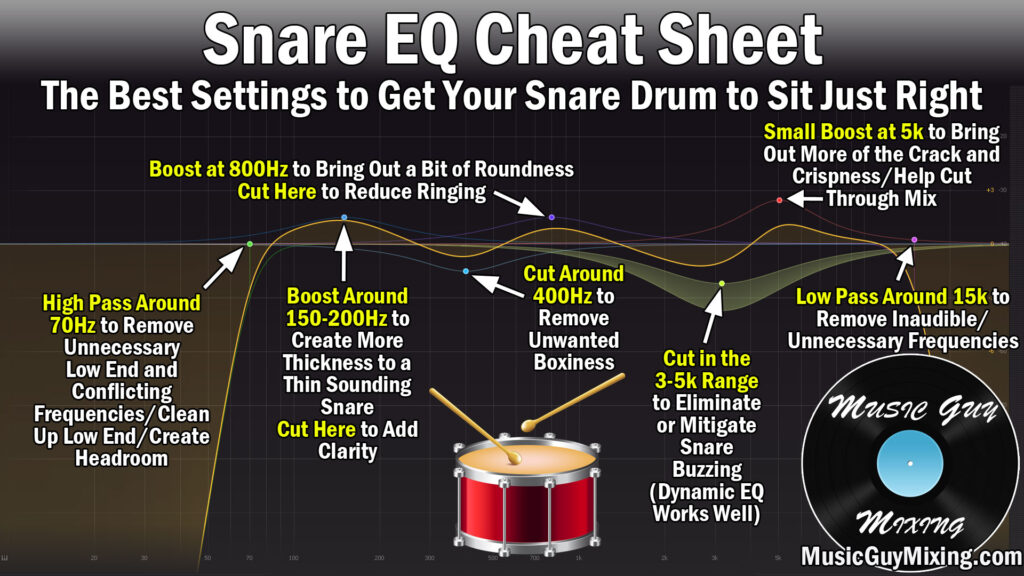
A typical EQ approach for a snare would be:
- High-Pass Filter (HPF): Cut everything below 100-120 Hz to remove low-end rumble and make space for the kick.
- Cut Boxiness: Use a narrow EQ band to cut frequencies in the 400-900 Hz range.
- Boost Body: If the snare sounds thin, a wide boost around 150-250 Hz can add weight.
- Boost Crack: To make the snare "snap," boost in the 3-6 kHz range.
Test your understanding!
Your snare drum sounds full and has a nice weight to it, but it gets lost behind the guitars and synths. It lacks "snap" and doesn't cut through the mix. Which frequency range would you boost with your EQ to fix this?
Show answer
You would boost the 3-6 kHz range. This is where the "crack" or "attack" of the snare lives, and enhancing this area will help it cut through other instruments in the mix.
Compressing the Snare for Snap and Sustain
Compression on the snare follows the same principle as the kick. A medium-to-slow attack will emphasize the initial "snap." A faster attack will clamp down on the transient and bring up the body and sustain, making the snare sound "fatter" and longer.
The Ultimate Drum Mixing Cheat Sheet
For specific starting points for snare compression, let's revisit 'The Ultimate Drum Mixing Cheat Sheet'.
Find the heading 'Compression Cheat Sheet for Individual Drums' and read the subsection for the 'Snare Drum'. Note the different effects of a medium attack (emphasizing attack) vs. a faster attack (bringing out body).
- To emphasize attack ("snap"): Use a medium attack (10-30 ms).
- To emphasize body ("fatness"): Use a faster attack (1-5 ms).
- Release: Set it to taste, often timed with the song's tempo. A fast release can bring up more of the drum's natural ring and sustain.
- Ratio: A ratio between 4:1 and 8:1 is a good starting point.
Conclusion
You now have the fundamental tools to shape the two most important elements of your drum sound. By using EQ and compression thoughtfully, you can take any kick and snare and give them the punch, weight, and snap they need to drive your track.
Key Takeaways:
- EQ is for Tone: Use it to remove problematic frequencies (like "boxiness" around 400 Hz) and enhance characteristic ones (like kick "punch" at 80 Hz or snare "crack" at 5 kHz).
- Compression is for Shape: Use a slow attack to let the initial transient through, which adds punch and snap. Use a fast release to bring up the body and sustain of the drum.
- It's a Partnership: EQ and compression work together. Often, the best workflow is:
- Subtractive EQ: Clean up mud and boxiness.
- Compression: Shape the dynamics for punch and consistency.
- Additive EQ: Boost frequencies to enhance character now that the sound is controlled.
Your most valuable tool is your ears. Open up FL Studio, load a drum loop, and experiment. Exaggerate the settings to clearly hear what each parameter does. This hands-on practice is the fastest way to master these skills.
Preview of Next Lesson:
Our kick and snare now sound great individually, but how do we make them sound like they belong to a single, cohesive, and powerful drum kit? In our next lesson, we'll learn how to use bus processing. We'll route our drums to a single channel and apply parallel compression to add weight and "glue" to the entire rhythm section, making it sound larger than life.