Hello! Welcome back to our work on mixing the instrumental.
In our last lesson, we gave the drum kit a huge dose of power and cohesion using parallel compression. The result is a drum bus that sounds fat and exciting. However, this creates a new challenge. The kick drum, now full of energy, is likely competing for space with the bass, as they both dominate the low-end of the frequency spectrum. This conflict can lead to a "muddy" or undefined sound where neither instrument has the impact it should.
Today, we'll tackle this head-on. Our goal is to carve out space between the kick drum and bass guitar using EQ and sidechain compression. This is one of the most crucial skills in modern mixing for achieving a clean, punchy, and powerful low end.
1. The Problem: Frequency Masking in the Low End
Before we jump into the techniques, let's quickly define the problem. When two instruments have significant energy in the same frequency range, our ears can have trouble distinguishing them. This is called frequency masking. For the kick and bass, this clash almost always happens in the sub-bass and bass regions (roughly 50 Hz to 200 Hz).
While panning is often a solution for separating instruments, it's not ideal here. The kick and bass are the foundation of your track's groove and power, and they almost always sound best when placed in the center of the mix.
So, we need a different approach. We'll explore two: a static method using EQ and a dynamic one using sidechaining.
2. Method 1: Static EQ for Separation
The most straightforward way to create space is with equalization. The idea is to find the most important frequencies for each instrument and then "carve out" a little space for them in the other. This is often called "reciprocal EQ."
Here's a common approach:
- Find the Kick's Fundamental: Put a parametric EQ with a spectrum analyzer (like FL Studio's Fruity Parametric EQ 2) on your kick track. Find the frequency where it has the most energy—its fundamental. This is often between 50 and 80 Hz.
- Cut the Bass: On your bass track's EQ, apply a narrow, subtle cut (around 2-3 dB) at the kick's fundamental frequency.
- Find the Bass's Fundamental: Now, identify the fundamental frequency of your bass line. This will likely be a bit higher than the kick, perhaps around 80-150 Hz, depending on the notes being played.
- Cut the Kick (Optional): You can apply a similar subtle cut on the kick track at the bass's fundamental frequency.

The Limitation: This method is static. The EQ cut on the bass is always there, even when the kick isn't playing. This can sometimes thin out the bass sound when you don't want it to. This leads us to a more elegant, dynamic solution.
3. Method 2: Sidechain Compression for Dynamic Space
Sidechain compression is the definitive modern technique for this problem. Instead of a permanent EQ cut, it dynamically lowers the volume of the bass for a split second, only when the kick hits. This is often called "ducking." It's highly effective and, when set correctly, completely transparent to the listener.
Since you're proficient in FL Studio, we'll go through the exact workflow using the stock Fruity Limiter.
Step 1: Routing the Sidechain
First, you need to tell the bass track to "listen" to the kick track.
- Select your Kick track in the FL Studio Mixer.
- Right-click the small arrow at the very bottom of your Bass track's fader.
- From the context menu, select "Sidechain to this track." A green cable will appear, visually confirming the link.
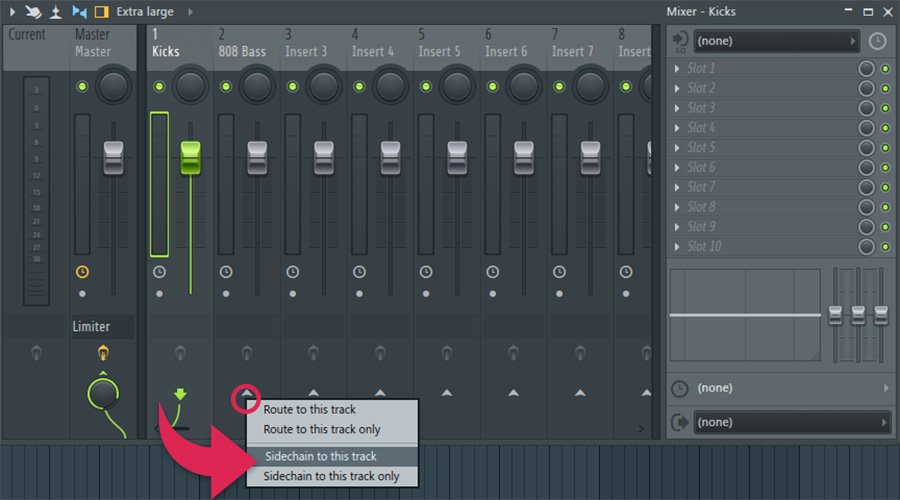
Step 2: Setting up the Compressor
Now, we'll put a compressor on the bass track and configure it to react to the kick signal.
How To Sidechain in FL Studio 12 - Kick and Bass Clarity - Fruity limiter
The 'In The Mix' channel has an excellent, straight-to-the-point tutorial on setting up sidechain compression in FL Studio. This will walk you through the entire process, from routing to dialing in the settings.
Watch from the beginning up to 03:43. Pay close attention to: The routing step we just discussed. How to load the Fruity Limiter and switch it to 'COMP' (compressor) mode. How to select the kick as the sidechain input in the bottom-right corner of the plugin. How to adjust the Threshold, Ratio, Attack, and especially the Release by ear to get the right pumping effect.
As the video demonstrates, the key parameters to adjust on the Fruity Limiter (in COMP mode) on your bass track are:
- Sidechain Input: Right-click the "Sidechain" box and select your kick channel.
- Threshold: Lower this until you see and hear the bass level dipping each time the kick hits. The lower the threshold, the more the signal is affected.
- Ratio: This controls how much the bass is compressed. A higher ratio (e.g., 4:1 to 8:1) creates a more dramatic ducking effect.
- Attack: Keep this very fast (near 0 ms) so the bass ducks out of the way the instant the kick hits.
- Release: This is the most important control for tuning the feel. It determines how quickly the bass returns to its full volume.
- A short release will create a quick, tight pump.
- A long release will create a more obvious, breathing "sucking" effect, which is a signature sound in many electronic genres.
Test your understanding!
You've set up sidechain compression, but the bass sounds like it's "sucking" too much and losing its groove long after the kick has faded. Which single parameter on the Fruity Limiter is most likely set too high and needs to be adjusted to fix this?
Show answer
The Release time. A release time that is too long will keep the bass volume suppressed for too long after the kick has hit, creating that "sucking" or "pumping" sound. By shortening the release time, the bass will return to its normal volume more quickly, right after the kick's transient has passed.
4. Advanced Method: Frequency-Specific Sidechaining
Sometimes, ducking the entire bass signal can be too much. For example, if you have a complex bass sound with interesting midrange texture, you might not want that texture to disappear every time the kick hits. A more surgical approach is to only duck the specific low frequencies that are clashing.
This can be done in FL Studio using the Fruity Peak Controller to drive a dynamic EQ band.
How To Sidechain ONLY the Bass and Sub Frequencies
While full-band sidechaining is great, sometimes you need a more transparent effect. This next video, also from 'In The Mix', shows how to sidechain only the low frequencies of the bass, preserving its character. This is a very powerful mixing technique.
First, watch from 00:19 to 01:40 to understand why you'd want to use this technique. Then, skip ahead to 04:52 and watch until 08:24. This section demonstrates a fantastic method using the 'Fruity Peak Controller' on the kick to automate an EQ band on the bass. Pay close attention to the 'Link to controller' and 'Inverted' mapping steps.
To summarize the video's workflow:
- On the Kick Track: Add
Fruity Peak Controller. - On the Bass Track: Add
Fruity Parametric EQ 2. - Link them: On the EQ, select the low-frequency band you want to duck. Right-click its gain knob and choose "Link to controller."
- Map them: In the settings window, set the "Internal controller" to the kick's Peak Controller and the "Mapping formula" to "Inverted."
Now, the peak of the kick will dynamically dip the low-end of your bass, leaving the mids and highs untouched. This provides incredible clarity in the low-end without affecting the overall tone of your bass.
Conclusion
You now have a complete toolkit for resolving one of the most common conflicts in mixing. By creating space between the kick and bass, your rhythm section will sound tighter, punchier, and more professional.
Key Takeaways:
- Kick and bass often clash in the low frequencies, causing muddiness.
- Static EQ is a simple fix but can thin out the bass sound unnecessarily.
- Sidechain Compression (using
Fruity Limiter) is a dynamic solution that ducks the entire bass volume when the kick hits. TheReleasetime is key for tuning the effect. - Frequency-Specific Sidechaining (using
Fruity Peak ControllerandParametric EQ 2) is an advanced, transparent method that only ducks the clashing low frequencies, preserving the bass's character.
The best way to master these techniques is to use them. Open up one of your projects and experiment. Try both full-band and frequency-specific sidechaining. Listen for how each method changes the relationship between your kick and bass and the overall feel of the groove.
Preview of Next Lesson:
Now that our kick and bass are working together instead of fighting, we can focus on perfecting the bass sound itself. In our next lesson, we will learn how to process bass for clarity and weight, ensuring it translates well on different speaker systems. This will involve techniques to make sure your bass sounds full and defined, whether it's being heard on studio monitors, laptop speakers, or earbuds.