Welcome back! In our last lesson, you set up your first project by creating a blank 6x9 inch page. That blank canvas is the starting point for your ebook, and today, we're going to begin filling it with the most important element: words.
This lesson focuses on using Canva's text tool. You will learn how to add different types of text, such as headings for your chapters and body text for your paragraphs. We will then explore the fundamental formatting options—like changing fonts, adjusting size, and setting alignment—that allow you to control how your text looks and feels. Mastering these skills is the first and most crucial step in designing a readable and professional-looking ebook.
Adding Text to Your Page
In Canva, all text lives inside a text box. You can think of this as a container that you can move around, resize, and style independently from other elements on your page.
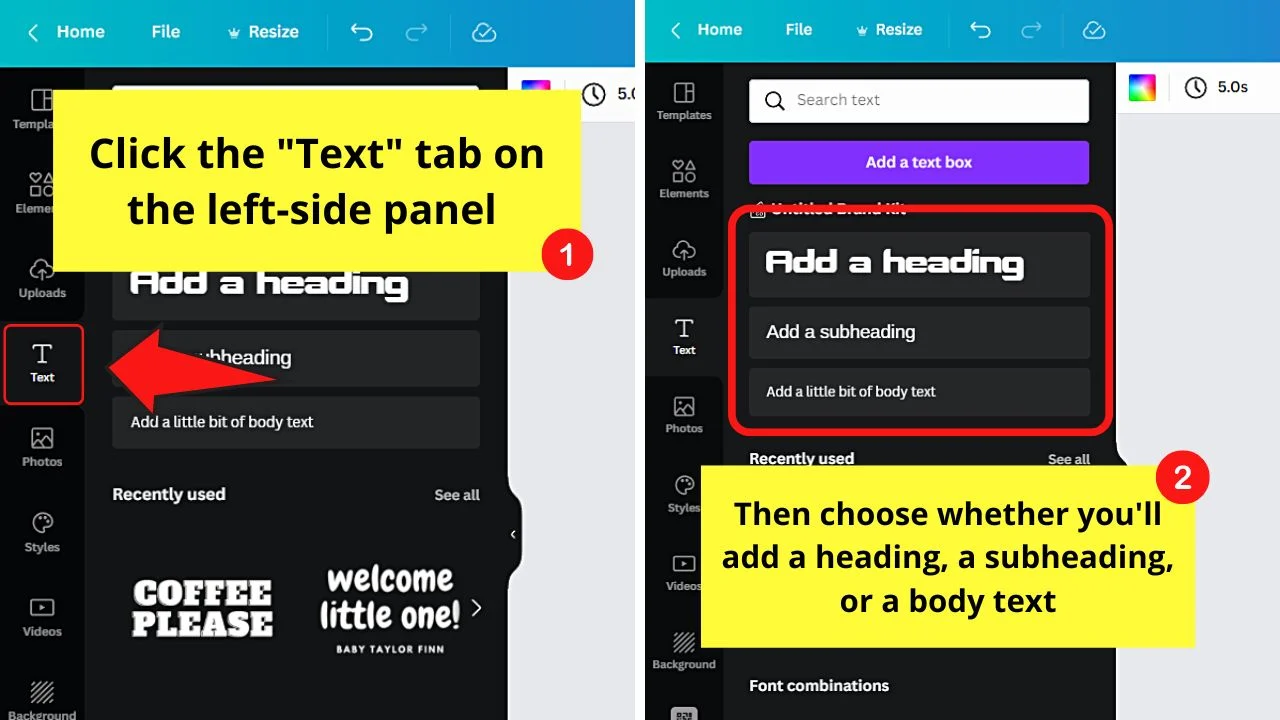
To add text, you'll use the 'Text' tab in the main toolbar on the left side of the editor. When you click it, you’ll see three basic options:
- Add a heading: Creates a large text box, suitable for titles.
- Add a subheading: Creates a medium-sized text box.
- Add a little bit of body text: Creates a smaller text box, ideal for paragraphs.
These are just starting points; you can change the size and style of any text box, no matter how you create it.
A great time-saving trick is to simply press the T key on your keyboard. This will instantly add a new body text box to your page. Since you prefer a hands-on approach, this shortcut will become very useful for quickly adding text as you build your ebook pages.
The Text Formatting Toolbar
Once you add a text box and click on it, a new toolbar will appear at the top of the Canva editor. This is your main control panel for everything related to text formatting.

Today, we'll focus on the most essential tools in this bar:
- Font: To change the typeface (e.g., from Times New Roman to Arial).
- Font Size: To make text bigger or smaller.
- Text Style: To apply bold, italic, or an underline.
- Alignment: To control if text lines up on the left, right, or in the center.
A Practical Walkthrough
The best way to learn these tools is to see them in action. The official Canva team has an excellent, clear video that walks through exactly these functions. Please watch the following clips, which cover adding and formatting text from scratch.
2. Working with Text in Canva | Skills
This video from Canva's official "Skills" series provides a concise and practical demonstration of the text tools.
Follow along as the presenter shows you how to work with text: First, watch how to add a heading and edit its content. Next, see how to change the font and size using the top toolbar. Then, learn how to apply bold and italic styles for emphasis. Finally, watch the section on changing text alignment and note the advice on using left-aligned text for readability.
As you saw in the video, these simple tools give you a lot of control over the look of your text. Changing the font can dramatically alter the mood of your page, while adjusting size and style helps create a clear structure for your reader.
Your Turn: Create a Title Page
Now it's time to apply what you've learned to the 6x9 inch project you created in the last lesson. We'll create a very simple title page for a story.
- Open your 6x9 inch project in Canva.
- Add a heading: Click the 'Text' tab and select 'Add a heading', or press 'T' and resize the text to be large.
- Type the book title: Let's use "The Silent Forest".
- Change the font: With the text box selected, go to the font menu in the top toolbar. Search for and select the font Merriweather. This is a classic serif font that works wonderfully for story titles.
- Set the font size: In the font size box, type in 48 and press Enter.
- Add body text: Press 'T' on your keyboard to add a new, smaller text box.
- Type the author's name: Let's use "A. N. Author".
- Change the font: Select this new text box and change the font to Lato. This is a clean sans-serif font that pairs nicely with Merriweather. Set its size to 14.
- Position the elements: Click and drag the title text box towards the top of the page, and the author name text box towards the bottom. Use the pink lines that appear (Canva's alignment guides) to make sure both are centered horizontally.
Your page should now look something like this:
An example of a simple, clean title page using two different fonts for the title and author name, both centered on the page.
For a more detailed written reference of the tools we used, the following guide covers the fundamentals of adding and styling text.
Text design in Canva: A simple guide
This article from TutKit provides a clear, step-by-step summary of the text tools. It's a great resource to review the concepts we've just practiced.
Focus on the following sections: Accessing the text tools to find the text menu. Adjusting text size by dragging or using the toolbar. Changing the font via the dropdown menu. Applying basic formatting like bold and italic. Adjusting alignment to position your text.
Conclusion
In this lesson, you've mastered the foundational skill of adding and formatting text in Canva. You now know how to create text boxes, type your content, and modify its core visual properties: the font family, size, basic styles, and alignment. You’ve successfully transformed your blank page into the beginning of a designed document.
In our next lesson, we will move from text to visuals. You'll learn how to search for and insert images and basic shapes from Canva's extensive library, which will allow you to add a powerful visual dimension to your ebook pages.