Welcome back. In our last lesson, you took a significant step by adding and formatting the text for a title page. Your blank canvas now has a title and an author, the fundamental building blocks of your ebook. Today, we will explore how to add a visual dimension to your work by incorporating images and shapes.
This lesson is all about populating your designs with visual elements from Canva's vast library. You will learn how to navigate the 'Elements' tab, search for specific assets like photos and basic shapes, and insert them into your project. This skill is essential for making your ebook visually appealing, whether you're adding illustrations to a story or diagrams to an educational guide.
Your Gateway to Visuals: The 'Elements' Tab
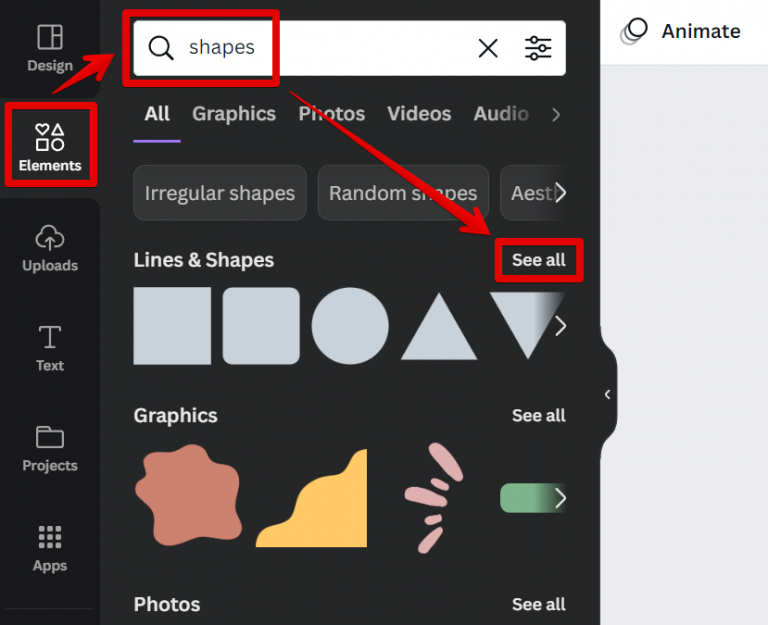
In Canva, nearly every visual asset you can add—from simple squares to intricate illustrations and stock photos—is found in one central place: the 'Elements' tab on the left-side panel. Think of it as your creative toolbox.
When you click on 'Elements', you'll see a search bar at the top and several categories below it, such as 'Lines & Shapes', 'Graphics', and 'Photos'.
Adding Graphics and Shapes
Graphics (like icons and illustrations) and shapes (like circles and squares) are the workhorses of design. They can be used to add decoration, structure your page, or draw attention to specific information.
The best way to understand how to use these is to see it in action. The following video provides a very clear, hands-on demonstration. You'll see how to search for graphics, add them to your page, and make basic edits. Then, you'll see how to do the same with fundamental shapes and lines.
Canva Tutorial For Beginners: A Free Masterclass 2026 (Complete Course)
This tutorial from the Wholesale Ted channel is excellent for your "learning by doing" approach. It recreates designs using the very tools you're learning today.
Please watch these two segments: First, focus on adding graphics. Watch from the introduction to Elements. Pay close attention to how to search, add a graphic, resize it, and most importantly, how to filter for free elements to avoid any costs. Next, skip ahead to the section on shapes and lines. This part clearly demonstrates how to add basic shapes, change their color, add borders (which Canva calls a "stroke"), and insert lines.
As you saw, searching is key. Being specific with your search terms (e.g., "hand-drawn flower" instead of just "flower") can help you find the perfect element much faster.
Adding Photos
In addition to graphics, Canva offers a massive library of stock photos. These are useful for everything from ebook covers to illustrative images inside your chapters. You can find these under the 'Photos' tab within the 'Elements' search results, or by selecting the dedicated 'Photos' tab that sometimes appears in the left panel.

Adding a photo works just like adding a graphic: you search for a term, find a photo you like, and click to add it to your design. You can then resize it by dragging its corners.
Let's Practice: Enhancing Your Title Page
Now, let's apply these new skills to the "The Silent Forest" title page you created in the last lesson.
- Open your 6x9 inch project in Canva.
- Add a decorative line:
- Go to the Elements tab.
- In the search bar, type "line".
- Click on a simple, straight line from the 'Lines & Shapes' category to add it to your page.
- Drag the line so it sits below the author's name, "A. N. Author".
- Use the white handles on the ends of the line to make it shorter, so it's just a bit wider than the author's name.
- With the line selected, click the color swatch in the top toolbar and choose a light gray to make it subtle.
- Add a thematic icon:
- Go back to the Elements search bar and type "pine tree icon". Click on 'Graphics' to see only illustrations.
- Click the filter icon (it looks like three sliders) next to the search bar. Scroll down and under 'Price', select Free. Click 'Apply filters'. Now you'll only see free options.
- Choose a simple, solid pine tree icon and click to add it.
- Drag the corners to make it quite small.
- Position it above your title, "The Silent Forest". Use the pink guide line to ensure it's centered on the page.
Your page now has text, a shape, and a graphic. It's starting to look like a real design! Don't worry about perfect positioning just yet; we'll cover that in the next lesson.
For a detailed written guide that you can refer back to later, the following article provides a great overview of the concepts we've just practiced.
How to Use Canva's Design Elements
This article by Brenda Cadman is a thorough reference for working with elements. It covers everything from searching and filtering to the specifics of shapes, graphics, and photos.
Read through these sections to solidify your understanding: Start with How to Search & Find Elements to review the powerful search and filter functions. Then, read the sections on Shapes & Lines and Graphics to get more detail on the elements we used in our practice exercise. Finally, look at the section on Photos, which reinforces how to add and perform basic edits on photographic images.
Conclusion
In this lesson, you've learned how to tap into Canva's extensive library of visual assets. You can now confidently search for and insert basic shapes, graphics, and photos into your designs. By adding a simple line and an icon to your title page, you've taken your first step in combining text and visuals to create a more compelling layout.
In our next lesson, we will focus on bringing order to your design. You'll learn how to use Canva's alignment guides and spacing tools to organize all these new elements neatly on the page, creating a clean and professional look.