Hello! Welcome to the final lesson in our module on advanced database operations.
In our last session, we discussed the critical role of database connection pooling and how Spring Boot uses HikariCP by default to manage connections efficiently. This is true whether you're connecting to a production-grade database like MySQL or, as we'll see today, a database used purely for testing.
This lesson addresses a key practice for professional software development: ensuring our tests are fast, reliable, and independent of external systems. Our learning outcome is to set up and use an in-memory database (like H2) for testing purposes. You'll learn why running tests against a "real" database can be slow and problematic, and how in-memory databases provide an elegant solution.
1. The Case for In-Memory Databases in Testing
When you write tests for your data layer (e.g., for your JpaRepository interfaces), you want them to run quickly and consistently. If your tests depend on an external MySQL or PostgreSQL database:
- They run slower: Network latency and disk I/O from a separate database server add significant time to each test run.
- They are brittle: The test environment needs a running database server with the correct configuration, which can be a hassle to set up, especially in automated CI/CD pipelines.
- They are not isolated: Tests might interfere with each other by leaving data behind, leading to unpredictable failures.
In-memory databases solve these problems. They run entirely in your computer's RAM, store data only for the duration of the application's runtime, and are incredibly fast because there's no network communication or disk I/O involved.
For Java applications, H2 is one of the most popular in-memory databases.
To get a clear definition of H2 and its purpose, let's look at the article "Spring Boot with H2 Database" from GeeksforGeeks.
Please read the section "What is H2 Database?". Focus on its definition and the two modes it can run in. For our purposes today, we are interested in the in-memory mode.
As you've read, the key takeaway is that H2's in-memory mode creates a temporary database that is automatically destroyed when the application stops. This makes it perfect for testing, as each test run starts with a clean, empty database, ensuring perfect isolation.
2. Spring Boot and H2: A Perfect Match for Testing
One of Spring Boot's most powerful features is its auto-configuration. Spring Boot follows the principle of "convention over configuration," and its integration with H2 is a prime example.
Here's the rule: If Spring Boot detects the H2 database library on the classpath during a test run, and no other database DataSource is explicitly configured, it will automatically set up and connect to an in-memory H2 database.
This means all you need to do is add the H2 dependency to your pom.xml file with a test scope. This ensures H2 is available only during the testing phase and isn't bundled with your production application.
<dependency>
    <groupId>com.h2database</groupId>
    <artifactId>h2</artifactId>
    <scope>test</scope>
</dependency>
With this single dependency, you've enabled a powerful testing setup without writing a single line of configuration code.
3. Using H2 with @DataJpaTest
Now, let's apply this to what we've learned previously. When we want to test our JPA repositories, we use the @DataJpaTest annotation. This annotation is designed to work seamlessly with in-memory databases.
@DataJpaTest and Repository Class in JUnit
The article "@DataJpaTest and Repository Class in JUnit" on Baeldung explains how this annotation leverages in-memory databases to create an ideal test environment.
Please read the following sections: "Understanding @DataJpaTest and Repository Class": Note how it provides a minimal context for the persistence layer. "Key Features": Pay close attention to section 4.1, which states that @DataJpaTest sets up a safe, in-memory database like H2. "Configuration and Setup" and "Implementing Repository Tests": Skim through these sections to see a complete, practical example of setting up and writing a test for a UserRepository.
Let's consolidate the key points from the article into a clear workflow:
- Dependencies: Ensure you have
spring-boot-starter-testand theh2dependency (withtestscope) in yourpom.xml. - Test Class Setup: Annotate your repository test class with
@DataJpaTest. This annotation does several things for you:- It scans for your
@Entityclasses and Spring Data JPA repositories. - It configures an in-memory database (like H2, if it's on the classpath).
- It configures a
TestEntityManager, a helpful utility for persistence tests. - It makes each test transactional and rolls back changes at the end, ensuring tests are isolated from each other.
- It scans for your
- Inject and Test: Autowire your repository and write your tests using JUnit assertions.
Here's what a typical repository test looks like. Notice the lack of any database configuration—it's all handled automatically.
// Assuming you have a User entity and UserRepository interface

import org.junit.jupiter.api.Test;
import org.springframework.beans.factory.annotation.Autowired;
import org.springframework.boot.test.autoconfigure.orm.jpa.DataJpaTest;

import static org.assertj.core.api.Assertions.assertThat;

@DataJpaTest
public class UserRepositoryTest {

    @Autowired
    private UserRepository userRepository;

    @Test
    void whenFindByUsername_thenReturnUser() {
        // given
        User user = new User("testuser", "password123");
        userRepository.save(user);

        // when
        User found = userRepository.findByUsername(user.getUsername());

        // then
        assertThat(found).isNotNull();
        assertThat(found.getUsername()).isEqualTo(user.getUsername());
    }
}
This test is self-contained, incredibly fast, and requires zero manual database setup.
Test your understanding!
You've written a repository test using @DataJpaTest. You have not added any database-related configuration to your application-test.properties file. When you run the test, it passes. What database is your test using and why did it work without any configuration?
Show answer
The test is using an in-memory H2 database. It worked because the @DataJpaTest annotation, combined with Spring Boot's auto-configuration, automatically detects the H2 library on the test classpath and configures an in-memory DataSource for the test context. This powerful "convention over configuration" feature eliminates the need for manual setup.
4. Peeking Inside: The H2 Console
Automated tests are essential, but sometimes during development or debugging, you want to visually inspect the state of your database. H2 provides a simple web-based interface called the H2 Console for this purpose.
To use it, you first need to enable it in your application.properties (or, more appropriately for testing, in src/test/resources/application.properties):
# Enable the H2 web console
spring.h2.console.enabled=true
With this property set, when you run your application or test, you can access the console in your browser, typically at http://localhost:8080/h2-console.

Once you connect, you get a simple UI where you can inspect table schemas and run SQL queries directly against your in-memory database.
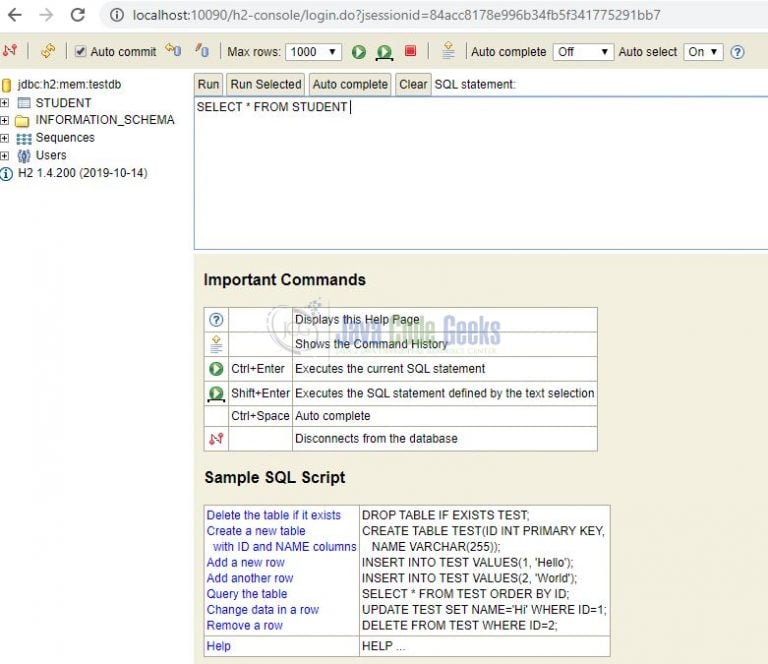
While the H2 Console is a fantastic development tool, remember to only enable it in your test or development environments, not in production.
Conclusion
In this lesson, you've learned a crucial technique for writing professional, efficient, and reliable tests for your data layer. By leveraging in-memory databases, you can significantly speed up your test suite and make your development process more robust.
Key Takeaways:
- In-memory databases like H2 are ideal for testing because they are fast, isolated, and require no external setup.
- Spring Boot's auto-configuration will automatically set up an H2 database for tests if the dependency is present on the classpath.
- The
@DataJpaTestannotation is the primary tool for testing the persistence layer, and it integrates seamlessly with in-memory databases. - The H2 Console is a useful web-based tool for inspecting your in-memory database during development and debugging.
This lesson concludes our module on Advanced Database Operations & Transactions. You now have a comprehensive toolkit for managing data persistence, from writing complex queries and handling transactions to optimizing performance and setting up a professional testing environment.
What's Next?
With a solid foundation for building and testing the data layer, we are now ready to tackle one of the most critical aspects of any web application: security. In the next module, we will begin our journey into Securing APIs with Spring Security. Our first lesson will introduce the Spring Security framework, explaining how to enable it and understand its default filter chain and authentication mechanisms.