Hello! Let's dive back into our backend development journey.
In our last lesson, we explored the theory behind JSON Web Tokens (JWTs). We learned that they are self-contained tokens enabling stateless authentication, and we broke down their structure into the Header, Payload, and Signature. You now understand how the signature guarantees a token's integrity and why the payload is perfect for carrying non-sensitive user data like roles.
Today, we transition from theory to practice. Our goal is to implement JWT generation on successful login and validate tokens on incoming requests via a custom filter. We'll be writing the core Java code that brings stateless authentication to life in our Spring Boot application.
We will build three key pieces:
- A
JwtUtilsclass to handle creating and validating tokens. - A custom
AuthTokenFilterto intercept requests and check for valid JWTs. - An update to our login logic to issue a token upon successful authentication.
Let's get started.
1. Project Setup: Dependencies and Configuration
To work with JWTs in Java, we need a library to handle the heavy lifting of encoding, decoding, and signing. A popular and robust choice is the Java JWT (JJWT) library.
First, add the following dependencies to your pom.xml file.
<!-- For JWT -->
<dependency>
    <groupId>io.jsonwebtoken</groupId>
    <artifactId>jjwt-api</artifactId>
    <version>0.11.5</version>
</dependency>
<dependency>
    <groupId>io.jsonwebtoken</groupId>
    <artifactId>jjwt-impl</artifactId>
    <version>0.11.5</version>
    <scope>runtime</scope>
</dependency>
<dependency>
    <groupId>io.jsonwebtoken</groupId>
    <artifactId>jjwt-jackson</artifactId>
    <version>0.11.5</version>
    <scope>runtime</scope>
</dependency>
jjwt-api: Provides the core interfaces and classes.jjwt-impl: Contains the actual implementation.jjwt-jackson: Adds support for serializing and deserializing the JSON payload using the Jackson library, which Spring Boot uses by default.
Next, we need to configure our application with the secret key and token expiration time. Storing these in application.properties (or application.yml) allows us to manage them centrally and keep them out of our code.
Add the following lines to your src/main/resources/application.properties:
app.jwt.secret=your-64-character-long-secure-random-string-for-hs512
app.jwt.expirationMs=86400000 # 24 hours
Important Security Note: The jwt.secret is the most critical piece of your JWT security. It must be a long, random, and securely stored string. For production, you should never hardcode it here; instead, use environment variables or a secrets management tool. For our learning purposes, you can generate a random string.
The expirationMs value sets the token's lifetime. A common practice is to have relatively short-lived access tokens (e.g., 15 minutes to 1 hour) and use a refresh token mechanism for longer sessions, but for now, a 24-hour token will suffice.
2. The JwtUtils Class: Your Token Toolkit
To keep our code organized, we'll create a utility class responsible for all JWT-related logic: generating, parsing, and validating tokens.
Implementation of JWT in Spring Boot 3 using Spring Security
This article provides a clear implementation of a JWT utility class. We will use it as a guide to build our own.
Please review the code for the JwtUtils.java class in the provided article. Focus on the logic within these three key methods: generateJwtToken(): How it builds the token with a subject, timestamps, and signature. getUserNameFromJwtToken(): How it parses the token to extract the username. validateJwtToken(): How it uses a try-catch block to handle different validation failures (e.g., expired, malformed).
Let's create this class in our project, for instance at com.example.yourapp.security.jwt.JwtUtils.java. Based on the resource, your implementation will look something like this:
@Component
public class JwtUtils {
    private static final Logger logger = LoggerFactory.getLogger(JwtUtils.class);

    @Value("${app.jwt.secret}")
    private String jwtSecret;

    @Value("${app.jwt.expirationMs}")
    private int jwtExpirationMs;

    public String generateJwtToken(Authentication authentication) {
        UserDetailsImpl userPrincipal = (UserDetailsImpl) authentication.getPrincipal();

        return Jwts.builder()
                .setSubject((userPrincipal.getUsername()))
                .setIssuedAt(new Date())
                .setExpiration(new Date((new Date()).getTime() + jwtExpirationMs))
                .signWith(key(), SignatureAlgorithm.HS512) // Using HS512 for stronger encryption
                .compact();
    }

    private Key key() {
        return Keys.hmacShaKeyFor(Decoders.BASE64.decode(jwtSecret));
    }

    public String getUserNameFromJwtToken(String token) {
        return Jwts.parserBuilder().setSigningKey(key()).build()
                   .parseClaimsJws(token).getBody().getSubject();
    }

    public boolean validateJwtToken(String authToken) {
        try {
            Jwts.parserBuilder().setSigningKey(key()).build().parse(authToken);
            return true;
        } catch (MalformedJwtException e) {
            logger.error("Invalid JWT token: {}", e.getMessage());
        } catch (ExpiredJwtException e) {
            logger.error("JWT token is expired: {}", e.getMessage());
        } catch (UnsupportedJwtException e) {
            logger.error("JWT token is unsupported: {}", e.getMessage());
        } catch (IllegalArgumentException e) {
            logger.error("JWT claims string is empty: {}", e.getMessage());
        }

        return false;
    }
}
Key Points:
@Component: We annotate it as a Spring component so we can inject it wherever needed.@Value: This annotation injects the properties we defined inapplication.properties.generateJwtToken(): Takes theAuthenticationobject (which Spring Security creates after a successful login) to get the username. It then builds the JWT with the username as the "subject", sets the issue and expiration dates, and signs it with our secret key using theHS512algorithm.validateJwtToken(): This method is the gatekeeper. It tries to parse the token using the secret key. If the token is expired, malformed, or has an invalid signature, the JJWT library will throw an exception, which we catch and log. Only a perfectly valid token will pass.
3. The AuthTokenFilter: Validating Tokens on Every Request
Now that we can create and validate tokens, we need a mechanism to check for a token on every incoming API request. In Spring Security, the perfect tool for this is a custom filter.
Our filter will extend OncePerRequestFilter, which guarantees it runs only once for each request.
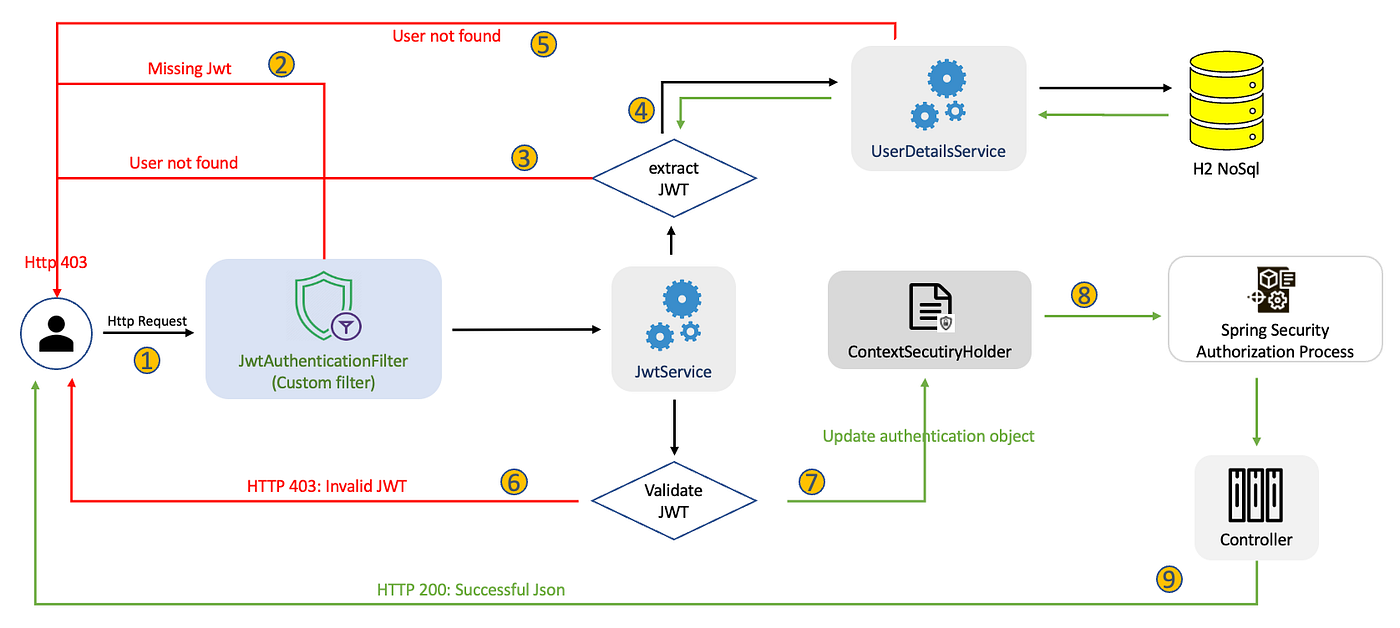
Implementation of JWT in Spring Boot 3 using Spring Security
Let's use the same article to guide our implementation of the custom filter. It provides a complete and well-explained example.
Now, study the AuthTokenFilter.java class. Pay close attention to the doFilterInternal method. Trace the steps it performs: parseJwt(): How it extracts the token string from the Authorization header. jwtUtils.validateJwtToken(): Calling our utility class. userDetailsService.loadUserByUsername(): Loading the user from the database. SecurityContextHolder.getContext().setAuthentication(): The crucial final step that authenticates the user for the current request.
Create a new class AuthTokenFilter.java in the same jwt package. Your implementation will follow the resource's example:
@Component
public class AuthTokenFilter extends OncePerRequestFilter {
    @Autowired
    private JwtUtils jwtUtils;

    @Autowired
    private UserDetailsServiceImpl userDetailsService; // Your existing UserDetailsService

    private static final Logger logger = LoggerFactory.getLogger(AuthTokenFilter.class);

    @Override
    protected void doFilterInternal(HttpServletRequest request, HttpServletResponse response, FilterChain filterChain)
            throws ServletException, IOException {
        try {
            String jwt = parseJwt(request);
            if (jwt != null && jwtUtils.validateJwtToken(jwt)) {
                String username = jwtUtils.getUserNameFromJwtToken(jwt);

                UserDetails userDetails = userDetailsService.loadUserByUsername(username);

                UsernamePasswordAuthenticationToken authentication =
                        new UsernamePasswordAuthenticationToken(userDetails, null, userDetails.getAuthorities());

                authentication.setDetails(new WebAuthenticationDetailsSource().buildDetails(request));

                SecurityContextHolder.getContext().setAuthentication(authentication);
            }
        } catch (Exception e) {
            logger.error("Cannot set user authentication: {}", e.getMessage());
        }

        filterChain.doFilter(request, response);
    }

    private String parseJwt(HttpServletRequest request) {
        String headerAuth = request.getHeader("Authorization");

        if (StringUtils.hasText(headerAuth) && headerAuth.startsWith("Bearer ")) {
            return headerAuth.substring(7);
        }

        return null;
    }
}
When this filter runs, it checks for a "Bearer" token. If a valid token is found, it populates the SecurityContext. This is how the rest of the Spring Security framework, including the @PreAuthorize annotations we used before, knows who the user is and what roles they have.
Test your understanding!
In our AuthTokenFilter, we load the user's details from the database using userDetailsService on every single authenticated request. What is a potential performance bottleneck with this approach, and how could you optimize it by adding more information to the JWT payload?
Show answer
The database call on every request is a potential performance bottleneck. Under heavy load, this could slow down the application.
To optimize this, you could include the user's roles/authorities directly in the JWT payload as a custom claim (e.g., a claim named "roles": ["ROLE_USER", "ROLE_ADMIN"]). The filter could then parse these roles from the token itself and create the UsernamePasswordAuthenticationToken using those authorities, completely avoiding the database hit. The trade-off is a slightly larger token size.
4. Wiring it all Together in WebSecurityConfig
With our JwtUtils and AuthTokenFilter beans ready, the final step is to integrate them into the Spring Security configuration.
Implementation of JWT in Spring Boot 3 using Spring Security
The WebSecurityConfig is where we tell Spring Security to use our stateless approach and our custom filter. The same article clearly shows how to do this.
Review the WebSecurityConfig.java file. Focus on two key configurations within the filterChain method: .sessionManagement(session -> session.sessionCreationPolicy(SessionCreationPolicy.STATELESS)): This is where we disable server-side sessions. .addFilterBefore(authenticationJwtTokenFilter(), UsernamePasswordAuthenticationFilter.class): This is how we plug our custom filter into the security chain.
Modify your WebSecurityConfig.java:
- Inject your
AuthTokenFilterbean. - Configure the
HttpSecurityto be stateless. - Add the filter to the filter chain.
@Configuration
@EnableWebSecurity
@EnableMethodSecurity
public class WebSecurityConfig {

    // ... your existing UserDetailsService and AuthEntryPointJwt injections ...

    @Bean
    public AuthTokenFilter authenticationJwtTokenFilter() {
        return new AuthTokenFilter();
    }

    // ... your existing DaoAuthenticationProvider, AuthenticationManager, and PasswordEncoder beans ...

    @Bean
    public SecurityFilterChain filterChain(HttpSecurity http) throws Exception {
        http.csrf(csrf -> csrf.disable())
            .exceptionHandling(exception -> exception.authenticationEntryPoint(unauthorizedHandler))
            // Make sure the session is stateless
            .sessionManagement(session -> session.sessionCreationPolicy(SessionCreationPolicy.STATELESS))
            .authorizeHttpRequests(auth ->
                auth.requestMatchers("/api/auth/**").permitAll() // Your login/register endpoints
                    .anyRequest().authenticated()
            );

        http.authenticationProvider(authenticationProvider());

        // Add our custom JWT filter before the default username/password filter
        http.addFilterBefore(authenticationJwtTokenFilter(), UsernamePasswordAuthenticationFilter.class);

        return http.build();
    }
}
The two most important changes are:
sessionCreationPolicy(SessionCreationPolicy.STATELESS): This tells Spring Security not to create or useHttpSessionobjects.addFilterBefore(...): This inserts ourAuthTokenFilterinto the filter chain, ensuring it runs before Spring tries to authenticate using a username and password.
5. Issuing the Token on Login
Finally, let's update our login controller/service to generate and return a JWT upon successful authentication.
Implementation of JWT in Spring Boot 3 using Spring Security
The login method in the article's AuthService provides a perfect template for issuing a token.
Examine the login function. Note how it uses AuthenticationManager to authenticate the user, and then, upon success, it calls jwtUtils.generateJwtToken() to create the token and includes it in the response.
In your AuthController, modify your sign-in method:
@PostMapping("/signin")
public ResponseEntity<?> authenticateUser(@Valid @RequestBody LoginRequest loginRequest) {

    Authentication authentication = authenticationManager.authenticate(
            new UsernamePasswordAuthenticationToken(loginRequest.getUsername(), loginRequest.getPassword()));

    SecurityContextHolder.getContext().setAuthentication(authentication);
    String jwt = jwtUtils.generateJwtToken(authentication);

    UserDetailsImpl userDetails = (UserDetailsImpl) authentication.getPrincipal();
    List<String> roles = userDetails.getAuthorities().stream()
            .map(item -> item.getAuthority())
            .collect(Collectors.toList());

    return ResponseEntity.ok(new JwtResponse(jwt,
                                             userDetails.getId(),
                                             userDetails.getUsername(),
                                             userDetails.getEmail(),
                                             roles));
}
Here, after the AuthenticationManager confirms the user's credentials are correct, we immediately call jwtUtils.generateJwtToken() and package the resulting token into a response object (JwtResponse in this example) to send back to the client.
Conclusion
Congratulations! You have just implemented a complete, stateless JWT authentication system. You've put the theory from our last lesson into solid, working code.
Key Takeaways:
- JWT Generation: We created a
JwtUtilsclass that uses a secret key and expiration time from ourapplication.propertiesto generate a signed JWT for an authenticated user. - Custom Filter Validation: We built an
AuthTokenFilterthat intercepts every request, extracts the "Bearer" token, and usesJwtUtilsto validate it. - Stateless Security Context: If the token is valid, our filter manually creates an
Authenticationobject and places it in theSecurityContextHolder, allowing Spring Security to authorize the request without a server-side session. - Configuration: We configured Spring Security to be
STATELESSand added our custom filter to the security chain.
What's Next?
Our API is now secured, but there's a practical problem we need to solve. Most modern applications have a separate frontend (e.g., a React or Angular app) that runs on a different domain or port. By default, web browsers will block the frontend from making requests to our backend API due to security restrictions.
In our next lesson, we will learn how to configure Cross-Origin Resource Sharing (CORS) policies to allow our frontend application to communicate securely with our newly protected backend.