Hello! Welcome to the next lesson in our journey to master backend development with Spring.
In our previous lessons, we built a robust security system using Spring Security. We created a database schema for users and roles, configured UserDetailsService to authenticate users against that database, and used Role-Based Access Control (RBAC) to authorize requests. This approach, often called "stateful" authentication, relies on the server creating and managing a session for each logged-in user.
Today, we're shifting our focus to a more modern, stateless approach to authentication. Our goal is to explain the structure and purpose of JSON Web Tokens (JWT) for stateless authentication. Understanding JWT is crucial, as it's a cornerstone of modern API security, especially in the context of microservices and single-page applications (SPAs) — aligning perfectly with your long-term goal of building enterprise-level applications.
We'll break down what a JWT is, how it's structured, and why its stateless nature is so powerful for building scalable systems.
1. From Stateful to Stateless Authentication
In the system we've built so far, when a user logs in, the server creates a session, stores information about that user in its memory (or a shared database), and gives the client a session ID (usually in a cookie). For every subsequent request, the client sends this session ID, and the server looks up the session data to identify the user.
This works well, but it has a key limitation: the server must maintain state. This can become a bottleneck in large, distributed systems where requests from a single user might be handled by different server instances. How do all instances share the session data?
JSON Web Tokens (JWTs) solve this problem by moving the state from the server to the client.
A JWT is a compact, self-contained token that holds all the necessary information about a user. Because the information is stored inside the token, the server no longer needs to keep track of sessions. Every request from the client includes the JWT, and the server can verify the user's identity and permissions just by inspecting the token itself. This is the essence of stateless authentication.
What is JWT? Understand JSON Web Tokens
To start, let's get a formal definition of JWT and solidify our understanding of why its stateless nature is so beneficial. This article from SuperTokens provides a great introduction.
Please read the introduction and the section "What is a JWT?". Focus on the contrast between traditional session-based authentication and the stateless model that JWTs enable. Also, note the distinction between opaque tokens and self-contained JWTs.
2. The Structure of a JSON Web Token
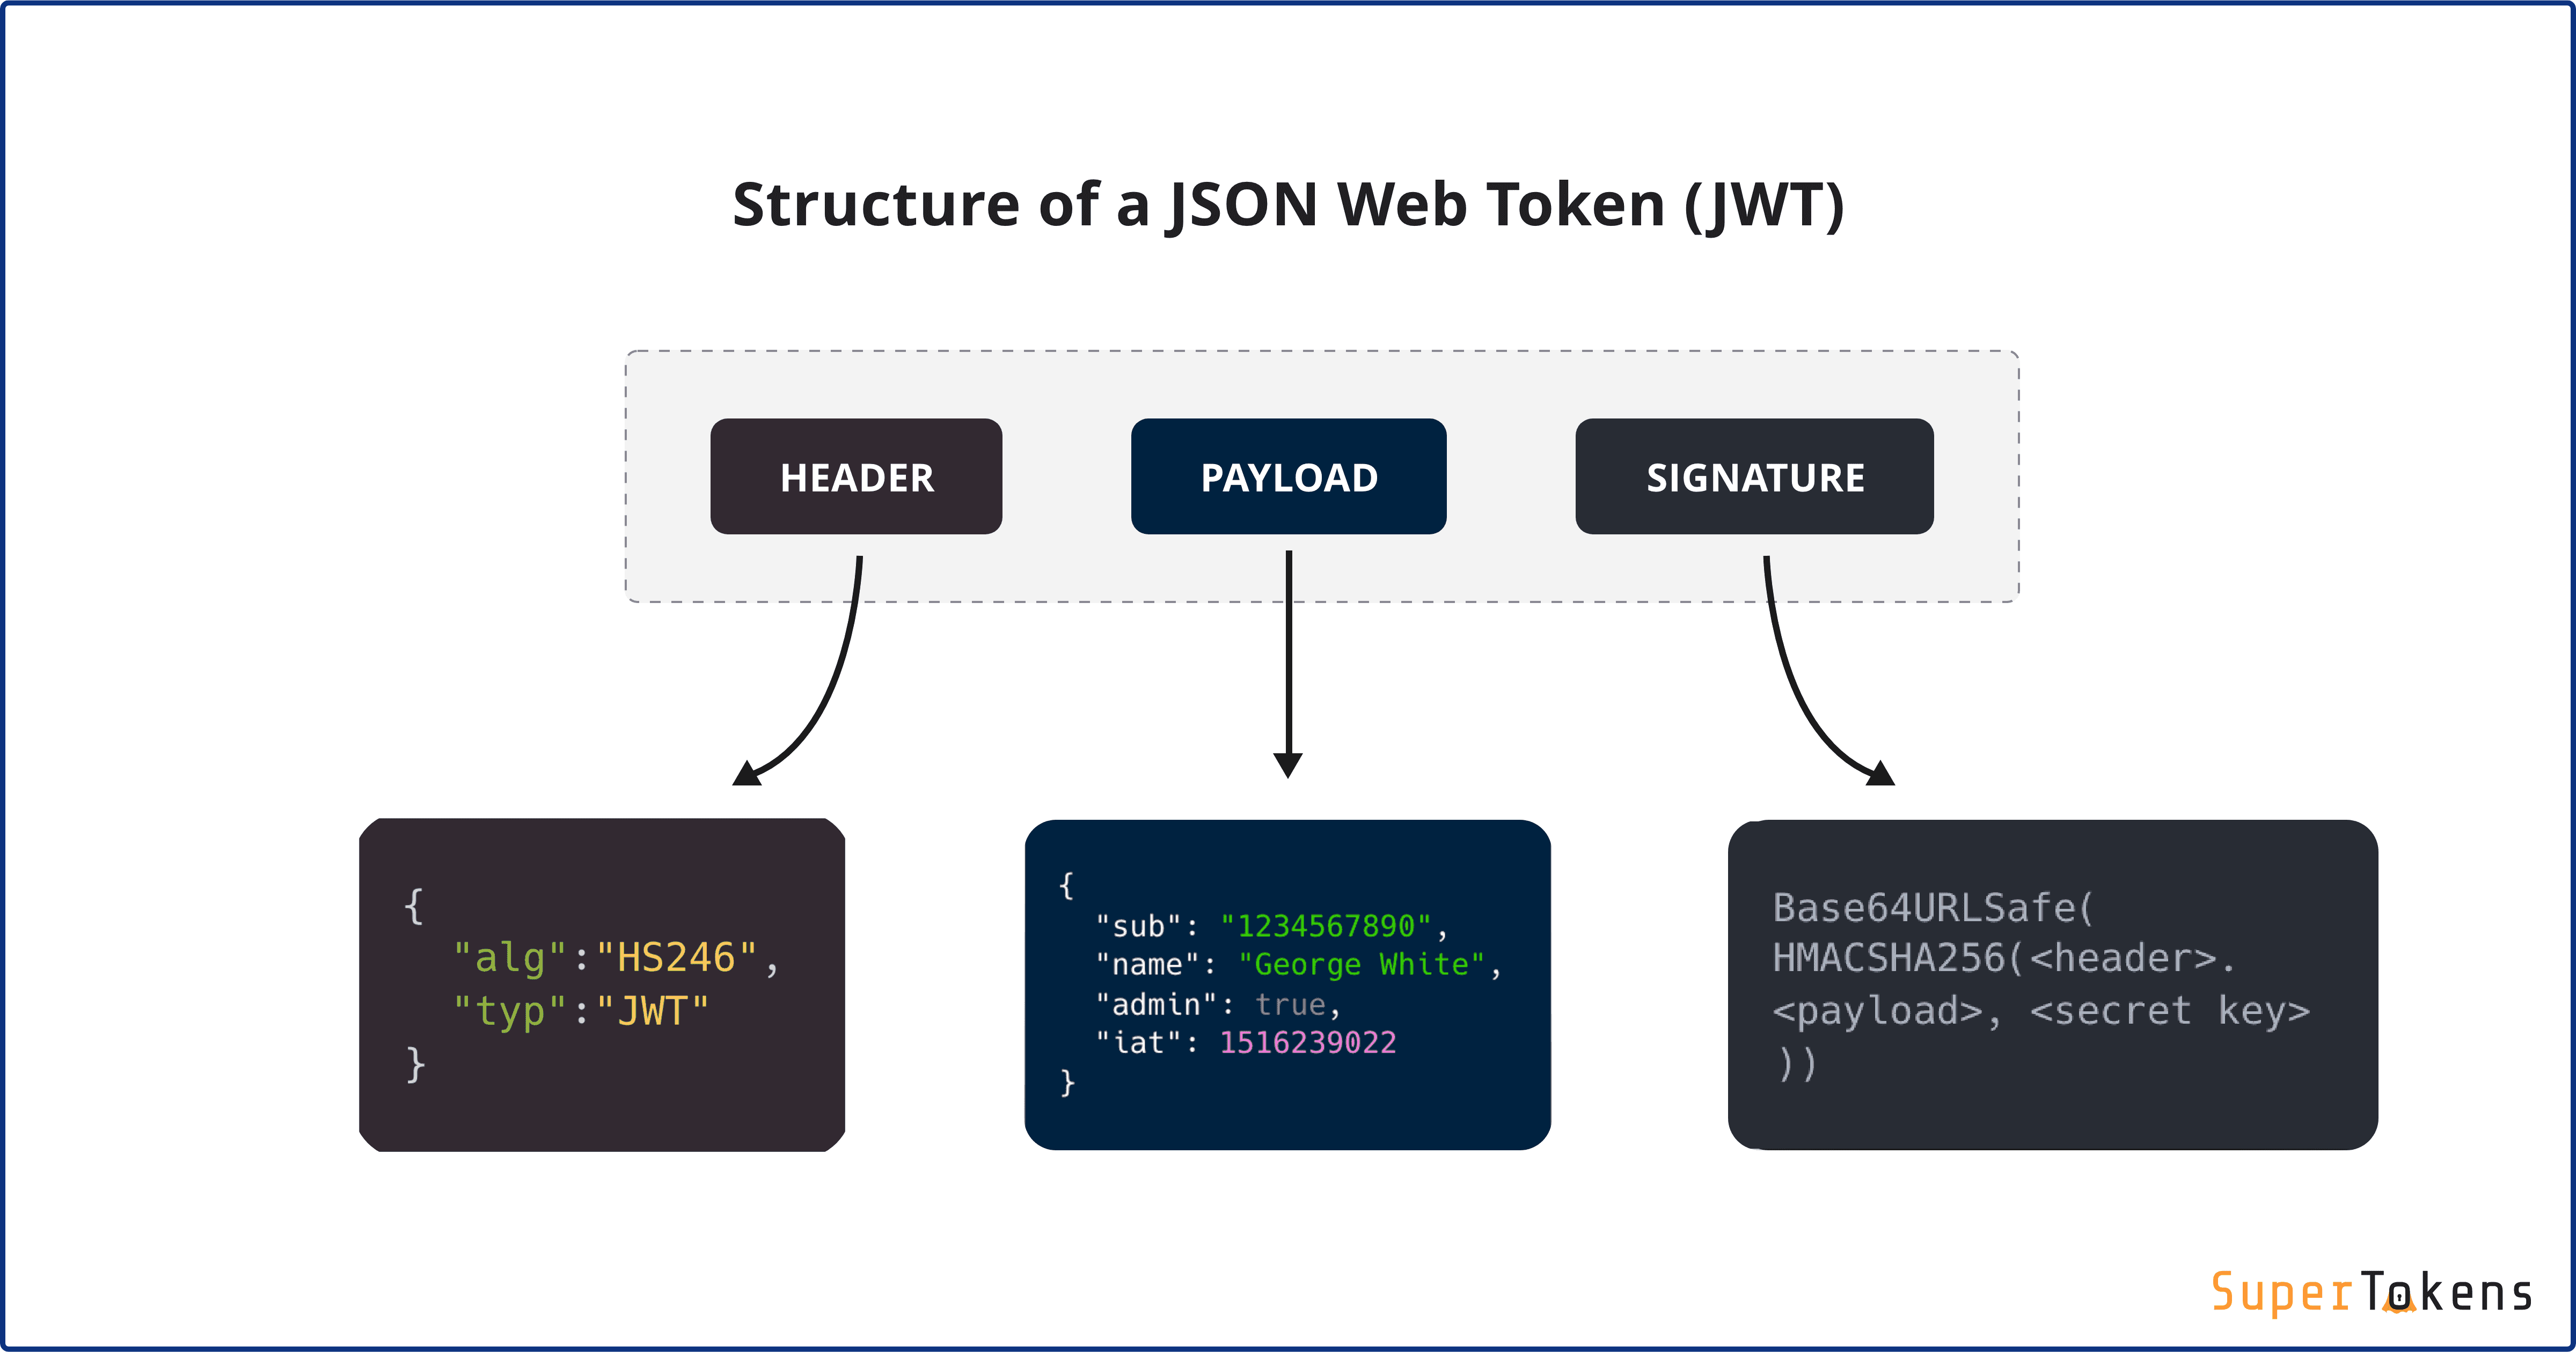
A JWT isn't just a random string. It has a very specific structure consisting of three parts, separated by dots (.):
Header.Payload.Signature
Let's look at each part.
a. Header
The header is a JSON object that typically identifies the algorithm used to generate the signature and the type of the token.
Example:
{
  "alg": "HS256",
  "typ": "JWT"
}
alg: The signing algorithm (e.g.,HS256which is HMAC using SHA-256).typ: The type of the token, which isJWT.
This JSON is then Base64Url encoded to form the first part of the JWT.
b. Payload
The payload is a JSON object containing the claims. Claims are statements about an entity (typically the user) and additional data. This is where you put user information like their ID, name, and roles, as well as metadata about the token itself.
Example:
{
  "sub": "1234567890",
  "name": "John Doe",
  "admin": true,
  "iat": 1516239022
}
This payload is also Base64Url encoded to form the second part of the JWT.
Important Note: The header and payload are only encoded, not encrypted. Anyone who intercepts the token can easily decode them and read their contents. Therefore, you must never store sensitive information like passwords in the JWT payload. The security of a JWT comes from its signature, not from secrecy of its content.
c. Signature
The signature is used to verify that the token has not been tampered with. It is created by taking the encoded header, the encoded payload, a secret key, and signing them with the algorithm specified in the header.
For example, using the HS256 algorithm, the signature is created as follows:
HMACSHA256(
  base64UrlEncode(header) + "." + base64UrlEncode(payload),
  secret
)
The secret is a key known only to the server. When the server receives a JWT from a client, it re-calculates the signature using the received header, payload, and its own secret key. If the re-calculated signature matches the signature on the token, the server knows the token is authentic and its payload has not been changed.
JSON Web Token Introduction - jwt.io
The official jwt.io website has an excellent, concise explanation of the JWT structure. Reading this will reinforce your understanding of the three core components.
Read the section "What is the JSON Web Token structure?". Pay close attention to the descriptions of the Header, Payload, and Signature, and how they are combined.
3. Understanding JWT Claims
The payload's claims are the heart of the token's information. There are three types:
-
Registered Claims: These are a set of predefined, recommended claims to ensure interoperability. They are short (three characters) to keep the JWT compact. The most common ones are:
iss(Issuer): Who issued the token.sub(Subject): The subject of the token (e.g., the user's ID).aud(Audience): The recipient(s) that the token is intended for.exp(Expiration Time): The timestamp after which the token is no longer valid. This is crucial for security.iat(Issued At): The timestamp when the token was issued.
-
Public Claims: These are custom claims defined by those using JWTs. To avoid collisions, they should be defined in the IANA JSON Web Token Registry or as a URI.
-
Private Claims: These are custom claims created to share information between parties that agree on using them. For example, you could include a
rolesclaim to carry user role information, directly connecting to what we learned in the last lesson.{ "sub": "user123", "roles": ["ADMIN", "EDITOR"], "exp": 1678886400 }
4. The JWT Authentication Flow
Now, let's put it all together. Here is the typical workflow for JWT-based authentication:
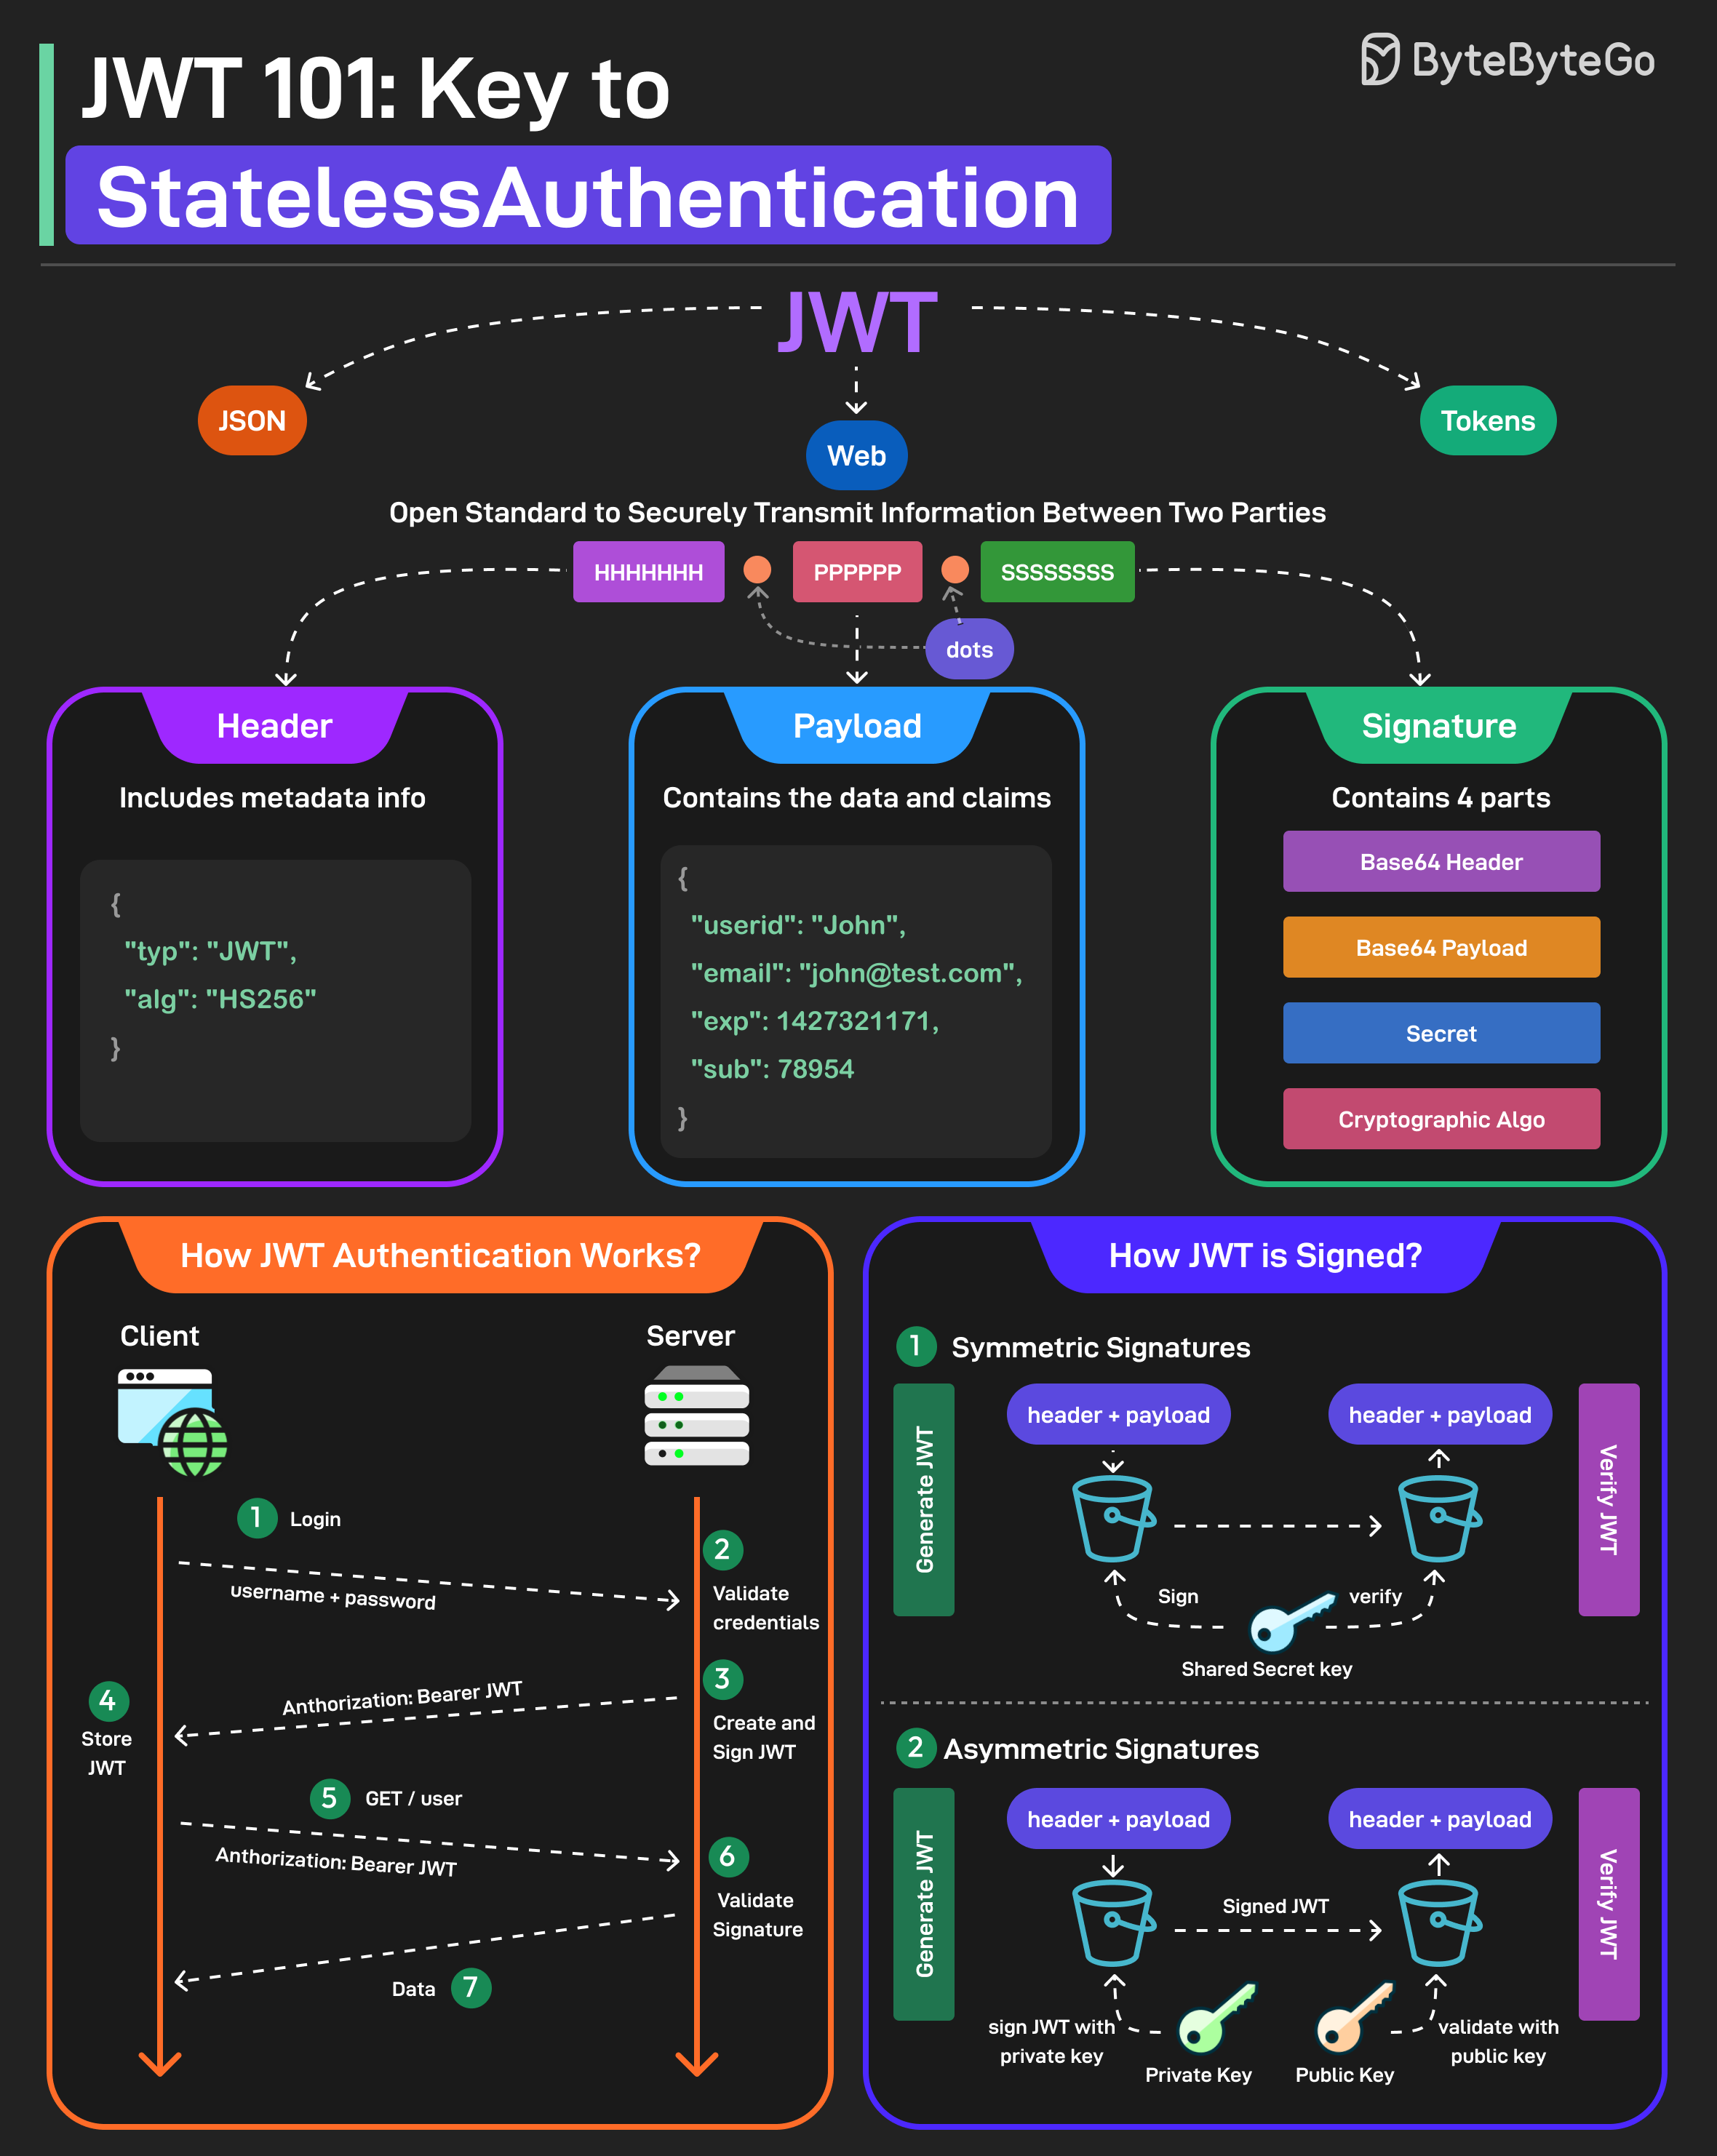
- Login: The user sends their credentials (e.g., username and password) to an authentication endpoint on the server.
- Verification & Token Issuance: The server verifies the credentials against the database. If they are correct, it creates a JWT, signs it with a secret key, and sends it back to the client in the response body.
- Client Storage: The client stores the received JWT securely. Common places are
localStorageorHttpOnlycookies. - Authenticated Requests: For every subsequent request to a protected API endpoint, the client includes the JWT in the
Authorizationheader, using theBearerschema:
Authorization: Bearer <your_jwt_here> - Server Verification: When the server receives a request for a protected endpoint, it looks for the
Authorizationheader. It extracts the token, verifies the signature using its secret key, and validates the claims (e.g., checks that the token has not expired). - Access Granted: If the signature is valid and the claims are okay, the server trusts the information in the payload and processes the request. If not, it rejects the request, typically with a
401 Unauthorizedor403 Forbiddenstatus.
Test your understanding!
A server receives a JWT from a client. The server finds that the signature is valid, meaning the token hasn't been tampered with. However, upon decoding the payload, it finds the exp (expiration) claim corresponds to a time that has already passed.
What should the server do?
Show answer
The server must reject the request, even though the signature is valid. A valid signature only proves authenticity and integrity, not timeliness. The server is responsible for both verifying the signature and validating the claims, including the expiration time. It should return an error, typically a 401 Unauthorized status, indicating that the client needs to re-authenticate to get a new token.
5. Advantages and Disadvantages of JWT
JWTs are powerful but are not a silver bullet. It's important to understand their trade-offs.
Advantages:
- Stateless & Scalable: Servers don't need to store session data, making it easy to scale horizontally and load balance across many servers. This is a huge win for microservice architectures.
- Decoupled: The token generation logic can be handled by a dedicated authentication server, and your resource servers only need the public key or secret to verify tokens.
- Performance: Verifying a token can be faster than a database lookup for session data, especially if the token contains all necessary user information (like roles).
Disadvantages:
- Revocation is Difficult: Since JWTs are stateless, they are valid until they expire. You can't easily "kill" a token before its expiration time. Common workarounds involve keeping a "blacklist" of revoked tokens, but this reintroduces state on the server, negating some of the primary benefits. This is why short expiration times are recommended.
- Token Size: If you put too much information in the payload, the token can become large, increasing the size of every request header.
- Secret Management: If the signing secret is compromised, an attacker can forge valid tokens for any user. Secrets must be stored and managed securely.
Conclusion
In this lesson, you've learned the fundamental theory behind JSON Web Tokens. You now understand their purpose as a mechanism for stateless authentication and can deconstruct their three-part structure.
Key Takeaways:
- JWT enables stateless authentication, where user state is stored on the client side within the token itself.
- A JWT consists of a Header, Payload, and Signature, separated by dots.
- The Header and Payload are Base64Url encoded and readable by anyone. Security is ensured by the Signature, which verifies the token's authenticity and integrity.
- The Payload contains claims, which are statements about the user and the token, such as user ID, roles, and expiration time.
- The authentication flow involves the client obtaining a token on login and sending it in the
Authorizationheader for all subsequent requests.
What's Next?
With the theory firmly in place, our next step is to get practical. In the upcoming lesson, we will implement JWT generation on successful login and create a custom Spring Security filter to validate tokens on incoming requests. You'll see exactly how to integrate these concepts into our Spring Boot application.