Hello! Welcome back to our module on Containerization and CI/CD.
In our previous lesson, we established the "what" and "why" of Docker. You learned that a Dockerfile is the fundamental recipe used to build a portable application image, and a container is a running instance of that image. We even looked at a high-level example of a Dockerfile.
Today, we're moving from theory to practice. This lesson is dedicated to the learning outcome: Write a Dockerfile to containerize a Spring Boot application. We'll go through the process of creating a Dockerfile for one of our microservices, examining each instruction in detail and learning best practices to create a secure and efficient image. This is a critical hands-on skill for any modern backend developer.
By the end of this lesson, you will be able to:
- Identify the essential instructions for a Java application's
Dockerfile. - Write a complete
Dockerfilefor a typical Spring Boot application. - Understand best practices like using a working directory and running as a non-root user.
Let's get started.
1. Setting the Stage: The Application Artifact
Before we can containerize our application, we need a runnable artifact. For a Spring Boot application, this is the executable JAR file. You generate this by running the package phase of your build tool from your project's root directory.
- For Maven:
./mvnw clean package - For Gradle:
./gradlew clean build
This command compiles your code, runs tests, and packages everything into a single JAR file located in the target (for Maven) or build/libs (for Gradle) directory. This JAR file is the main thing we need to get inside our Docker image.
2. The Anatomy of a Spring Boot Dockerfile
A Dockerfile is a plain text file, always named Dockerfile (with a capital 'D'), that you place in the root directory of your project.
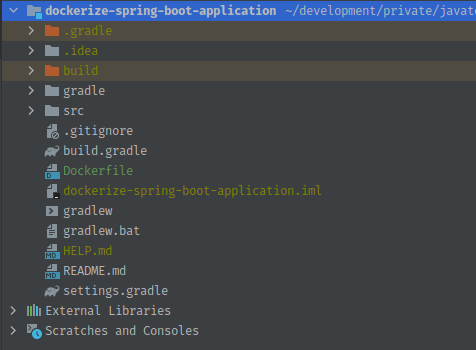
Let's watch a practical demonstration of how to create this file and populate it with the necessary instructions for a Spring Boot application.
Spring Boot 4 with Docker - Crash Course | Dockerizing a Spring Boot 4 Application
The video 'Spring Boot 4 with Docker - Crash Course' by Java Guides provides an excellent, step-by-step walkthrough of creating a Dockerfile for a Spring Boot REST API.
Watch from 11:50 to 18:04. The instructor first builds the JAR file and then creates a Dockerfile from scratch, explaining each instruction: FROM, LABEL, WORKDIR, COPY, and ENTRYPOINT.
3. Dissecting the Key Instructions
As you saw in the video, a few key instructions do most of the work. Let's analyze them in more detail.
FROM: The Base Image
Every Dockerfile must start with a FROM instruction. It specifies the parent image that your image is built upon. For a Java application, you need a base image that includes a Java Development Kit (JDK) or Java Runtime Environment (JRE).
A common and recommended choice is an official OpenJDK image, such as eclipse-temurin.
# Use an official OpenJDK runtime as a parent image
# We specify version 17 and the 'jammy' variant, which is based on Ubuntu 22.04 LTS
FROM eclipse-temurin:17-jdk-jammy
You can find many base images on Docker Hub. For Java, you'll see tags like -alpine, which are very small but may lack common debugging tools, and -jammy or -slim, which offer a balance of size and functionality.
COPY: Adding Your Application
The COPY instruction copies files from your local machine (the build context) into the filesystem of the image. Its syntax is COPY <source> <destination>. We use it to copy our built JAR file into the image.
# Copy the fat JAR file from the target directory to the root of the image
# and rename it to app.jar for simplicity.
COPY target/my-service-0.0.1-SNAPSHOT.jar app.jar
ENTRYPOINT: Running the Application
The ENTRYPOINT instruction configures the command that will be executed when the container starts. For our Spring Boot application, this is the java -jar command.
The preferred format is the "exec" form, which uses a JSON array. This form runs the command directly without a shell, which is considered a best practice.
# Specify the command to run on container startup
ENTRYPOINT ["java", "-jar", "app.jar"]
EXPOSE: Documenting the Port
The EXPOSE instruction informs Docker that the container listens on the specified network ports at runtime. This instruction doesn't actually publish the port; it functions as a type of documentation between the person who builds the image and the person who runs the container.
# Document that the application inside the container will listen on port 8080
EXPOSE 8080
When you run the container, you'll still use the -p flag (e.g., docker run -p 8080:8080 ...) to map the host port to the container port, as you'll see in the next lesson.
4. Best Practices for Better Dockerfiles
The simple Dockerfile above will work, but we can make significant improvements for better organization and security.
Use WORKDIR to Set a Working Directory
Copying files directly into the root (/) of the container's filesystem is not ideal. It can lead to conflicts with existing system directories and makes the container's filesystem messy.
The WORKDIR instruction sets the working directory for any subsequent RUN, CMD, ENTRYPOINT, COPY, and ADD instructions. This is a much cleaner approach.
The following video explains this best practice clearly.
Containerizing our Spring Boot Application with Docker | Geekific
The video 'Containerizing our Spring Boot Application with Docker' from Geekific explains why using WORKDIR is a best practice.
Watch from 06:23 to 07:51. This segment demonstrates how WORKDIR helps organize files within the container and prevents polluting the root directory.
Run as a Non-Root User for Security
By default, processes inside a Docker container run as the root user. This poses a security risk. If an attacker were to exploit a vulnerability in your application, they would gain root access inside the container, giving them extensive privileges.
It is a critical security best practice to create a dedicated, unprivileged user and run the application as that user. You can achieve this with the RUN and USER instructions.
The official Spring guide, 'Spring Boot with Docker,' demonstrates how to improve a Dockerfile by adding a non-root user.
Read the section that begins 'Running applications with user privileges helps to mitigate some risks...' and look at 'Example 2. Dockerfile'. This section shows you how to use RUN addgroup/adduser and the USER instruction.
5. A Production-Ready Dockerfile
Let's combine everything we've learned into a more robust and secure Dockerfile. This example is a great starting point for containerizing your Spring Boot microservices.
# 1. Base Image: Use a specific, recent LTS version of Java.
FROM eclipse-temurin:17-jdk-jammy

# 2. Security: Create a dedicated group and user for the application.
RUN groupadd --system spring && useradd --system -g spring spring

# 3. Working Directory: Create and set a working directory for the application.
WORKDIR /app

# 4. Copy Artifact: Copy the application JAR file into the working directory.
# The user 'spring' is made the owner of this directory and its contents.
COPY --chown=spring:spring target/your-app-name-*.jar app.jar

# 5. Switch User: Switch to the non-root user.
USER spring

# 6. Expose Port: Document the application's port.
EXPOSE 8080

# 7. Entrypoint: Define the command to run the application.
ENTRYPOINT ["java", "-jar", "app.jar"]
Note: The COPY --chown flag is a convenient way to set file ownership during the copy operation.
Test your understanding!
You are given the following Dockerfile:
FROM openjdk:11-jre-slim
COPY build/libs/user-service.jar user-service.jar
CMD java -jar user-service.jar
Based on the best practices discussed, what are two key improvements you would make to this Dockerfile?
Show answer
Here are two primary improvements:
- Add a
WORKDIR: Instead of copying the JAR to the root directory, you should define a working directory (e.g.,WORKDIR /app) and copy the file there. This keeps the container's filesystem organized. - Run as a non-root user: The container runs as
rootby default. You should add instructions to create a non-privileged user (e.g.,RUN adduser ...) and switch to that user (USER ...) before theCMDorENTRYPOINT.
Additionally, changing CMD to the exec form of ENTRYPOINT (ENTRYPOINT ["java", "-jar", "user-service.jar"]) is also a valid improvement.
Conclusion
You have now learned how to write a complete, secure, and well-structured Dockerfile for a Spring Boot application. This file is the bridge between your source code and a portable, runnable container.
Key Takeaways:
- A
Dockerfileis a text file in your project root that contains instructions to build a Docker image. - Essential instructions include
FROM(base image),COPY(add files), andENTRYPOINT(run command). - Best practices are crucial: use
WORKDIRto organize files and always run your application as a non-root user for security. - The
EXPOSEinstruction is important for documenting the port your application listens on.
What's Next?
You've written the recipe; in the next lesson, Build a Docker image and run it as a container, we'll do the cooking. You will use the Docker CLI to execute the docker build command to create an image from your Dockerfile, and then use docker run to start a container from that image and interact with your running Spring Boot application.