Hello! Welcome back to our final module, Containerization and CI/CD.
In our last session, you crafted a production-ready Dockerfile, which is the blueprint for our application's environment. You learned the essential instructions and best practices for creating a secure and efficient recipe for your Spring Boot service.
Today, we're bringing that blueprint to life. This lesson focuses on the learning outcome: Build a Docker image and run it as a container. We'll execute the core Docker commands that transform your Dockerfile into a portable image and then launch that image as a running container. This is where your backend application becomes a self-contained, distributable unit, ready for deployment.
The workflow we'll follow is simple yet powerful:
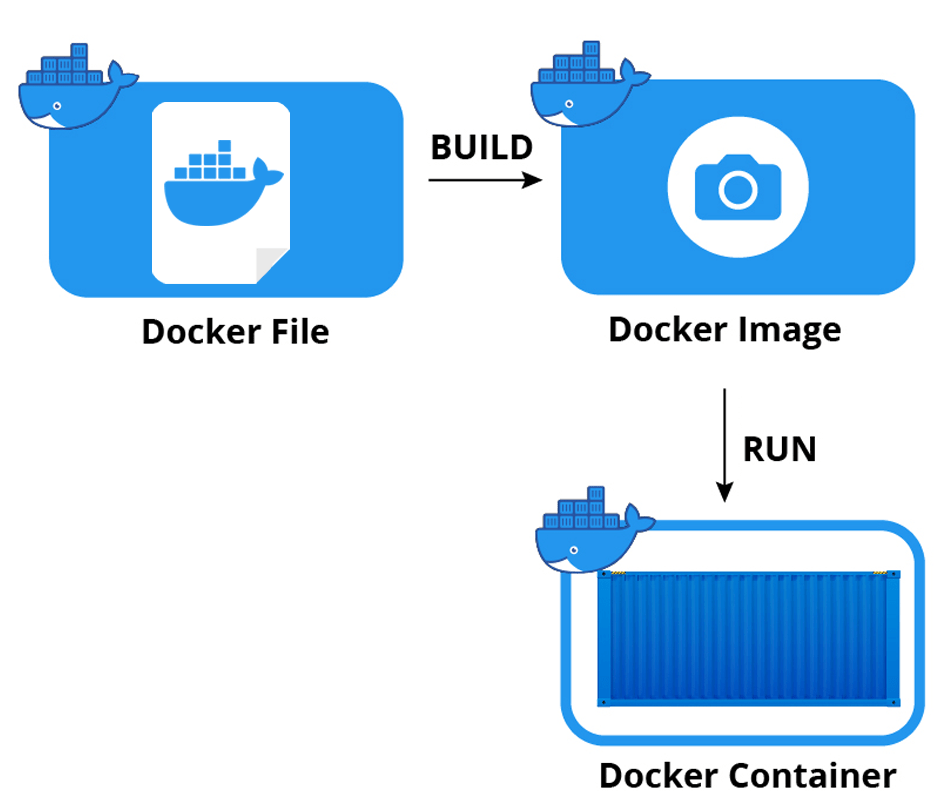
By the end of this lesson, you will be able to:
- Build a tagged Docker image from a
Dockerfile. - Run a Docker container from an image.
- Map ports to access your containerized Spring Boot application from your local machine.
- Manage the basic lifecycle of a container (run, view, stop).
Let's begin.
1. Packaging Your Application
Before we can build the Docker image, we need the application artifact that the Dockerfile expects to copy. As we discussed, for a Spring Boot application, this is the executable JAR file.
First, ensure you are in the root directory of your Spring Boot project. Then, run the packaging command for your build tool:
- For Maven:
./mvnw clean package - For Gradle:
./gradlew clean build
This process cleans any previous builds and creates a new JAR file in the target/ (Maven) or build/libs/ (Gradle) directory. This is the file our Dockerfile will use.
2. Building the Docker Image
With the JAR file ready and the Dockerfile in our project root, we can now ask Docker to build the image. This is done with the docker build command.
The two most important parts of this command are:
- Tagging (
-t): The-tflag allows you to "tag" your image with a human-readable name and version (e.g.,my-service:1.0). This is crucial for managing different versions of your application. The format is typicallyrepository:tag. - Build Context (
.): The final.in the command tells Docker to use the current directory as the "build context." Docker packages this directory and sends it to the Docker daemon to execute the build. This is how theCOPYinstruction in yourDockerfilecan find thetarget/*.jarfile.
How to dockerize your Spring Boot API | Docker Tutorial
Let's watch a demonstration of the docker build command. The video 'How to dockerize your Spring Boot API' by Random code clearly shows this process.
Watch from 03:53 to 05:12. The presenter uses docker build -t to create a tagged image from the Dockerfile in the current directory. Notice how the output shows Docker executing the steps from the file.
So, the full command you would run from your project's root directory is:
docker build -t your-app-name:0.0.1 .
(Replace your-app-name with the name of your service).
When you run this, Docker executes each instruction in your Dockerfile sequentially, creating a new "layer" for each step. You'll see output confirming each action, like pulling the base image and copying the JAR file.
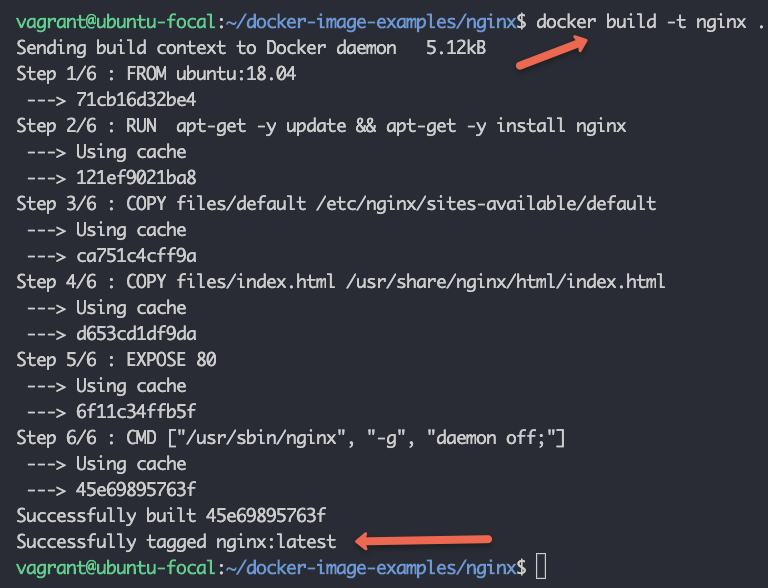
After the build completes, you can see your new image by running docker images. You should see your-app-name listed with the tag 0.0.1.
3. Running the Container
Now that we have a self-contained, runnable image, we can launch it as a container using the docker run command.
The most critical part of this command for a web application is port mapping. Your Spring Boot application is running inside the container and listening on a port (e.g., 8080) within the container's isolated network. To access it from your host machine (your laptop), you must map a port on your machine to the port inside the container.
This is done with the -p (or --publish) flag, using the format -p <host_port>:<container_port>.
How to dockerize your Spring Boot API | Docker Tutorial
The same video provides a great walkthrough of the docker run command, including port mapping.
Continue watching from 04:57 to 06:34. The presenter runs the image and uses -p 8000:8080 to map their local port 8000 to the container's port 8080. They then successfully test the API on localhost:8000.
The command to run your container would be:
docker run -p 8080:8080 your-app-name:0.0.1
This command:
- Creates a new container from the
your-app-name:0.0.1image. - Maps port 8080 on your host machine to port 8080 inside the container.
- Starts the container, which executes the
ENTRYPOINTcommand from yourDockerfile(java -jar app.jar).
You will see the familiar Spring Boot startup logs appear directly in your terminal. You can now access your application at http://localhost:8080 using a browser or an API client like Postman.
4. Managing Container Lifecycle
When you ran the previous command, your terminal was attached to the container's output, and you couldn't use it for anything else. For development, it's often better to run the container in the background.
Detached Mode (-d)
To run a container in "detached" mode, you simply add the -d flag.
docker run -d -p 8080:8080 your-app-name:0.0.1
This command will start the container and immediately return the unique container ID, freeing up your terminal.
Viewing Running Containers (docker ps)
If the container is running in the background, how do you know it's working? The docker ps command lists all currently running containers.
How to dockerize your Spring Boot API | Docker Tutorial
Let's see detached mode and docker ps in action.
Watch from 06:17 to 08:11. The presenter stops the first container and then restarts it using the -d flag. They then use docker container ls (which is the same as docker ps) to show the container running in the background.
The output of docker ps will give you key information, including the Container ID, the image it's from, its status, and the port mappings.
Stopping a Container (docker stop)
To stop a running container, you use the docker stop command followed by the Container ID (or the auto-generated name) from the docker ps output.
# Get the container ID from the first column of `docker ps`
docker ps

# Stop the container using its ID
docker stop <container_id>
Getting Started | Spring Boot with Docker
For a textual summary of these commands, the official Spring guide provides a concise reference.
Read the section titled 'After the Push'. It demonstrates the docker run command with port mapping, how to view running containers with docker ps, and how to stop a container with docker stop.
Test your understanding!
You have just built a Docker image and tagged it as inventory-service:latest. The application inside the container listens on port 8081. What single command would you use to run this container in the background and make it accessible on your local machine at http://localhost:9000?
Show answer
The command would be:
docker run -d -p 9000:8081 inventory-service:latest
docker run: The command to start a new container.-d: Runs the container in detached (background) mode.-p 9000:8081: Maps port 9000 on the host to port 8081 in the container.inventory-service:latest: The image to run.
Conclusion
Congratulations! You have successfully taken your Spring Boot application from source code to a running, isolated container. This is a fundamental skill in modern backend development, enabling consistent deployments across any environment.
Key Takeaways:
docker build -t <name>:<tag> .creates a tagged image from theDockerfilein the current directory.docker runcreates and starts a container from an image.- The
-p <host_port>:<container_port>flag is essential for accessing web applications running inside containers. - The
-dflag runs the container in the background. - You can manage running containers with
docker ps(list) anddocker stop <id>(stop).
What's Next?
Manually building and running images is great for development, but in a real-world project, you need to automate this process. In our next lesson, we will explore the concepts of Continuous Integration and Continuous Deployment (CI/CD). You'll learn how to create a pipeline that automatically builds, tests, and prepares your Docker image for deployment every time you push new code to your repository.