Hello! Welcome to the third module of our course, where we'll transition from theory to practice and start building the backend services you're aiming for.
In the previous module, we built a solid foundation by exploring the core mechanics of the Spring Framework, including dependency injection, bean scopes, and—most recently—how to externalize configuration using application.properties and the @Value annotation. You now understand how Spring manages objects and their dependencies, which is the "magic" behind the framework.
Today, we embark on a new and exciting journey: building a real RESTful API with Spring Boot. This lesson directly addresses the first learning outcome of this module: Create a Spring Boot application using Spring Initializr. By the end of this lesson, you will have created, imported, and run your very first Spring Boot application, setting the stage for all the backend development that follows.
1. What is Spring Boot?
You've already worked with the Spring Framework's core container. So, what is Spring Boot?
Spring Boot is not a new framework. Instead, it is a powerful extension of the Spring ecosystem designed to radically simplify the process of building production-ready, stand-alone Spring applications. It takes an "opinionated" view of the Spring platform, which means it makes intelligent assumptions to minimize the amount of configuration you have to write.
This directly addresses the complexity you might have glimpsed when we manually configured beans. Spring Boot automates much of that work.
Spring Boot Fundamentals (Deep dive for beginners)
The article 'Spring Boot Fundamentals (Deep dive for beginners)' provides an excellent overview of Spring Boot's key features. Understanding these features will clarify why we use Spring Boot instead of plain Spring for new applications.
Please read the section titled 'What is Spring Boot? (short deep dive)'. Focus on understanding these three core concepts: Auto-configuration: How Spring Boot automatically configures your application based on the libraries (dependencies) you've included. Starters: How these bundles of dependencies simplify your build configuration. Embedded server: The concept of bundling a server (like Tomcat) within your application, which allows you to run it as a simple Java application.
In essence, Spring Boot lets you focus on writing business logic—the code that makes your application unique—rather than on the boilerplate configuration required to wire everything together.
2. Creating Your First Project with Spring Initializr
So, how do we start a new Spring Boot project? The standard and most efficient way is by using the Spring Initializr. This is a web tool that generates a complete, ready-to-code project structure based on your specifications.
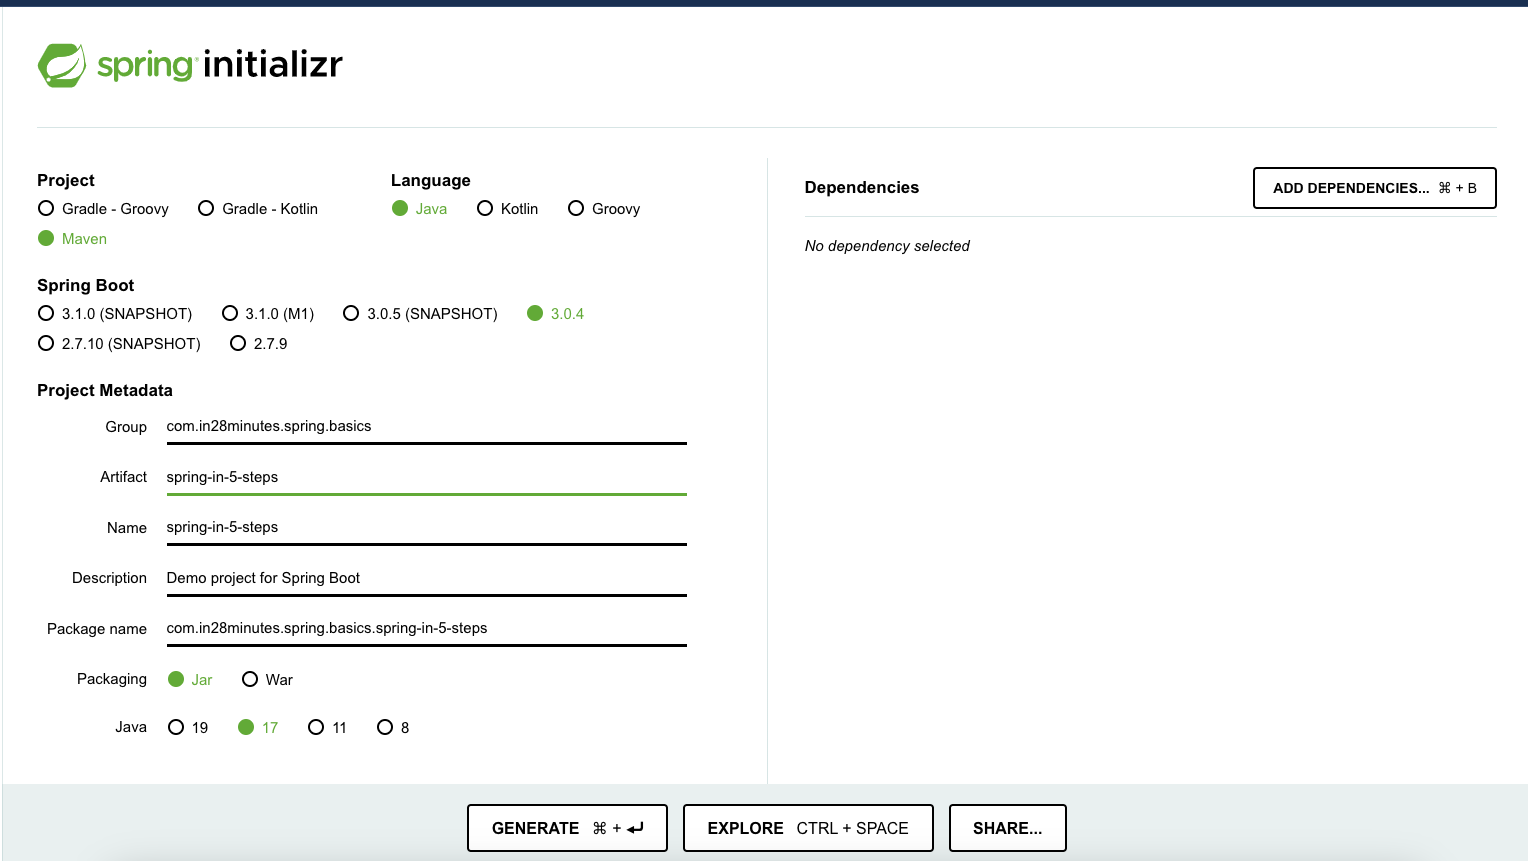
Let's break down the key options you'll see on this page:
- Project: This is your build automation tool. We will be using Maven, which is a very popular and robust choice in the Java world.
- Language: We'll use Java.
- Spring Boot: This lets you select the version of Spring Boot. It's best practice to choose the latest stable version (avoiding those marked
SNAPSHOTorMfor milestone). - Project Metadata:
Group: A unique identifier for your organization or project group, typically in reverse domain name notation (e.g.,com.mycompany).Artifact: The name of your project (e.g.,user-api).Package name: The root Java package for your project's source code. This is automatically derived from the Group and Artifact.
- Packaging: You can choose between
JarandWar. Spring Boot's philosophy is "make JAR, not WAR," because the embedded server allows your application to be packaged as a self-contained, executableJarfile. This is simpler than deploying aWarfile to an external server. We will use Jar. - Java: The Java version for the project. Spring Boot 3 requires Java 17 or later.
- Dependencies: This is where you select the "starters" we just learned about. For our first web application, the most important one is
Spring Web.
3. Hands-On: Generate Your Project
Now it's your turn to create a project. We will use the Spring Initializr web UI for this.
Spring Boot Fundamentals (Deep dive for beginners)
This section of the 'Spring Boot Fundamentals' article provides a clear, step-by-step guide to generating a project from the Spring Initializr website.
Follow the steps under 'Option A — Web UI (easy)' to generate and download your project. Use the following settings: Project: Maven Project Language: Java Spring Boot: Choose a recent stable version (e.g., 3.2.x, not a SNAPSHOT or M release). Group: com.mybackend Artifact: first-api Packaging: Jar Java: 17 Dependencies: Click 'Add Dependencies' and search for and add 'Spring Web'. Once configured, click the 'Generate' button. This will download a ZIP file to your computer.
After downloading the ZIP file, extract it to a folder where you keep your projects. You have now successfully bootstrapped a Spring Boot application!
4. Importing and Exploring the Project in Your IDE
The generated folder is a standard Maven project, which you can open in any Java IDE. We'll proceed assuming you're using IntelliJ IDEA, which is highly recommended for Spring development.
Spring Boot Fundamentals (Deep dive for beginners)
Let's continue with our guide to import the project into IntelliJ and understand its structure.
First, read section '4. Create / Import the Spring Boot project in IntelliJ' and follow the 'From ZIP' instructions to open your newly created project. Next, read section '6. Structure of a Spring Boot application' to familiarize yourself with the generated files and folders. Pay close attention to: pom.xml: The heart of your Maven project's configuration. FirstApiApplication.java: The main entry point of your application. application.properties: The configuration file you learned about in our last lesson.
Let's dig a little deeper into two key files:
-
pom.xml: Open this file. You'll see thespring-boot-starter-parent, which provides sensible default configurations, and thespring-boot-starter-webdependency you added. This single "starter" has transitively pulled in everything needed for a web application, including Spring MVC and an embedded Tomcat server. This is dependency management made easy. -
FirstApiApplication.java: This class contains themainmethod that runs your entire application. Notice the@SpringBootApplicationannotation. This single annotation is incredibly powerful and does three things:@Configuration: Marks the class as a source of bean definitions (like we saw in the previous module).@EnableAutoConfiguration: This is the magic we discussed. It tells Spring Boot to start adding beans based on classpath settings, other beans, and various property settings.@ComponentScan: Tells Spring to look for other components, configurations, and services in the same package and its sub-packages.
This structure directly relates to your prior knowledge. The embedded Tomcat server acts as the Servlet Container, and the auto-configured DispatcherServlet (which comes with spring-boot-starter-web) acts as the Front Controller. Spring Boot simply configures and manages these foundational pieces for you.
Test your understanding!
You are starting a new project to build a "library-management" system. Using your knowledge of the Spring Initializr, answer the following:
- What would be a suitable
GroupandArtifactfor this project? - To build a REST API that will eventually connect to a PostgreSQL database, what are the two most essential dependencies you should add?
- When the project is generated, what is the name of the annotation on the main application class?
Show answer
- A suitable
Groupcould becom.libraryand theArtifactcould belibrary-management-api. - The two essential dependencies would be Spring Web (for the REST API functionality) and Spring Data JPA (for database interaction with JPA). You would also need the PostgreSQL Driver dependency later on.
- The annotation is
@SpringBootApplication.
5. Running Your Application
Now for the final step: running the application.
You have two simple ways to do this:
- From your IDE: In IntelliJ, open the
FirstApiApplication.javafile. You should see a green "play" button next to themainmethod. Click it and select 'Run'. - From the command line: Open a terminal, navigate to the root directory of your project (where the
pom.xmlfile is), and run the command:mvn spring-boot:run.
You will see a lot of log output in the console. Near the end, you should see lines indicating that Tomcat has started on a specific port, usually 8080.
...
.s.t.c.s.Tomcat      : Tomcat started on port(s): 8080 (http)
...
.c.m.f.FirstApiApplication   : Started FirstApiApplication in X.XXX seconds (process running for Y.YYY)
Congratulations! You have a running backend application.
If you open a web browser and navigate to http://localhost:8080, you will likely see a default Spring "Whitelabel Error Page". This is perfectly normal! It means your server is running and responding to requests, but you haven't defined any specific endpoints (like /users or /books) yet.
Conclusion
In this lesson, you took a huge first step into practical backend development. You moved from the core theory of the Spring Framework to the powerful, streamlined world of Spring Boot.
Key Takeaways:
- Spring Boot simplifies building production-ready applications with auto-configuration, starters, and an embedded server.
- Spring Initializr (
start.spring.io) is the standard tool for generating a new Spring Boot project skeleton. - Starters (like
spring-boot-starter-web) are dependency bundles that drastically simplify yourpom.xml. - A Spring Boot application is just a Java application with a
mainmethod, launched by the powerful@SpringBootApplicationannotation. - You can run your application directly from your IDE or via the command line with Maven.
What's Next?
You now have a running, but empty, web application. In our next lesson, we will put it to work. We will learn how to build our first REST controller using the @RestController and @RequestMapping annotations, allowing us to define custom endpoints that can handle HTTP requests and return data.