Hello! Welcome to the final lesson in our module on Spring Core and Dependency Injection.
In our last session, we explored singleton and prototype bean scopes, understanding how Spring manages the lifecycle and instantiation of the objects in your application. We concluded by noting that hard-coding values like connection strings or configuration flags inside our Java code is inflexible and risky.
Today, we'll solve that problem by learning how to externalize our application's configuration. This lesson directly addresses the learning outcome: Configure application properties using application.properties and the @Value annotation. This is a critical skill for building applications that can be easily configured for different environments (like development, testing, and production) without changing the code.
1. Introducing application.properties
When you create a Spring Boot project, it includes a special file located at src/main/resources/application.properties. This file is the default, central location for all your application's configuration settings.
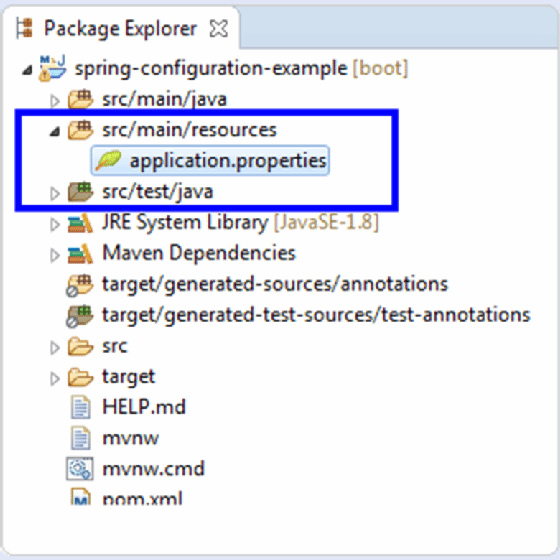
Spring Boot follows a "convention over configuration" principle. It automatically finds and loads this file when the application starts, making any properties defined within it available to your application. This feels a bit like magic, but it's a powerful feature that simplifies setup.
You can configure both Spring Boot's built-in properties (like the server port) and your own custom application properties.
.YAML vs .Properties - What will you choose ? Spring Boot properties configuration | Spring boot #4
To understand how Spring Boot automatically uses this file, let's watch a section of the video 'YAML vs .Properties' from the Selenium Express channel. It demonstrates this concept by changing the default server port.
Watch from 04:42 to 07:23. The instructor first shows the default port (8080) and then adds the server.port property to application.properties to change it. This clearly illustrates the file's automatic effect on the application.
As you saw, simply adding server.port=1996 to the file was enough to change the application's behavior. You didn't need to write any code to load or read the file; Spring Boot handled it for you.
2. Defining Custom Properties and Injecting with @Value
While configuring built-in properties is useful, the real power comes from defining your own. You can add any custom key-value pairs to application.properties to manage settings specific to your application.
A common naming convention for property keys is "kebab-case" (e.g., my-app.version) or dot-separated notation (e.g., my.app.version).
Once you've defined a property, you can inject its value directly into your Spring-managed beans (like @Component, @Service, or @Controller) using the @Value annotation.
Let's see this in action.
Read application.properties File In Spring Boot Using @Value Annotation
This video from Infybuzz provides a concise, step-by-step guide on defining a custom property and injecting it with @Value.
Watch from 00:29 to 03:44. The video will show you: How to add a custom property (app.name=Demo App) to application.properties. How to use @Value("${app.name}") in a controller to inject the value into a field.
The syntax is straightforward:
- In
application.properties:app.name=My Backend App - In your Java class:
@Value("${app.name}") private String appName;
The ${...} placeholder tells Spring to look for a property with the key app.name in its environment and inject the corresponding value.
A crucial point to remember: The @Value annotation only works on beans managed by the Spring container. If you place it in a plain Java class (a POJO) that you instantiate yourself with new MyClass(), Spring will not process the annotation, and the value will not be injected. This is a common source of confusion for beginners.
3. Making Your Configuration Robust
What happens if a property is not defined in application.properties? As you might expect, your application will fail to start because Spring cannot resolve the placeholder. To prevent this, it's a best practice to provide a default value.
You can also inject values that aren't strings. Spring will automatically convert the property value to the target field's type, such as int, double, or boolean.
Let's explore these two important features.
Read application.properties File In Spring Boot Using @Value Annotation
Let's return to the Infybuzz video, which perfectly demonstrates how to handle missing properties with default values.
Watch from 03:44 to 06:01. The video first shows the application startup failure when a property is missing. Then, it introduces the colon syntax (:) to provide a default value, which allows the application to start successfully.
The syntax for providing a default value is @Value("${app.name:Default App Name}").
Now, let's look at type conversion.
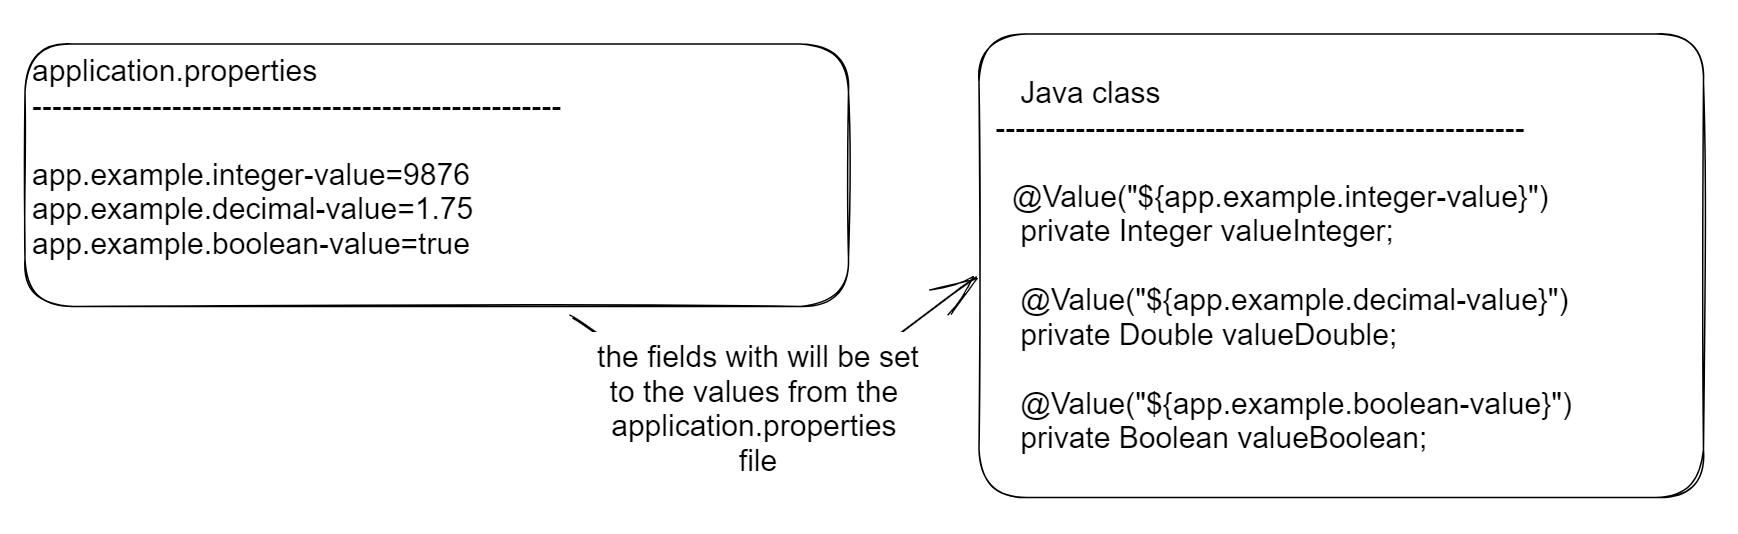
The process is seamless. If you define these properties:
app.example.integer-value=100
app.example.decimal-value=99.9
app.example.boolean-value=true
You can inject them like this:
@Value("${app.example.integer-value}")
private int valueInteger;

@Value("${app.example.decimal-value}")
private double valueDouble;

@Value("${app.example.boolean-value}")
private boolean valueBoolean;
For a deeper dive into all the possibilities with @Value, including injecting lists and using more complex expressions, the following guide is an excellent resource.
A Comprehensive Guide to Using Spring's @Value Annotation
The article 'A Comprehensive Guide to Using Spring's @Value Annotation' covers several advanced use cases. We'll focus on type mapping and the best practices.
Please read Section 4, 'Auto-Mapping to Various Types,' and Section 7, 'Best Practices and Advanced Tips.' This will reinforce your understanding of type conversion and introduce key principles for writing maintainable configurations.
Test your understanding!
You are building a service that processes user uploads. You need to configure two parameters:
- The maximum allowed file size in megabytes.
- A feature flag to enable or disable virus scanning.
Your task:
- In
application.properties, define properties forupload.max-size-mb(set to50) andupload.virus-scan.enabled(set totrue). - In a Spring service class (
UploadService), create two fields,maxSizeMb(as anint) andvirusScanEnabled(as aboolean). - Use the
@Valueannotation to inject the properties into these fields. For themaxSizeMbfield, provide a default value of10.
Write out what your application.properties entries and the relevant parts of your UploadService.java class would look like.
Show answer
src/main/resources/application.properties:
upload.max-size-mb=50
upload.virus-scan.enabled=true
UploadService.java:
import org.springframework.beans.factory.annotation.Value;
import org.springframework.stereotype.Service;

@Service
public class UploadService {

    private final int maxSizeMb;
    private final boolean virusScanEnabled;

    // Using constructor injection is a best practice for required dependencies
    public UploadService(
            @Value("${upload.max-size-mb:10}") int maxSizeMb,
            @Value("${upload.virus-scan.enabled}") boolean virusScanEnabled) {

        this.maxSizeMb = maxSizeMb;
        this.virusScanEnabled = virusScanEnabled;

        System.out.println("Max upload size: " + this.maxSizeMb + "MB");
        System.out.println("Virus scanning enabled: " + this.virusScanEnabled);
    }

    // ... service methods
}
Note: Using @Value on constructor parameters is a great way to ensure that the bean cannot be created without its required configuration.
4. The "Why": Externalizing Configuration
We've covered the "how," but it's just as important to understand the "why." Your goal is to build enterprise-level applications, and a core principle for such systems is outlined in the 12-Factor App methodology. Factor III, "Config," states that configuration that varies between deployments (development, staging, production) should be stored in the environment.
This means you should have one codebase and one build that can be deployed to any environment, with only the external configuration changing. Things like database credentials, API keys for third-party services, and environment-specific feature flags should never be hard-coded or committed to your version control system.
Spring Boot fully embraces this philosophy. While application.properties inside your project is the first place Spring looks, it will also check for properties in other locations, with values from "more external" sources overriding internal ones. The order of precedence is quite extensive, but a simplified version looks like this (from lowest to highest precedence):
- Properties inside your packaged JAR (
application.properties). - Properties outside your packaged JAR (in the same directory).
- Operating system environment variables.
- Command-line arguments (e.g.,
java -jar my-app.jar --server.port=9000).
This hierarchical system gives you immense flexibility to configure your application securely and effectively in any environment.
Conclusion
Congratulations on completing the Spring Core module! You now have a solid foundation in the principles that power the entire Spring ecosystem.
Key Takeaways:
application.propertiesis Spring Boot's default file for externalizing configuration.- The
@Value("${property.key}")annotation injects property values into fields or constructor parameters of Spring-managed beans. - It's a best practice to provide default values (e.g.,
${key:default}) to make your application more resilient. - Spring automatically converts property strings to the required data type (
int,boolean,double, etc.). - Externalizing configuration is a fundamental principle for building flexible, secure, and maintainable backend applications.
What's Next?
You have now mastered the core mechanics of the Spring IoC container: defining beans, managing their dependencies through DI, controlling their lifecycles with scopes, and externalizing their configuration.
With these fundamentals in place, you are ready to start building what you came here to learn: RESTful APIs. In the next module, we will jump straight into Spring Boot, use the Spring Initializr to bootstrap our first web project, and create a simple REST controller to handle live HTTP requests.