Hello! Welcome back.
In our last lesson, you successfully created, imported, and ran your first Spring Boot application. You now have a running server, but it doesn't do anything specific yet. It's like having an engine that's on, but not connected to any wheels. Today, we'll connect the wheels.
This lesson addresses the next step in our journey: building REST controllers using @RestController and @RequestMapping annotations. We will create our first API endpoint, which is the fundamental building block for any backend service. You'll learn how to tell Spring to execute a specific piece of your Java code when a user makes an HTTP request to a particular URL.
Let's begin.
1. From Request to Code: The Role of a Controller
Remember from our first module how the DispatcherServlet acts as a central hub, receiving all incoming requests? Its main job is to figure out which code should handle that specific request. In Spring, the components responsible for handling these requests are called controllers.
A controller is simply a Java class that listens for requests at specific URLs and contains methods that execute in response.

To get a feel for how this works in Spring, let's watch a brief introduction.
Spring Boot Quick Start 11 - Adding a REST Controller
The following video from Java Brains provides a great high-level overview of what a controller is and how annotations are used to map URLs to your code.
Watch the first minute of this video (from 00:16 to 01:16) to understand the concept of a controller and its role in a Spring application.
As the video explains, we will create a simple Java class and use annotations to give it the "superpower" of being a web request handler.
2. Introducing @RestController
To turn a plain Java class into a web controller, Spring provides a set of special annotations. For building REST APIs that return data (like JSON) rather than HTML pages, the primary annotation is @RestController.
@RestController is a specialized annotation that tells Spring two things:
- This class is a controller and should be scanned for request mappings.
- The return value of its methods should be written directly into the HTTP response body. This is crucial for APIs, as we want to send back data, not render a view.
@Controller vs. @RestController
You might also see @Controller used in Spring applications. What's the difference? This is an important distinction that aligns with your goal of understanding what happens "under the hood".
@Controller: This is the original annotation for Spring MVC. By default, its methods are expected to return aStringthat represents the name of a view (e.g., an HTML template) to be rendered.@RestController: This is a convenience annotation that combines@Controllerand another annotation,@ResponseBody. The@ResponseBodypart is what automatically tells Spring to serialize the method's return object into the response body (e.g., as JSON).
Since our goal is to build REST APIs, we will almost always use @RestController.
This short video explains the difference clearly.
@Controller vs @RestController in Spring Boot | Last-Minute Java Interview Guide
The Java Guides channel provides a concise breakdown of when to use @Controller versus @RestController.
Watch the segment from 00:23 to 02:33. Focus on the core purpose of each annotation and how @RestController is a shortcut.
To reinforce this, the following image provides a handy comparison table.
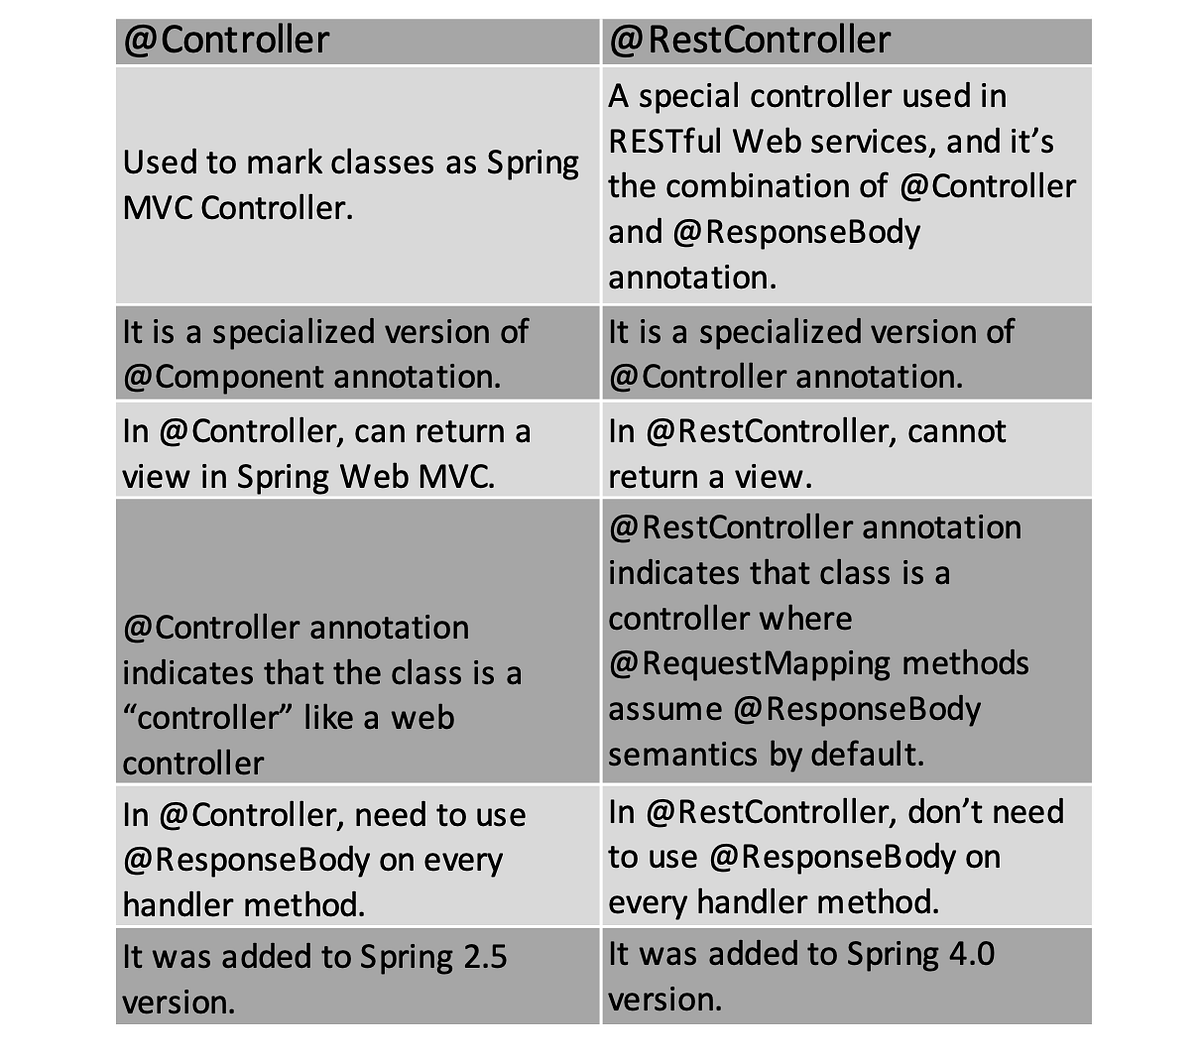
3. Mapping URLs with @RequestMapping
Now that we have a class marked as a @RestController, how do we link a specific URL path to a method inside that class? For this, we use the @RequestMapping annotation.
You apply @RequestMapping to a method and provide it with the URL path you want to map.
For example:
@RequestMapping("/hello")
public String sayHello() {
    return "Hello, World!";
}
When Spring sees this, it understands that any HTTP request to http://localhost:8080/hello should trigger the sayHello() method. Because the class is annotated with @RestController, the returned String ("Hello, World!") will be sent back as the plain text response.
Let's see this in action.
Spring Boot Quick Start 11 - Adding a REST Controller
Let's return to the Java Brains video to see a practical demonstration of creating a controller class and adding a request mapping.
Watch the section from 02:21 to 06:32. Observe how @RestController is added to the class and @RequestMapping is added to the method.
An important point mentioned in the video is that @RequestMapping by default maps to GET requests, which is what your browser makes when you type a URL. We'll cover other HTTP methods like POST in the next lesson.
4. Hands-On: Your First API Endpoint
It's time to apply this to the first-api project you created in the last lesson.
-
Open your project in your IDE.
-
Create a new package: Inside your main package (
com.mybackend.firstapi), create a new sub-package namedcontroller. It's good practice to organize your classes by their function. -
Create a new Java class: Inside the
controllerpackage, create a new class namedGreetingController. -
Add the annotations and method: Add the
@RestControllerannotation to the class and create a method with a@RequestMapping. Your final code should look like this:package com.mybackend.firstapi.controller; import org.springframework.web.bind.annotation.RequestMapping; import org.springframework.web.bind.annotation.RestController; @RestController public class GreetingController { @RequestMapping("/greeting") public String getGreeting() { return "Hello from your first Spring Boot API!"; } } -
Run the application: Just as you did in the previous lesson, run the
FirstApiApplicationmain class. -
Test your endpoint: Once the server starts (on port 8080), open a web browser and navigate to
http://localhost:8080/greeting.
You should see the text "Hello from your first Spring Boot API!" in your browser. You've just created and successfully called your first API endpoint!
How did Spring find your controller?
You might wonder how Spring automatically detected your GreetingController class. This is due to the component scanning feature we touched upon in the last lesson. The @SpringBootApplication annotation on your main class includes @ComponentScan, which directs Spring to scan the current package and all its sub-packages for classes annotated with stereotypes like @RestController, @Service, @Repository, etc., and register them as Spring beans.
5. Looking at a Complete Controller
Our greeting controller is simple. In a real application, controllers manage a specific resource (like "Employees" or "Products").
Getting Started | Building REST services with Spring
To see what a more complete controller looks like, let's look at an example from the official Spring documentation. This will give you a sense of where we are headed.
Read the sections 'HTTP is the Platform' and the brief explanation that follows it. You don't need to understand every line of code yet, but focus on the structure of the EmployeeController.java class. Notice how @RestController is used at the class level and various mapping annotations (like @GetMapping, @PostMapping, etc.) are used on methods to handle different operations for the '/employees' resource.
This EmployeeController example shows how one controller can have multiple methods to handle all the operations for a single resource. We will build a controller just like this over the next few lessons.
Test your understanding!
- In your
GreetingController, add a new method that responds to the URL/farewelland returns the string "Goodbye!". - After adding the method, what steps do you need to take to test it?
- Conceptually, if you changed
@RestControllerto@Controlleron yourGreetingControllerclass and re-ran the application, what would happen when you visithttp://localhost:8080/greeting? Why?
Show answer
- You would add the following method to your
GreetingControllerclass:@RequestMapping("/farewell") public String getFarewell() { return "Goodbye!"; } - You would need to restart your Spring Boot application for the changes to take effect, then open a browser and navigate to
http://localhost:8080/farewell. - You would get a
404 Not Founderror (or a "Whitelabel Error Page"). This is because with@Controller, Spring assumes the returned string"Hello from your first Spring Boot API!"is the name of a view template to render. Since no such template exists, it fails to find the view and returns an error.
Conclusion
Fantastic work today! You've bridged the gap between a running server and a functional API endpoint. This is a critical milestone in your backend development journey.
Key Takeaways:
- Controllers are Java classes that handle incoming web requests.
@RestControlleris the primary annotation for building REST APIs. It marks a class as a controller and ensures method return values are serialized directly to the response body.@RequestMapping("/path")is used on methods to map them to a specific URL path.- Spring Boot's component scanning automatically detects and registers your controller classes when the application starts.
What's Next?
So far, we've used @RequestMapping for a simple GET request. However, REST APIs use various HTTP methods to perform different actions (Create, Read, Update, Delete). In our next lesson, we will dive into more specific mapping annotations like @GetMapping, @PostMapping, @PutMapping, and @DeleteMapping to build a full set of CRUD operations for a resource.