Hello! Welcome back to our journey through Python and data science.
In our last lesson, we took the first crucial step into numerical computing by learning how to create 1D and 2D NumPy arrays. You learned how to use functions like np.array(), np.zeros(), and np.arange(), and how to inspect an array's fundamental properties: its shape, size, and dtype.
Today, we move from creating arrays to manipulating them. This lesson is all about accessing, selecting, and restructuring the data within your arrays. Our goal is to master three essential skills: indexing, slicing, and reshaping. These operations are the workhorses of data manipulation in Python and are used constantly when preparing data for AI models.
Let's begin.
Indexing: Accessing Single Elements
Just like with Python lists, you can access individual elements of a NumPy array using their index. The key difference and improvement comes when working with multi-dimensional arrays.
- 1D Arrays: Works exactly like a Python list.
arr[i]gets the element at indexi. Remember that indexing starts at 0. - 2D Arrays (Matrices): You can use a single set of square brackets with a comma to specify the row and column:
arr[row, col]. This is cleaner and more efficient than the nested bracket syntax used for lists (my_list[row][col]).
Let's watch a short video that demonstrates this clearly.
Complete Python NumPy Tutorial (Creating Arrays, Indexing, Math, Statistics, Reshaping)
The video 'Complete Python NumPy Tutorial' by Keith Galli provides excellent, clear examples of basic indexing.
Watch the segment from the beginning of the section at 16:08 to 18:25. Focus on the syntax for accessing elements in 2D and 3D arrays, and how negative indexing works.
Here's a code example to summarize:
import numpy as np

# A 2D array (3 rows, 4 columns)
a = np.array([[1, 2, 3, 4],
              [5, 6, 7, 8],
              [9, 10, 11, 12]])

# Access the element in the 2nd row (index 1) and 3rd column (index 2)
element = a[1, 2]
print(f"Element at [1, 2] is: {element}") # Output: 7

# Negative indexing: access the last element in the first row
last_element_first_row = a[0, -1]
print(f"Element at [0, -1] is: {last_element_first_row}") # Output: 4

# You can also modify elements using indexing
a[0, 0] = 99
print("\nArray after modification:")
print(a)
Slicing: Selecting Subsets of Arrays
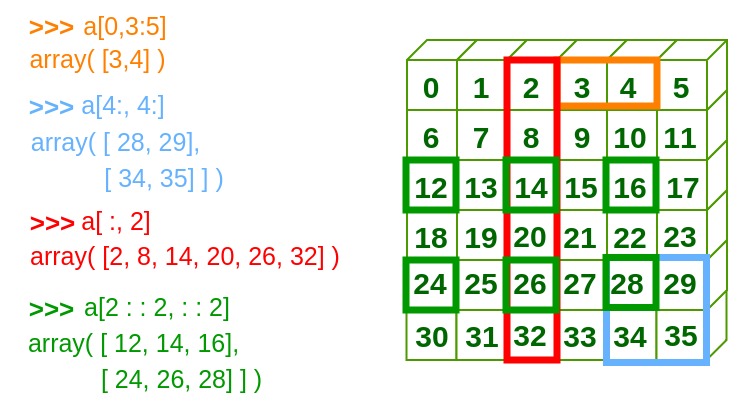
Slicing lets you select entire sections of an array. The syntax is start:stop:step, which should be familiar from Python lists. Where NumPy shines is applying this across multiple dimensions.
The general syntax for a 2D array is arr[row_slice, column_slice]. A single colon : is used to select all elements along that axis.
a[1, :]ora[1]: Selects the entire second row (index 1).a[:, 2]: Selects the entire third column (index 2).a[0:2, 1:3]: Selects a sub-array from the first two rows (0 and 1) and the middle two columns (1 and 2).
This image provides a great visual guide to slicing operations.
An Important Distinction: Views vs. Copies
This is a critical concept. When you slice a Python list, you get a new list—a copy of the original data. In NumPy, slicing creates a view of the original array. A view is not a new array; it's a window into the original array's data.
Why does this matter?
- Performance: Creating views is much faster and more memory-efficient than copying data, especially for large arrays.
- Side Effects: If you modify a view, you are also modifying the original array. This is a powerful feature but can cause unexpected bugs if you're not aware of it.
the absolute basics for beginners — NumPy v2.2 Manual
The official NumPy documentation explains the concept of views vs. copies clearly. Understanding this is crucial for writing correct and efficient code.
First, read the paragraph in the 'Array fundamentals' section starting with 'One major difference is that slice indexing of a list copies...'. Then, jump to the section 'How to create an array from existing data' and read the paragraphs under the sub-heading 'You can use the view method...', which provides a code example of how modifying a view affects the original array. Finally, read the paragraph about the .copy() method.
If you explicitly need a copy, you must use the .copy() method: new_array = old_array[0:2, :].copy().
Test your understanding!
Given the array a from our previous example:
a = np.array([[1, 2, 3, 4],
              [5, 6, 7, 8],
              [9, 10, 11, 12]])
- Write a slice that selects the last two columns (
[3, 4],[7, 8],[11, 12]). - Write a slice that selects the sub-array
[[6, 7], [10, 11]]. - Consider the code:
b = a[0, :]. If you then runb[0] = 100, what willa[0, 0]be?
Show answer
a[:, 2:]ora[:, 2:4]a[1:3, 1:3]a[0, 0]will be100. Becausebis a view of the first row ofa, modifyingbalso modifiesa.
Advanced Indexing
Beyond simple slicing, NumPy offers more powerful ways to select data.
1. Boolean Indexing (Masking)
You can use an array of boolean values to select elements. The boolean array (or "mask") must have the same shape as the array you are indexing. This is incredibly useful for filtering data based on conditions.
data = np.array([[10, 25],
                 [30, 15],
                 [40, 5]])

# Create a boolean mask for values greater than 20
mask = data > 20
print("Boolean Mask:\n", mask)
# [[False  True]
#  [ True False]
#  [ True False]]

# Use the mask to select only the elements that are True
print("\nElements greater than 20:\n", data[mask]) # Output: [25 30 40]
2. Integer Array Indexing ("Fancy" Indexing)
You can also use lists or NumPy arrays of integers to select specific elements in a non-contiguous way.
arr = np.array([10, 20, 30, 40, 50, 60])

# Select elements at indices 0, 2, and 5
print(arr[[0, 2, 5]]) # Output: [10 30 60]

# For a 2D array, you can select specific rows
matrix = np.array([[1, 2, 3],
                   [4, 5, 6],
                   [7, 8, 9]])
print("\nSelecting rows 0 and 2:\n", matrix[[0, 2], :])
Unlike slicing, advanced indexing always returns a copy of the data, not a view.
Let's see these advanced techniques in action.
Complete Python NumPy Tutorial (Creating Arrays, Indexing, Math, Statistics, Reshaping)
Let's return to Keith Galli's tutorial, which has a great segment on these advanced methods.
Watch the segment on Advanced Indexing (50:10 - 54:40). Pay close attention to how a conditional statement like file_data > 50 creates a boolean mask and how that mask is used inside the square brackets to filter the array.
Reshaping Arrays
Often, you'll need to change the dimensions of your array. For example, you might have a long 1D array of pixel values that you need to convert into a 2D array representing an image. This is done with the reshape() method.
The fundamental rule of reshaping is: The size of the new array must be identical to the size of the original array. For instance, you can reshape an array of size 12 into (3, 4), (4, 3), (2, 6), (6, 2), or (12, 1), but not (3, 5).
Python NumPy Tutorial for Beginners #5 - Shape and Reshaping Arrays
The video 'Shape and Reshaping Arrays' by Code of the Future gives a fantastic, intuitive explanation of reshaping, including the core rule about matching the total number of elements.
Please watch from 5:00 to 12:21. The example of organizing student exam scores is a great practical use case for reshaping. The video clearly explains the 'multiplication rule' for valid new shapes and shows the error you get when you violate it.
Here is a code example:
# Create a 1D array of 12 elements
a = np.arange(12)
print("Original array:\n", a)
print("Original shape:", a.shape)

# Reshape it into a 3x4 matrix
b = a.reshape(3, 4)
print("\nReshaped array (3x4):\n", b)
print("New shape:", b.shape)

# Flatten a multi-dimensional array back into 1D
# The -1 is a useful trick that tells NumPy to automatically infer the correct dimension.
c = b.reshape(-1)
print("\nFlattened array:\n", c)
print("Flattened shape:", c.shape)
Adding New Dimensions
A common task, especially when preparing data for machine learning models, is to add a new dimension. For instance, you might convert a 1D vector of shape (n,) into a 2D column vector (n, 1) or row vector (1, n). This is essential for linear algebra operations you'll perform later.
You can do this using reshape, but a more convenient syntax is np.newaxis.
# A 1D array
vec = np.array([1, 2, 3])
print(f"Original shape: {vec.shape}")

# Convert to a row vector
row_vec = vec[np.newaxis, :]
print(f"Row vector shape: {row_vec.shape}") # (1, 3)
print(row_vec)

# Convert to a column vector
col_vec = vec[:, np.newaxis]
print(f"Column vector shape: {col_vec.shape}") # (3, 1)
print(col_vec)
Conclusion
Fantastic work today. You've now acquired a powerful toolkit for manipulating NumPy arrays. These skills—indexing to access data, slicing to create views, advanced indexing for filtering, and reshaping to alter structure—form the backbone of almost all data preparation tasks in machine learning.
Key Takeaways:
- Indexing: Use
arr[row, col]for precise element access in 2D arrays. - Slicing: Use
start:stop:stepnotation to select sections of an array. Slicing creates a view, meaning modifications affect the original array. Use.copy()to create an independent copy. - Advanced Indexing:
- Boolean masking (
arr[arr > 5]) is a powerful way to filter data based on conditions. - Integer array indexing (
arr[[1, 5, 7]]) selects specific, non-contiguous elements.
- Boolean masking (
- Reshaping: Use
arr.reshape(new_shape)to change an array's dimensions. The total number of elements (size) must remain the same. Usenp.newaxisto easily add a dimension.
In our next lesson, we will put these skills to use by learning how to apply fast, vectorized mathematical and statistical operations across entire arrays.