Hello! Welcome to your fifth lesson in the Routing and Request Handling module.
In our last lesson, we took a big step toward professional application structure by organizing our endpoints into modules with APIRouter. We also got a small taste of FastAPI's documentation capabilities when we used the tags parameter to group our endpoints in the Swagger UI.
Today, we'll dive deep into what is arguably FastAPI's most celebrated feature: its automatic, interactive API documentation. While you get a basic version for free, the real power lies in customizing it to create a clear, comprehensive, and user-friendly guide for your API consumers (including your future self!).
Learning Outcome: Customize auto-generated OpenAPI docs (Swagger UI/ReDoc) with metadata, tags, and response status codes.
Given your experience with Django REST Framework (DRF), you'll likely appreciate that FastAPI's co-creator was inspired by DRF's browsable API. FastAPI takes this concept to the next level by adopting the industry-standard OpenAPI specification. This lesson will show you how to leverage this to its full potential.
1. The Magic Behind the Docs: OpenAPI
Before we start customizing, let's briefly understand how FastAPI generates this documentation.
- Code as the Source of Truth: FastAPI inspects your code—specifically your path operation functions, type hints, Pydantic models, and decorators.
- OpenAPI Schema Generation: It uses this information to automatically generate a machine-readable JSON file, typically at
/openapi.json. This file strictly follows the OpenAPI specification, an open standard for defining RESTful APIs. - Interactive UIs: This
openapi.jsonfile is then used to power two different interactive documentation UIs that come bundled with FastAPI:- Swagger UI: Available at
/docs. - ReDoc: A cleaner, alternative view available at
/redoc.
- Swagger UI: Available at
The key takeaway is that you don't write documentation separately. You enrich your code, and the documentation is automatically generated and updated. This was a core design principle inspired by the limitations of older frameworks.
Alternatives, Inspiration and Comparisons - FastAPI
To understand the inspiration behind this feature, let's look at this brief document from FastAPI's creator. It explains how DRF's automatic documentation led to the adoption of the OpenAPI standard.
Read the sections 'Django REST Framework' and 'Swagger / OpenAPI'. Notice the explicit mention of DRF as an inspiration and the decision to use an open standard (OpenAPI) instead of a custom solution.
2. High-Level API Metadata
The first and easiest customization is to provide high-level metadata about your API. This information appears at the top of the documentation pages and gives users essential context. You do this by passing arguments directly to the FastAPI instance in your main.py.
How to Generate OpenAPI Documentation in FastAPI
The following article from OneUptime provides a clear guide to customizing documentation. We'll start with the 'Customizing API Metadata' section.
Read the section 'Customizing API Metadata'. Pay attention to the arguments like title, description, version, contact, and license_info. The description field is particularly powerful as it accepts Markdown, allowing for rich formatting.
Here's an example of how you would apply this in main.py:
# main.py
from fastapi import FastAPI

app = FastAPI(
    title="My Awesome Items API",
    description="""
An API to manage items, built with FastAPI. 🚀

You can **create**, **read**, **update**, and **delete** items.
    """,
    version="1.0.0",
    contact={
        "name": "API Support",
        "url": "http://www.example.com/support",
        "email": "support@example.com",
    },
    license_info={
        "name": "Apache 2.0",
        "url": "https://www.apache.org/licenses/LICENSE-2.0.html",
    },
)


# ... rest of your application
3. Organizing Endpoints with Rich Tags
In the previous lesson, we used tags=["Items"] to group our routes. We can make these tags even more informative by defining them with descriptions and external links in the main FastAPI instance. This provides a "table of contents" for your API.
How to Generate OpenAPI Documentation in FastAPI
Let's continue with the OneUptime article to see how to define metadata for our tags.
Read the section 'Using Tags to Organize Endpoints'. The key is the openapi_tags parameter, which takes a list of dictionaries, where each dictionary defines a tag.
Here is what the openapi_tags metadata looks like in code:
# main.py

tags_metadata = [
    {
        "name": "Items",
        "description": "Operations with items. The main logic of the API.",
    },
    {
        "name": "Root",
        "description": "The root/health-check endpoint.",
        "externalDocs": {
            "description": "Project README",
            "url": "https://github.com/your-repo/readme",
        },
    },
]

app = FastAPI(
    title="My Awesome Items API",
    openapi_tags=tags_metadata,


    # ... other metadata
)
The result in the Swagger UI is a much more organized and descriptive interface.
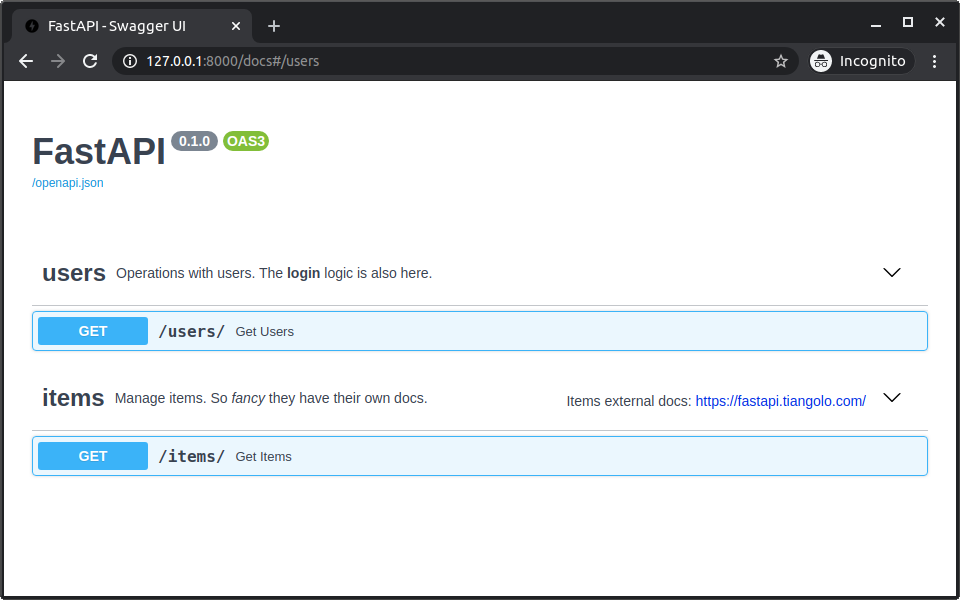
4. Documenting Endpoints and Responses
Now, let's zoom into individual endpoints. You can add a wealth of detail directly in the path operation decorator.
Setting a Default Status Code
By default, FastAPI assumes a successful response has a status code of 200 OK. For resource creation (POST requests), the conventional success code is 201 Created. You can specify this using the status_code parameter.
Python FastAPI Tutorial (Part 4): Pydantic Schemas - Request and Response Validation
In this video, Corey Schafer demonstrates creating a POST endpoint and sets the appropriate status code. This is a best practice for RESTful APIs.
Watch from 12:39 to 13:48. Focus on how he adds status_code=HTTP_201_CREATED to the @app.post decorator and explains why this is the correct code for resource creation.
You'll need to import the status codes from fastapi: from fastapi import status. Then you can use it like this:@router.post("/", status_code=status.HTTP_201_CREATED)
Documenting Multiple Response Types
A real-world API endpoint doesn't just have one possible outcome. A request to get an item might succeed (200 OK) or fail because the item doesn't exist (404 Not Found). A request to create an item might succeed (201 Created) or fail because the input data is invalid (422 Unprocessable Entity).
Good documentation lists all possible responses. You can achieve this with the responses parameter.
How to Generate OpenAPI Documentation in FastAPI
The OneUptime article has an excellent section on documenting success and error responses together.
Read 'Documenting Multiple Response Types'. Notice how the responses parameter takes a dictionary where keys are status codes and values are dictionaries describing the response, including the Pydantic model (model) that defines its structure.
This is a powerful feature that makes your API predictable and easier to integrate with. For example, to document a GET endpoint that can return an item or a 404 error, your decorator might look like this:
from pydantic import BaseModel

class Message(BaseModel):
    detail: str


# In your router file
@router.get(
    "/{item_id}",
    response_model=Item,
    responses={
        404: {"model": Message, "description": "The item was not found"}
    }
)
async def get_item(item_id: int):


    # ... logic to find item ...
    if not item:
        raise HTTPException(status_code=404, detail="Item not found")
    return item
The documentation will now clearly show that this endpoint can return two different kinds of responses.
5. Practical Exercise
Let's apply everything we've learned to the modular application we built in the last lesson.
1. Update main.py
Modify your main.py to include high-level metadata and definitions for your tags.
# main.py
from fastapi import FastAPI, status
from routers import items

tags_metadata = [
    {
        "name": "Items",
        "description": "Manage items. You can **create** and **read** items.",
    },
    {
        "name": "Root",
        "description": "The root endpoint of the API.",
    },
]

app = FastAPI(
    title="My Items API",
    description="An API to manage items, built with FastAPI routers and rich documentation.",
    version="1.0.0",
    openapi_tags=tags_metadata,
    contact={
        "name": "Your Name",
        "email": "you@example.com",
    },
)

@app.get("/", tags=["Root"])
async def read_root():
    return {"message": "Welcome to the Items API!"}


# Include the items router
app.include_router(items.router, prefix="/items", tags=["Items"])
2. Enhance routers/items.py
Now, let's add detailed documentation to the endpoints themselves.
First, ensure you have the necessary imports:from fastapi import APIRouter, status, HTTPExceptionfrom pydantic import BaseModel
Create a simple Message model for error responses:
class Message(BaseModel):
    detail: str
Next, update your path operation decorators:
# routers/items.py


# ... your Item model and items_db list ...


# Create the router instance
router = APIRouter()


# Update the POST endpoint
@router.post(
    "/",
    response_model=Item,
    status_code=status.HTTP_201_CREATED,
    summary="Create a new item",
    description="Create a new item and store it in the in-memory database.",
    responses={
        status.HTTP_422_UNPROCESSABLE_ENTITY: {
            "description": "Validation Error",
        }
    }
)
async def create_item(item: Item):
    items_db.append(item.model_dump())
    return item


# Update the GET endpoint
@router.get(
    "/",
    response_model=List[Item],
    summary="Retrieve all items",
    description="Returns a list of all items currently in the database."
)
async def get_items():
    return items_db
3. Run and Explore
Now, run your server with uvicorn main:app --reload and open http://127.0.0.1:8000/docs.
Explore the changes:
- See the new title, version, and contact information at the top.
- Notice the descriptions under the "Items" and "Root" tags.
- Expand the
POST /items/endpoint. You'll see the custom summary, description, and a "Responses" section that now lists201as the successful response and422as a possible error. - Check the
GET /items/endpoint to see its summary and description.
Now, navigate to http://127.0.0.1:8000/redoc. You'll see the same information presented in a clean, three-panel layout.
Conclusion
You have now transformed your API's documentation from a bare-bones default into a rich, structured, and genuinely helpful resource. By embedding documentation details directly into your code, you ensure it stays up-to-date as your API evolves.
Key Takeaways:
- API-Level Metadata: Configure the main
FastAPIinstance withtitle,description,version, andopenapi_tagsto provide high-level context. - Endpoint-Level Detail: Use parameters in path operation decorators like
summary,description, andstatus_codeto document individual endpoints. - Documenting All Outcomes: The
responsesparameter is crucial for documenting both success and error scenarios, making your API predictable and robust. - Code as Documentation: FastAPI's approach keeps documentation and implementation tightly coupled, reducing the risk of outdated docs.
In our next lesson, we will address a practical challenge that arises when you try to connect a frontend application to your new API. We will implement and configure CORS middleware to allow cross-origin requests, an essential step for building full-stack applications.