Welcome back! In our last lesson, we contrasted Azure Storage Queues with Azure Service Bus, concluding that Service Bus is the go-to choice for enterprise scenarios demanding high reliability and advanced features. Now, it's time to move from theory to practice.
Today's lesson will guide you through implementing point-to-point messaging, a fundamental pattern for decoupling services. You will learn how to implement point-to-point messaging using Azure Service Bus queues with the .NET SDK. By the end of this session, you'll have written C# code to send messages to a Service Bus queue and reliably receive them for processing.
Let's begin by visualizing the simple but powerful pattern we are about to build.
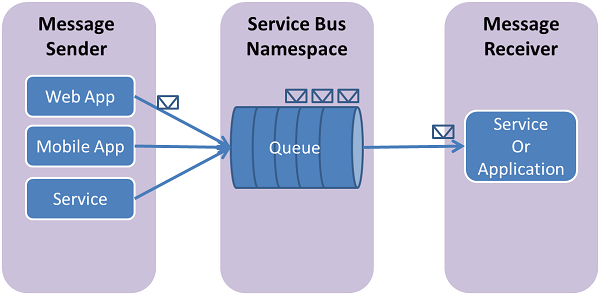
1. Setting Up Your Service Bus Resources
Before we can write any code, we need to create the necessary Azure resources: a Service Bus namespace and a queue within it. The namespace acts as a container for all your messaging components.
The following video provides a clear walkthrough of this process in the Azure portal.
Build Async Messaging in .NET with Azure Service Bus (Step-by-Step)
This video from Milan Jovanović demonstrates how to create a Service Bus namespace and a queue, which are the foundational steps for our task.
Watch the section from creating the resources. Pay attention to: Creating the namespace first. Selecting the Standard pricing tier, as the Basic tier does not support all the features we'll explore later (like topics). Creating a queue inside the namespace. Locating the Shared access policies and finding the connection string. You'll need this to connect your .NET application to the queue. For our exercise, the RootManageSharedAccessKey is sufficient, but in a real-world application, you would create more granular policies with only Send or Listen permissions.
Once you have your namespace and queue created, and you've copied the primary connection string, you're ready to start coding.
2. Sending Messages to a Queue
With your extensive background in .NET, you'll find the Azure SDK for Service Bus intuitive. We'll be using the Azure.Messaging.ServiceBus NuGet package, which provides the modern, async-first client library for interacting with Service Bus.
The core components for sending messages are:
ServiceBusClient: The main entry point. It manages the connection to your Service Bus namespace. It's best practice to register this as a singleton in your application's dependency injection container.ServiceBusSender: Created from theServiceBusClient, this object is responsible for sending messages to a specific queue or topic.ServiceBusMessage: Represents the message itself. The body can be a string, a byte array, or any serializable object (typically as a JSON string).
Let's look at the complete code for a simple console application that sends a batch of messages.
Azure Service Bus Queue Quickstart for .NET Apps - Microsoft Learn
The official Microsoft Quickstart provides a self-contained, copy-paste-ready example for a sender application. It's a great way to see the core SDK classes in action.
Read the section titled Send messages to the queue. Create a new .NET Console App project named QueueSender and follow these steps: Add the Azure.Messaging.ServiceBus NuGet package. Replace the contents of Program.cs with the code provided under the Connection string tab. Important: Replace the placeholder values for the connection string and queue name with your own. Notice how the code creates a client, then a sender, builds a batch of messages using CreateMessageBatchAsync, and finally sends them with SendMessagesAsync.
After running this sender application, you can go to your queue in the Azure Portal. Under the "Overview" tab, you should see the "Active Message Count" has increased.
3. Receiving and Processing Messages
Receiving messages reliably is more nuanced than sending them. The most common and robust approach uses the default PeekLock receive mode.
Here's how it works:
- The receiver "peeks" at a message and "locks" it, making it invisible to other receivers.
- The message remains locked for a configured duration (the "lock duration").
- Your code processes the message.
- If processing is successful, you explicitly complete the message (
CompleteMessageAsync), which deletes it from the queue. - If processing fails, you can abandon the message (
AbandonMessageAsync), which unlocks it and makes it available for another receiver to try again.
This two-phase process ensures that messages are not lost if your receiver application crashes during processing.
The following video explains this crucial concept very clearly.
AZ-204 - Connect and Consume Services - Azure Service Bus
This video by Alan Rodrigues provides an excellent conceptual breakdown of the message lock duration and the importance of explicitly completing a message when using PeekLock mode.
Watch the section on message lock duration. This will solidify your understanding of why we need to explicitly manage the message lifecycle.
Using the ServiceBusProcessor
To simplify receiving messages, the SDK provides the ServiceBusProcessor. This high-level object runs in the background, continuously fetches messages, and invokes your code via event handlers. It's the recommended way to build a message receiver.
The key steps are:
- Create a
ServiceBusProcessorfor your queue. - Register handlers for two events:
ProcessMessageAsync: This is your main handler, called for each message received. You write your business logic here.ProcessErrorAsync: This handler is called if an error occurs within the processor itself (e.g., connection issues).
- Start the processor with
StartProcessingAsync(). - Inside your
ProcessMessageAsynchandler, after successfully processing the message, you must callargs.CompleteMessageAsync(args.Message).
Let's add a receiver application to your solution to process the messages we sent earlier.
Azure Service Bus Queue Quickstart for .NET Apps - Microsoft Learn
This part of the quickstart guides you through creating the receiver application using the ServiceBusProcessor.
Follow the instructions in the section Receive messages from the queue. Add a new .NET Console App project named QueueReceiver to your solution. Make it the startup project. Add the Azure.Messaging.ServiceBus NuGet package. Replace the Program.cs code with the one from the Connection string tab. Again, replace the placeholder values for the connection string and queue name. Pay close attention to the MessageHandler function. The line await args.CompleteMessageAsync(args.Message); is where you tell Service Bus that you're done with the message and it can be safely deleted.
Now, run your QueueReceiver application. You should see the console output indicating that it has received and processed the messages. If you check the Azure Portal again, the active message count on your queue will drop to zero.
Conclusion
In this lesson, you've successfully built a complete point-to-point messaging solution using Azure Service Bus and the .NET SDK. You've seen how to send messages, and more importantly, how to receive them reliably using the ServiceBusProcessor and the PeekLock pattern.
Here are the key takeaways:
- SDK Core Classes: The primary types you'll work with are
ServiceBusClient(for connection),ServiceBusSender(to send messages), andServiceBusProcessor(to receive messages). - Sending Messages: You create a
ServiceBusMessageand use aServiceBusSenderto send it. Sending messages in a batch withCreateMessageBatchAsyncis more efficient for high throughput. - Reliable Receiving: The
ServiceBusProcessorprovides a robust, event-driven model for continuous message processing. - Message Settlement: In the default
PeekLockmode, you are responsible for the message's lifecycle. You must callCompleteMessageAsyncupon success to delete it from the queue, orAbandonMessageAsyncon failure to allow for a retry.
In our next lesson, we will build on this foundation to explore a more complex pattern. We will implement publish-subscribe messaging using Service Bus topics and subscriptions, which allows a single message to be delivered to multiple independent consumers.