Hello! In our previous lesson, we built a point-to-point messaging system using Azure Service Bus queues. This one-to-one pattern is excellent for decoupling a sender and a receiver. Today, we'll explore a more powerful one-to-many communication model.
This lesson focuses on the publish-subscribe (or "pub/sub") pattern. You will learn to implement publish-subscribe messaging using Service Bus topics and subscriptions. Instead of a message being consumed by a single receiver, we'll send a message to a central "topic," which can then distribute copies of that message to multiple independent subscribers. This is a cornerstone of event-driven architectures and a critical skill for the AZ-204 exam.
Let's start by visualizing this pattern.
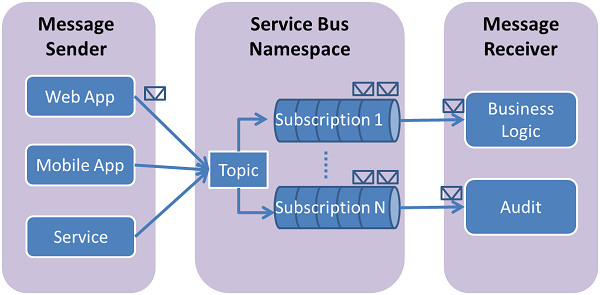
1. Topics and Subscriptions: The Core Concepts
In the pub/sub pattern, the producer (or publisher) sends a message to a topic. The topic then forwards the message to one or more subscriptions. You can think of a subscription as a virtual queue that gets a copy of every message sent to the topic. Each subscription can have its own consumer, allowing different parts of your system to react to the same event independently.
For a concise explanation of how topics differ from the queues we used in the last lesson, the following video segment is very helpful.
Build Async Messaging in .NET with Azure Service Bus (Step-by-Step)
Milan Jovanović provides a clear, animated comparison between queues (point-to-point) and topics (publish-subscribe).
Watch the short introduction from topics versus queues. This will solidify the conceptual difference before we start building.
2. Setting Up the Azure Resources
Just like in our last lesson, we need to create our resources in Azure before we can write code. We can reuse the same Service Bus namespace. Inside it, you'll need to create a topic and at least one subscription for that topic.
Crucially, a subscription will only receive messages that are published after the subscription has been created.
You can use the Microsoft Learn quickstart to walk through these steps.
Get started with Azure Service Bus topics (.NET)
The official documentation provides clear, step-by-step instructions for creating these resources in the Azure portal.
Follow the instructions in the sections titled Create a topic using the Azure portal and Create a subscription to the topic. You can use the same Service Bus namespace from the previous lesson.
3. Implementing the Publisher and Subscriber
With your strong background in .NET and your experience from the last lesson, you'll find the code for topics and subscriptions feels very familiar. We'll use the same Azure.Messaging.ServiceBus library.
The Publisher
The publisher's role is to send a message to the topic. The key point here is that the publisher is completely unaware of the subscriptions; it only needs to know the topic's name.
The code is nearly identical to the queue sender from our last lesson. The only change is that you provide a topic name instead of a queue name when creating the ServiceBusSender.
The Subscriber
The subscriber's role is to listen for messages on a specific subscription. We will again use the ServiceBusProcessor for a robust, background-processing implementation.
The primary difference from our queue receiver is that when you create the ServiceBusProcessor, you must provide both the topic name and the subscription name.
Let's implement this. We'll use the official quickstart, which provides a clean, self-contained example.
Get started with Azure Service Bus topics (.NET)
This guide provides complete code for a publisher and a subscriber console application, mirroring the structure we used for queues.
Publisher: Follow the instructions under Send messages to the topic. Create a new console app, add the Azure.Messaging.ServiceBus package, and use the code from the Connection string tab. Replace the placeholder values for the connection string, namespace, and topic name. Subscriber: Follow the instructions under Receive messages from a subscription. Create a second console app, add the package, and use the code from the Connection string tab. Replace the placeholders for the connection string, namespace, topic name, and subscription name. Run the publisher first, then the subscriber. You should see the subscriber process the messages. Notice how the code patterns for creating the client, sender, and processor are consistent with what you've already learned.
4. Advanced Routing with Subscription Filters
The real power of the pub/sub pattern emerges when you use filters. By default, each subscription gets a copy of every message. Filters allow a subscription to declare which messages it's interested in, enabling sophisticated routing scenarios.
There are two main types of filters:
SqlRuleFilter: Evaluates a SQL-like expression against the message's system and user properties. This provides powerful and flexible filtering logic.CorrelationRuleFilter: A highly optimized filter that performs simple equality matching on properties likeCorrelationId,Subject,ReplyTo, and user properties.
Let's see how to apply these.
Set subscriptions filters in Azure Service Bus
This documentation provides excellent examples of how to define and use filters.
First, read the sections Filter on message properties and Correlation filters. This will give you the syntax and concepts for both SqlRuleFilter and CorrelationRuleFilter. Pay attention to how user properties (from ServiceBusMessage.ApplicationProperties) can be used in the filter expressions. For example, a SQL filter of color = 'blue' AND quantity > 5 would match messages where you've set those specific application properties.
Hands-On Exercise: Implementing Filters
Now, let's put this knowledge into practice.
-
Create New Subscriptions: In the Azure Portal, go to your topic and create two new subscriptions:
HighPriorityOrdersBlueOrders
-
Add Filters:
- Select the
HighPriorityOrderssubscription, go to its Filters section, delete the default1=1filter, and add a new Correlation Filter. Set theCorrelationIdproperty tohigh. - Select the
BlueOrderssubscription, go to its Filters, delete the default filter, and add a new SQL Filter. Set the filter expression tocolor = 'blue'.
- Select the
-
Modify the Publisher: Update your publisher application (
Program.cs) to send a few different types of messages. The key is to set theApplicationPropertiesandCorrelationIdon theServiceBusMessageobject.// Inside your publisher's main method, before the finally block // Create a client and sender var client = new ServiceBusClient("YOUR_CONNECTION_STRING"); var sender = client.CreateSender("YOUR_TOPIC_NAME"); // Message 1: High-priority blue order var msg1 = new ServiceBusMessage("High-priority blue order") { CorrelationId = "high" }; msg1.ApplicationProperties.Add("color", "blue"); msg1.ApplicationProperties.Add("quantity", 10); // Message 2: Low-priority blue order var msg2 = new ServiceBusMessage("Low-priority blue order") { CorrelationId = "low" }; msg2.ApplicationProperties.Add("color", "blue"); msg2.ApplicationProperties.Add("quantity", 5); // Message 3: High-priority red order var msg3 = new ServiceBusMessage("High-priority red order") { CorrelationId = "high" }; msg3.ApplicationProperties.Add("color", "red"); msg3.ApplicationProperties.Add("quantity", 8); await sender.SendMessageAsync(msg1); await sender.SendMessageAsync(msg2); await sender.SendMessageAsync(msg3); Console.WriteLine("Sent 3 messages with properties."); await sender.DisposeAsync(); await client.DisposeAsync(); -
Test the Subscribers:
- Modify your subscriber application to read from the
HighPriorityOrderssubscription. Run it. It should receive Message 1 and Message 3. - Modify it again to read from the
BlueOrderssubscription. Run it. It should receive Message 1 and Message 2. - Finally, modify it to read from your original subscription (which has no filter). It should receive all three messages.
- Modify your subscriber application to read from the
This exercise demonstrates how a single publisher can send events to a topic, and multiple, independent downstream services can selectively process only the events relevant to them.
Conclusion
In this lesson, you've moved beyond simple point-to-point messaging and implemented the powerful publish-subscribe pattern. This is a fundamental building block for creating scalable, decoupled, and event-driven applications in Azure.
Here are the key takeaways:
- Pub/Sub Pattern: A topic acts as a message broker, fanning out messages to multiple independent subscriptions.
- .NET SDK Consistency: Sending to a topic and receiving from a subscription uses the same core
ServiceBusClient,ServiceBusSender, andServiceBusProcessorclasses you're already familiar with, making the transition from queues straightforward. - Publisher Decoupling: The message publisher sends to a topic and has no knowledge of the consumers.
- Subscription Filtering:
SqlRuleFilterandCorrelationRuleFilterare essential tools for routing messages to the appropriate subscribers based on message properties, enabling advanced architectural patterns.
In our next lesson, we will shift gears to explore Azure's other primary messaging service. We will implement basic queueing operations using Azure Queue Storage, and by comparing it with what we've learned about Service Bus, you'll gain a clear understanding of when to use each service.