Welcome back! In our previous lesson, we successfully integrated the Microsoft Authentication Library (MSAL) into a .NET application to handle user sign-in. This process, known as authentication, is all about verifying an identity—proving who a user is.
Now, we'll turn our attention to the next logical step: authorization. Once we know who the user (or application) is, we need to determine what they are allowed to do. Today, we will explore the two fundamental permission models in the Microsoft Identity Platform: delegated and application permissions. Understanding the difference is crucial for properly securing your APIs. By the end of this lesson, you will be able to configure both types of permissions and understand when to use each for controlling API access.
1. Two Scenarios for Accessing Data
At a high level, an application can access a protected resource like a web API in one of two ways:
- Delegated Access: The application acts on behalf of a signed-in user.
- App-only Access: The application acts on its own, with no user present. This is common for background services, daemons, or microservice-to-microservice communication.
These two scenarios map directly to the two permission types we'll be discussing.
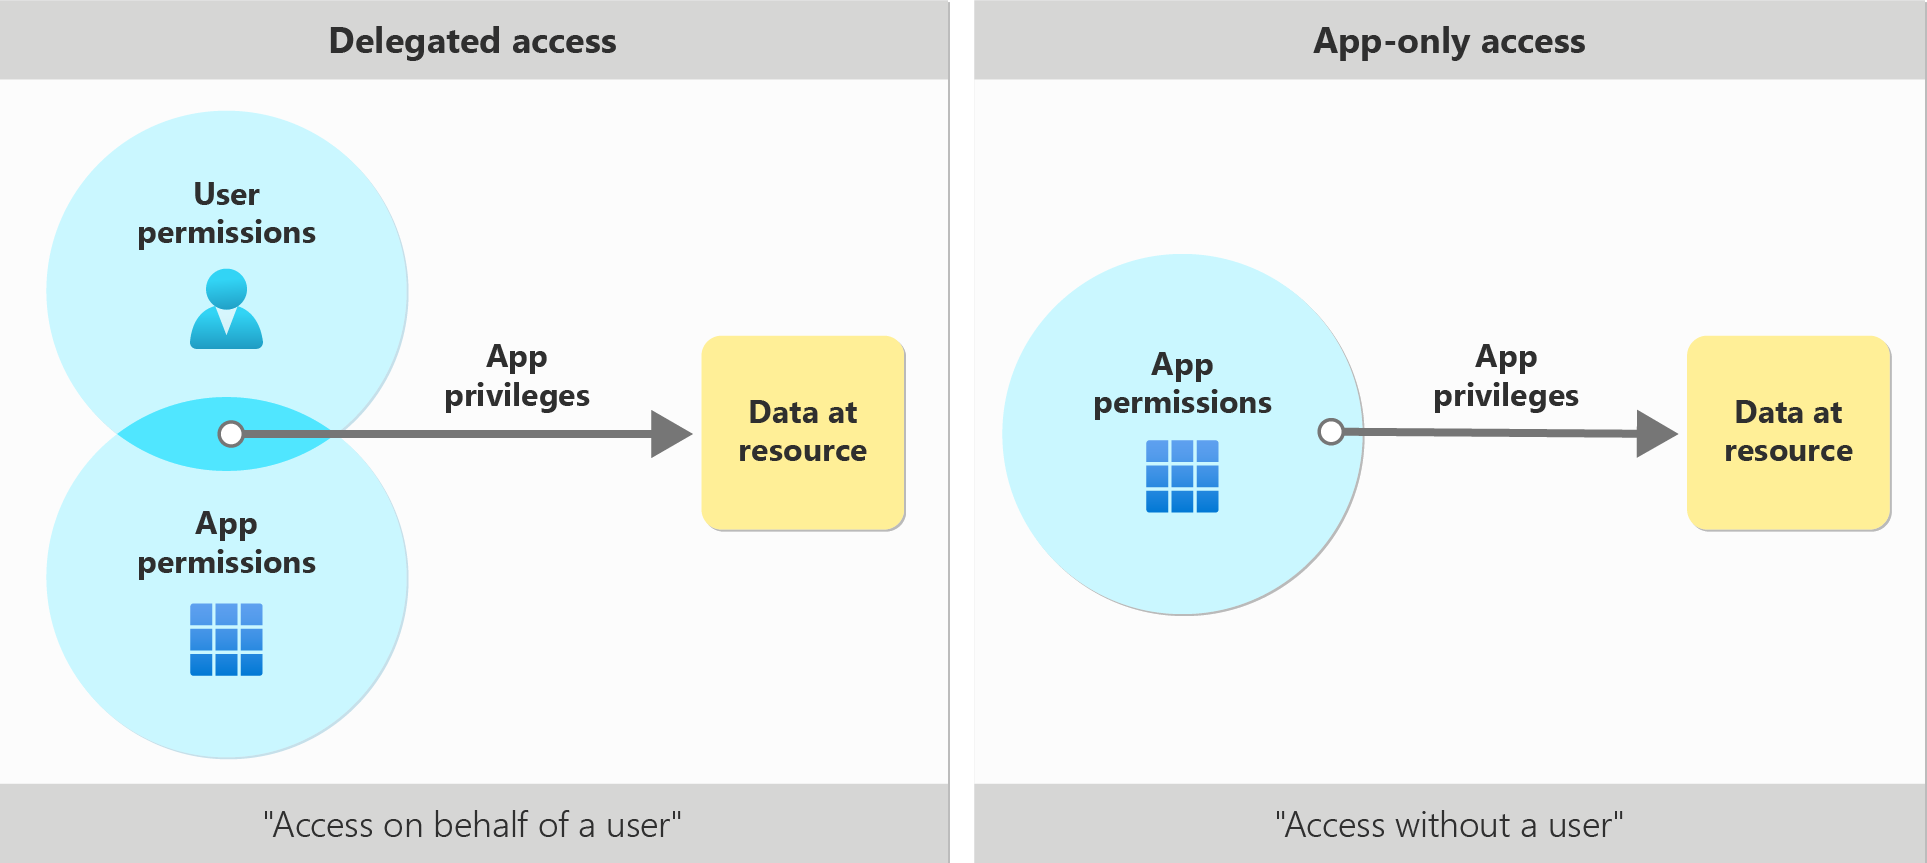
Let's dive into the details of each permission type.
2. Delegated vs. Application Permissions: The Core Concepts
To start, let's get a clear and concise definition of delegated and application permissions from Microsoft.
What are App Application Permissions vs Delegated Permissions? | One Dev Question: Hirsch Singhal
This short video from the official Microsoft Azure channel provides an excellent explanation of the two permission types.
Watch the entire video to grasp the fundamental difference: Delegated Permissions: Pay attention to the phrase "on behalf of" and how consent is recorded for a user. Application Permissions: Notice the absence of a user and the requirement for tenant administrator consent due to the "high powered" nature of this scenario.
To solidify these concepts, the following reading from Microsoft's documentation provides more detail and a helpful comparison table.
Overview of permissions and consent in the Microsoft identity platform
This document is the definitive guide to permissions and consent in Azure AD. It will provide the detailed conceptual framework you need for the AZ-204 exam.
Please read the following sections: Start with Access scenarios to reinforce the visual diagram from earlier. Read Types of permissions carefully. This section directly defines delegated and application permissions and includes a crucial comparison table. Finally, read the Consent section to understand how permissions are granted by users and administrators.
After reviewing these resources, let's summarize the key distinctions:
| Feature | Delegated Permissions | Application Permissions |
|---|---|---|
| Alias | Scopes | App Roles |
| Context | App acts on behalf of a signed-in user. | App acts on its own identity (a service principal). No user is present. |
| Use Case | Interactive web apps, mobile apps, SPAs where a user is present. | Background services, daemons, server-to-server APIs. |
| Effective Permissions | The intersection (least privilege) of the app's permissions and the signed-in user's privileges. | The app has the full permissions granted to it, independent of any user. |
| Who Can Consent | A user can consent for some permissions. An admin must consent for high-privilege permissions. | Only an administrator can consent. |
3. Configuring and Using Permissions in Practice
Now let's move from theory to practice. Seeing how these permissions are configured in the Azure portal and how they affect API calls is key.
Delegated Permissions in Action
Delegated permissions are requested by a client application to act on a user's behalf. Let's see what this looks like. The following video demonstrates adding a delegated permission to an app registration to call the Microsoft Graph API. The principles are the same when calling your own custom APIs.
Overview of Microsoft Graph API and delegated permissions
This video provides a practical walk-through of configuring delegated permissions and seeing the immediate effect on an API call.
Watch the following segments to see the end-to-end process: Conceptual overview: A quick recap of what delegated permissions are. Demonstration: This is the most important part. The presenter first shows a 403 Forbidden error when an API is called without the correct permission. Then, they walk through the Azure portal to add the required User.Read.All delegated permission and grant admin consent. Verifying the token: After getting a new token, notice how the new permission (user.read.all) appears in the scp (scope) claim of the JWT. Summary: A concise summary of the key takeaways.
This flow is typical: if a client app calls an API with a token that doesn't contain the required scope, the API should reject the request. By adding the delegated permission in the client's app registration, you are enabling it to request that permission during the sign-in flow.
Application Permissions in Action
Application permissions are used when an application needs to call an API by itself, for example, a nightly data-processing job. For your own API to expose an application permission, you must first define an App Role in its manifest. A client application can then be granted this role.
The following guide demonstrates exactly how to set this up for an ASP.NET Core API. You don't need to write the code yourself, but focus on understanding the configuration steps in the Azure Portal.
Protect and call an ASP.NET Core minimal Web API with Azure AD
This excellent blog post by Mark Heath details the end-to-end process of securing a .NET API and allowing a client application to call it using application permissions. Given your .NET background, the context should be very familiar.
Read through the first two steps, focusing on the configuration in the Azure Portal: Step 1 - Create an App Registration in Azure AD for the Web API: Pay close attention to the two key actions: Editing the manifest to add an appRole. This is how you define an application permission that your API exposes. Exposing an API to set the Application ID URI. This gives your API a unique identifier. Step 2 - Create an App Registration for the Client App: This is where you grant the permission. Focus on these actions: Under API permissions, clicking "Add a permission" and finding your API under the "My APIs" tab. Choosing Application permissions and selecting the DaemonAppRole you defined in Step 1. Finally, and most importantly, clicking the "Grant admin consent" button. As you can see, this step is mandatory for application permissions.

After following the steps in the article, the client application would be able to authenticate using its own credentials (e.g., a client secret) and receive an access token. Instead of a scp claim, this token would contain a roles claim with the value DaemonAppRole. Your API would then validate this token and authorize the call based on the presence of this role.
Conclusion
In this lesson, we demystified the two core authorization models in the Microsoft Identity Platform. Properly securing your applications for the AZ-204 exam and in real-world scenarios depends on a solid grasp of these concepts.
Here are the key takeaways:
- Delegated Permissions (Scopes) are for scenarios where an app acts on behalf of a user. The app's power is limited by what the user can do.
- Application Permissions (App Roles) are for non-interactive scenarios like background services. The app acts with its own identity and the full power of the granted permission.
- To expose a delegated permission, you define a scope under your API's "Expose an API" tab.
- To expose an application permission, you define an
appRolein your API's manifest. - A client app requests permissions in its "API permissions" configuration, and an administrator must always grant consent for application permissions.
Now that we understand how to secure APIs with identities and permissions, a new question arises: how do we securely store the credentials our client applications need, like client secrets or database connection strings? In our next lesson, we will address this by introducing Azure Key Vault, a service for managing secrets, keys, and certificates securely.