Hello! In our last lesson, you successfully registered applications in Microsoft Entra ID and manually tested the OAuth 2.0 authorization code flow using Postman. This gave you a solid understanding of the mechanics behind securing an application.
Today, we will build directly on that foundation. Our goal is to replace the manual steps in Postman with code, implementing the authorization code flow within a .NET application. We'll use the Microsoft Authentication Library (MSAL), which is the standard way to integrate Microsoft Identity Platform authentication into your apps. By the end of this lesson, you'll be able to secure a .NET application, allowing it to sign in users and acquire tokens to access protected resources.
1. What is MSAL and Why Do We Use It?
In the previous lesson, you saw that the authorization code flow involves several steps: redirecting the user, handling a callback with a code, and then making a backend request to exchange that code for a token. While it's possible to implement this with raw HTTP requests, it's complex and error-prone.
This is where MSAL comes in. It's a library that abstracts away these complexities. Instead of manually crafting URLs and managing tokens, you call simple, high-level methods. MSAL handles the protocol details, token caching, and secure token refresh for you.
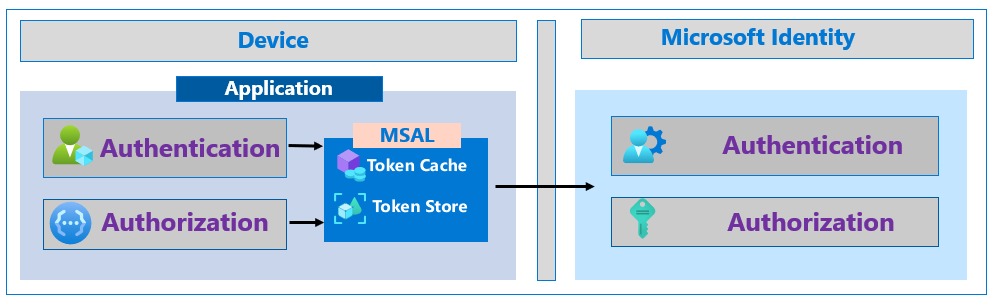
Your application code talks to MSAL, and MSAL handles the secure conversation with the identity provider.
2. Acquiring a Token with MSAL.NET
Let's start with a basic console application to see the core MSAL functions in action. This isolates the MSAL logic from the complexities of web application middleware, making the process very clear. We will use the Microsoft.Identity.Client NuGet package, which is the core MSAL.NET library.
The following video provides a concise, practical demonstration of this entire process.
Microsoft Authentication Library (MSAL) for .NET
This video from Microsoft DevRadio, "Microsoft Authentication Library (MSAL) for .NET", is an excellent walkthrough of acquiring a token in a simple .NET application.
Please watch the following segments to see the implementation from start to finish: Project setup: Watch how to create a new project and add the Microsoft.Identity.Client NuGet package. Building the client: Pay attention to the distinction between a PublicClientApplication and a ConfidentialClientApplication. The demo uses a public client, which is suitable for desktop or mobile apps where the user is present to sign in. Acquiring a token: This is the core of the flow. Observe the use of AcquireTokenInteractive, which triggers the browser-based login prompt for the user. Using the token: The presenter shows how to use the acquired access token to make an authenticated call to the Microsoft Graph API. This completes the cycle, demonstrating the token's purpose.
Let's recap the key code elements from the video:
-
Install the Package:
dotnet add package Microsoft.Identity.Client -
Build the Application Client:
You use a builder pattern to configure the client with the information from your app registration.var app = PublicClientApplicationBuilder .Create("YOUR_CLIENT_ID_HERE") .WithRedirectUri("http://localhost") // Must match a redirect URI in your app registration .WithAuthority("https://login.microsoftonline.com/common") // 'common' allows any work/school or personal Microsoft account .Build(); -
Define Scopes and Acquire Token:
You define the permissions (scopes) your app needs. TheAcquireTokenInteractivemethod handles showing the login UI to the user and completing the auth code flow.string[] scopes = { "user.read" }; // The permission you're requesting AuthenticationResult result = await app.AcquireTokenInteractive(scopes) .ExecuteAsync(); // The access token is now available in result.AccessToken Console.WriteLine(result.AccessToken);
This simple example fully demonstrates the authorization code flow being executed programmatically. MSAL pops up a browser, the user logs in, consents, and MSAL receives the token, which it returns to your application.
3. Integrating Authentication into an ASP.NET Core Web App
While the console app is great for learning, in your role as a Senior Software Engineer, you'll most often be securing ASP.NET Core web applications. For this, Microsoft provides an even higher level of abstraction: the Microsoft.Identity.Web library. It's a wrapper around MSAL that integrates directly into the ASP.NET Core authentication pipeline.
This approach is simpler because you don't call AcquireTokenInteractive yourself. The framework's middleware handles the redirects and token exchange automatically based on your configuration.
The following guide from Microsoft Learn details the exact steps.
Tutorial: Configure an ASP.NET Core web app for authorization and ...
This tutorial walks you through modifying a standard ASP.NET Core web app to use Microsoft Identity for user sign-in. It's the standard, recommended practice for this scenario.
Follow the instructions in the article, focusing on these two sections: Add authorization to HomeController.cs: This shows how to protect a controller using the [Authorize] attribute, ensuring only authenticated users can access it. Add authentication and authorization elements to Program.cs: This is the most critical part. You'll add the necessary services to wire up the authentication middleware. Pay close attention to the AddMicrosoftIdentityWebApp method, which does most of the heavy lifting. It reads your app registration settings from appsettings.json and configures the OpenID Connect handler.
Here's a summary of the key changes you would make to an ASP.NET Core project:
-
Add Package References:
dotnet add package Microsoft.Identity.Web dotnet add package Microsoft.Identity.Web.UI -
Update
appsettings.json:
You add a section with your app registration details.Microsoft.Identity.Webwill read from here automatically.{ "AzureAd": { "Instance": "https://login.microsoftonline.com/", "TenantId": "YOUR_TENANT_ID_HERE", "ClientId": "YOUR_CLIENT_ID_HERE", "CallbackPath": "/signin-oidc" }, // ... } -
Configure Services in
Program.cs:
This single line of code configures the entire authentication flow.// Add services to the container. builder.Services.AddAuthentication(OpenIdConnectDefaults.AuthenticationScheme) .AddMicrosoftIdentityWebApp(builder.Configuration.GetSection("AzureAd")); builder.Services.AddControllersWithViews(options => { var policy = new AuthorizationPolicyBuilder() .RequireAuthenticatedUser() .Build(); options.Filters.Add(new AuthorizeFilter(policy)); }); builder.Services.AddRazorPages() .AddMicrosoftIdentityUI(); -
Protect Your Controllers:
Simply add the[Authorize]attribute to any controller or action method you want to secure.[Authorize] public class HomeController : Controller { // ... }
When a user tries to access HomeController, the ASP.NET Core middleware will see they are not authenticated, automatically redirect them to the Microsoft login page, handle the token exchange upon their return, and establish a session. All the steps you performed manually in Postman are now handled seamlessly by the framework.
Conclusion
In this lesson, you have learned how to programmatically implement the OAuth 2.0 authorization code flow in a .NET application using MSAL.
Here are the key takeaways:
- MSAL simplifies authentication by providing a high-level API that abstracts the underlying OAuth 2.0 and OpenID Connect protocols.
- For desktop or console applications, you can use the core
Microsoft.Identity.Clientlibrary and theAcquireTokenInteractivemethod to trigger a user sign-in. - For ASP.NET Core web applications, the
Microsoft.Identity.Weblibrary provides seamless integration with the authentication middleware, automating the sign-in process with minimal code. - The implementation always starts with your App Registration details (Client ID, Tenant ID) which configure the MSAL client.
You have now successfully authenticated a user. In our next lesson, we will delve deeper into authorization by exploring how to use app roles and different permission types (delegated vs. application) to control what an authenticated user or application is allowed to do within your API.