Hello! Welcome to our next lesson in the "Developing Containerized Applications on Azure" module.
In our last session, you successfully created your own private Azure Container Registry (ACR) and authenticated your local machine to it using the Azure CLI. This gave you a secure, private location in Azure to manage container images.
Today, we will complete the workflow by taking a Docker image built on your local machine and pushing it into that registry. This is the essential step that makes your containerized application available for deployment across various Azure services. By the end of this lesson, you will be able to build a Docker image for a .NET application, tag it for your ACR, and push it, readying it for use in the cloud.
1. The Container Publishing Workflow
Before we execute the commands, let's visualize the end-to-end process. The goal is to move a container image from your development machine into a central registry in Azure. From there, services like Azure Container Instances, Azure Kubernetes Service, or Azure App Service can pull and run the image.
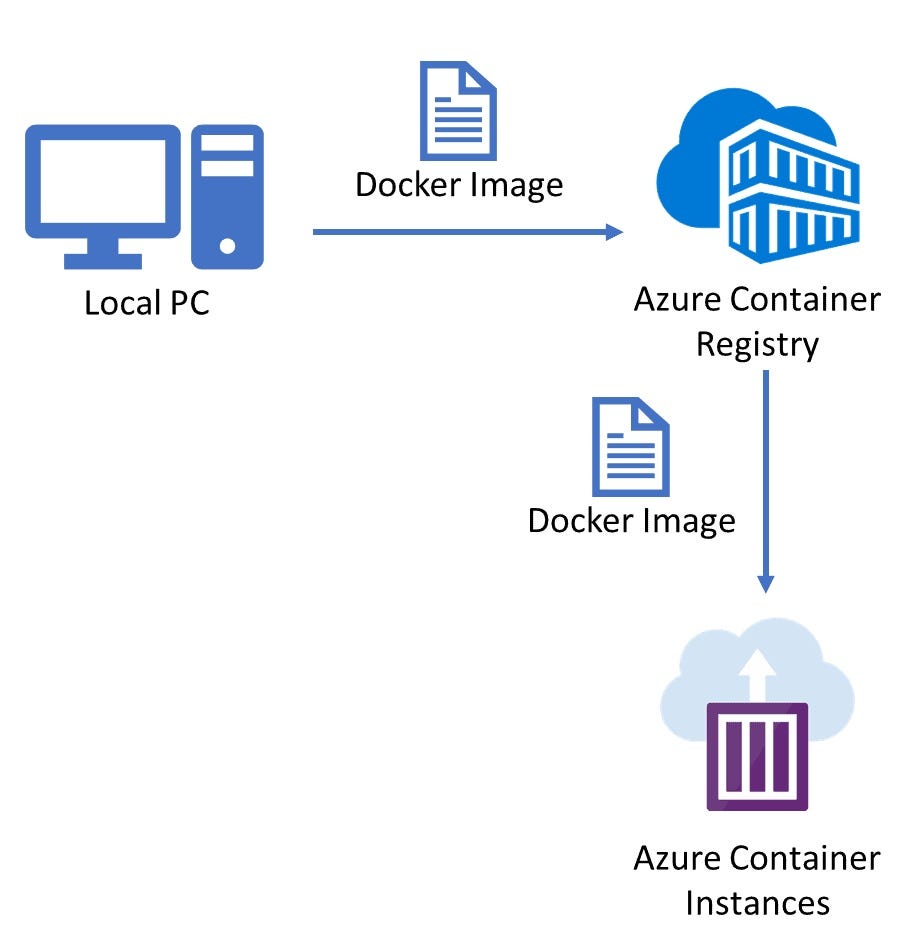
The process involves three main commands that you'll run from your local terminal:
docker build: You've already used this to create an image from aDockerfile.docker tag: This re-labels an existing image with a new name that includes your registry's address. This is the key to telling Docker where to push the image.docker push: This command uploads the tagged image to the specified registry.
Let's break down each step.
2. Building and Tagging Your Image
First, you need an image to work with. For this lesson, you can use the .NET application and Dockerfile from our previous lesson on Docker fundamentals. Ensure you are in the directory containing the Dockerfile.
Step 1: Build (A Quick Recap)
Build the image as you did before. Let's give it a simple name like webapp:v1.
docker build -t webapp:v1 .
After this, docker images will show webapp with the tag v1 in your local image list.
Step 2: Tag for Azure Container Registry
This is the most important new concept in this lesson. A local tag like webapp:v1 has no association with your Azure Container Registry. To push it to ACR, you must create a new tag that follows this format:
<login-server>/<repository-name>:<tag>
<login-server>: This is the unique URL of your ACR instance, which you found in the last lesson (e.g.,youruniqueregistryname.azurecr.io). You can retrieve it again by runningaz acr show --name <your-registry-name> --query loginServer -o tsv.<repository-name>: This is effectively the name of your application within the registry. For our example, we can usewebapp.<tag>: The version identifier, such asv1.
The command to apply this new tag is docker tag. It doesn't create a new copy of the image; it simply adds another pointer to the existing one.
# Example command
# docker tag <source_image>:<source_tag> <login_server>/<repository_name>:<new_tag>
docker tag webapp:v1 youruniqueregistryname.azurecr.io/webapp:v1
Replace youruniqueregistryname with the actual name of your ACR instance. If you run docker images now, you'll see two images listed, but they will share the same Image ID, confirming they are the same underlying image.
3. Pushing the Image to ACR
With the image correctly tagged and your client authenticated via az acr login (from the previous lesson), the final step is to push it.
Step 3: Push
The docker push command uses the tag to determine the destination. Since our new tag includes the ACR login server, Docker knows exactly where to send the image layers.
docker push youruniqueregistryname.azurecr.io/webapp:v1
This command will display progress bars as it uploads the image layers to your registry.
The following video provides a complete demonstration of this build -> tag -> push process for a .NET application.
Deploy Multiple Docker Images to Azure Web App using Azure Container Registry | ACR | LSC
This video from Learn Smart Coding demonstrates the full lifecycle from a .NET project to a pushed image in ACR.
Watch these segments to see the commands in action: First, see the local build at Docker build. Next, pay close attention to the tagging step from Tagging the image. The presenter clearly explains how the ACR login server becomes part of the new image tag. Then, watch the login and push commands from Authentication and push. Note that you should already be logged in from the previous lesson, but it's a good recap. Finally, see how to verify the push in the Azure portal from Verifying in ACR.
4. Verification
After the push completes, you should always verify that the image is in your registry.
Verification via Azure Portal:
As shown in the video, you can navigate to your ACR instance in the Azure portal, select Repositories under the "Services" section, and you will see your new webapp repository containing the image with tag v1.
Verification via Azure CLI:
For a scriptable, command-line approach, you can list the repositories in your ACR.
Create and Push a Docker Image to Azure Container Registry
This article provides another useful walkthrough. We'll focus on its verification step.
Scroll down to the heading List Container Images in ACR. This section gives you a simple az acr repository list command to verify your push from the command line.
The command will look like this:
az acr repository list --name youruniqueregistryname --output table
This confirms the repository was created. You can further inspect the tags within that repository with az acr repository show-tags.
5. Connecting to Your CI/CD Experience
As a Senior Software Engineer with a background in Azure DevOps, you can see how this manual build-tag-push sequence forms the core logic of a container-based CI/CD pipeline.

In your Azure DevOps pipelines, you would simply use pipeline tasks (like the Docker@2 task) to execute these docker build, docker tag, and docker push commands, using service connections to authenticate to your ACR instance. The fundamental process remains the same.
An Alternative: az acr build
It's also worth knowing about a streamlined Azure CLI command, az acr build. This single command can take your source code, build the image directly in the cloud (using ACR Tasks), and push it to your registry, all in one step.
# Example of building from a local context (directory with Dockerfile)
az acr build --registry youruniqueregistryname --image webapp:v1 .
This is a powerful shortcut, especially for automation or if you don't have Docker installed locally. However, understanding the underlying docker build/tag/push mechanics you learned today is crucial for troubleshooting and more complex scenarios.
Conclusion
In this lesson, you have bridged the gap between local container development and the Azure cloud. You now have the practical skills to publish your .NET applications as Docker images to a secure, private registry.
Here are the key takeaways:
- The workflow to publish an image is build, tag, and push.
- The
docker tagcommand is critical. It relabels an image with the ACR login server address, which directs thedocker pushcommand. - The tag format is
<login-server>/<repository-name>:<tag>. - After pushing, you can verify the image's presence in the Azure portal under Repositories or by using the
az acr repository listCLI command. - This manual process is the foundation for automated CI/CD pipelines for containers in Azure DevOps.
Your container image is now stored securely in Azure. In our next lesson, we will deploy this image from your Azure Container Registry to a running container using Azure Container Instances (ACI), bringing your application to life in the cloud.