Welcome back! In our previous lesson, we explored the different hosting plans available for Azure Functions, understanding the trade-offs between cost, performance, and features. That gave us the "where" and "how" of running our serverless code. Now, it's time to get practical and build our first function.
This lesson directly addresses the learning outcome: Create, test, and deploy a .NET HTTP-triggered Azure Function locally and to Azure. You'll use your existing C# and Visual Studio skills to go through the entire developer lifecycle, from writing code on your local machine to running it in the cloud. This is a fundamental skill for the AZ-204 exam and for any developer working with Azure.
Let's look at the workflow we'll follow today.
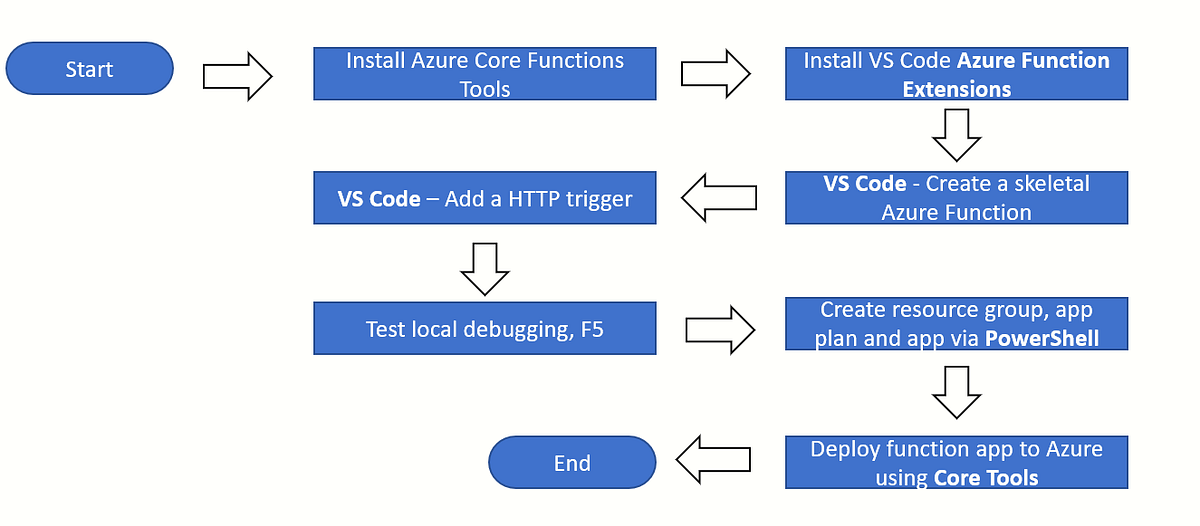
1. Creating the Azure Functions Project
Given your deep experience with Visual Studio and .NET, the initial setup will feel very familiar. The key difference is that we'll be using the specific project template for Azure Functions, which provides the necessary structure and boilerplate code to get started quickly.
We will create an HTTP-triggered function, which is essentially a lightweight API endpoint that responds to web requests.
To begin, let's watch a short segment that walks through the "New Project" dialog in Visual Studio.
Intro to Azure Functions - What they are and how to create and deploy them
The video "Intro to Azure Functions" by Tim Corey provides a clear, developer-focused walkthrough. This first clip shows how to find and configure the Azure Functions project template.
Watch from creating the project. Pay attention to the template selection and the choice of the Functions runtime version. The video uses an older .NET version, but the process is identical for modern .NET.
Now, let's put that into practice. The following Microsoft Learn quickstart guide provides detailed, up-to-date steps. Please follow along and create your own project in Visual Studio.
Quickstart: Create your first C# function in Azure using Visual Studio
This guide from Microsoft is the official documentation for this process. We will use it as our main step-by-step reference for creating, testing, and deploying the function.
Read and follow the steps in the section "Create a function app project". When you get to the "Additional information" settings, please use these values: Functions worker: .NET 8.0 Isolated (Long Term Support). The isolated worker process is the modern standard for .NET functions, running your code in a separate process from the Functions host for better dependency management and performance. Function: HTTP trigger. Authorization level: Anonymous. This will make our function publicly accessible for easy testing. In a real-world scenario, you'd likely choose Function or Admin to secure the endpoint with a key. After creating the project, also follow the short "Rename the function" section in the guide to give your function a more meaningful name, like HttpExample.
2. Local Testing and Debugging
You should now have a C# project containing a single file (e.g., HttpExample.cs). Inside, you'll see a method decorated with [Function] and [HttpTrigger] attributes. These attributes are how the Azure Functions runtime discovers your code and determines how it should be triggered.
One of the most powerful features of Azure Functions development is the ability to run and debug the entire runtime on your local machine. When you press F5 in Visual Studio, it launches the Azure Functions Core Tools—a local version of the same runtime that runs in Azure. This allows you to test your function's logic completely before deploying.
Let's see this in action.
Intro to Azure Functions - What they are and how to create and deploy them
Continuing with Tim Corey's video, these next clips show the local debugging experience.
First, watch the code walkthrough to understand the boilerplate code generated by the template. Focus on how the [HttpTrigger] attribute is configured and how the code reads from the HTTP request. Next, watch the local test. This demonstrates: Pressing F5 to start the local Functions host. The console window that appears, showing the local URL for your function. Testing the function by pasting the URL into a browser and adding a query string parameter.
Now, try this yourself. Press F5 in your Visual Studio project. A console window will appear and, after a moment, display the local URL for your function, which will look something like this:http://localhost:7071/api/HttpExample
Open a browser and navigate to that URL, adding a name parameter to the query string:http://localhost:7071/api/HttpExample?name=AzureDeveloper
You should see a response in your browser. You can also set breakpoints in your C# code, and they will be hit just as in any other .NET application.
3. Publishing the Function to Azure
Once you've confirmed the function works locally, the next step is to deploy it. The Visual Studio "Publish" feature streamlines this process, allowing you to create the necessary Azure resources and deploy your code in a few steps.
You will publish your function to a Consumption Plan, which we discussed in the last lesson. This is the "serverless" plan where you pay only for what you use, and it's perfect for our simple HTTP trigger.
Intro to Azure Functions - What they are and how to create and deploy them
This segment shows the process of right-clicking the project and using the "Publish" wizard.
Watch from publishing the function. The video explains the choices in the wizard, including selecting the consumption plan and creating a new Function App and the required Storage Account.
To deploy your own function, follow the detailed instructions in the Microsoft Learn guide.
Quickstart: Create your first C# function in Azure using Visual Studio
This section of the guide walks you through the entire publishing process.
Follow the steps under "Publish the project to Azure". The wizard will guide you to: Select Azure as the target. Select Azure Function App (Windows) or (Linux) as the specific target. Linux is generally recommended. Create a new Function App. You'll need to provide a globally unique name. The wizard will also create a new Resource Group and Storage Account for you. Ensure the Plan Type is set to Consumption. Once you click Publish, Visual Studio will package your code, create the resources in your Azure subscription, and deploy the package.
4. Verifying the Function in Azure
After the deployment completes, your function is live in the cloud. The final step is to test it. The process is similar to local testing, but now you'll use the public URL and will need to handle authorization if you had chosen a level other than "Anonymous".
The Microsoft Learn guide clearly explains how to get the URL from the Azure portal.
Quickstart: Create your first C# function in Azure using Visual Studio
Let's complete the quickstart by testing our deployed function.
Follow the steps in the "Verify your function in Azure" section. You will: Navigate to the newly created Function App resource in the Azure portal. Find your deployed function (e.g., HttpExample). Use the "Get function URL" button to copy the public URL to your clipboard. Paste this URL into a browser, add a query string parameter just as you did locally, and verify that you get the expected response.
You can also go to the "Monitor" tab for your function in the Azure portal to see the invocation logs, which confirm that your function was executed successfully in Azure.
Conclusion
Congratulations! You have successfully created, tested, and deployed a serverless .NET application to Azure. You have experienced the full inner loop (local coding and debugging) and outer loop (deployment and cloud testing) of Azure Functions development.
Let's summarize the key takeaways:
- Project Creation: Visual Studio provides a dedicated Azure Functions template to create a C# project with the correct structure.
- Local Development: You can run and debug your functions locally by pressing
F5, which launches the Azure Functions Core Tools. This provides a high-fidelity environment for testing before deployment. - Deployment: The Publish feature in Visual Studio simplifies deployment by creating the necessary Azure resources (Function App, Storage Account) and uploading your code.
- Triggers: The
[HttpTrigger]attribute marks a method as a function that responds to HTTP requests. The[Function]attribute gives it a name discoverable by the runtime.
In our next lesson, we will build upon this foundation. We'll learn how to implement input and output bindings, a powerful declarative feature of Azure Functions that allows you to seamlessly connect your function to other Azure services like Blob Storage and Cosmos DB with minimal code.