Welcome back! In the last lesson, you successfully built, tested, and deployed your first HTTP-triggered Azure Function. This gave you a solid foundation in the fundamental development lifecycle. Now, we're going to unlock one of the most powerful features of Azure Functions: bindings.
This lesson is designed to help you master the learning outcome: Implement input and output bindings for an Azure Function. Instead of writing boilerplate code to connect to services like storage or databases, you'll see how to use simple, declarative attributes to have the Functions runtime handle that work for you. This is a core concept for building efficient, event-driven applications on Azure and is frequently tested on the AZ-204 exam.
We'll explore how data flows into and out of a function, moving beyond just the trigger.
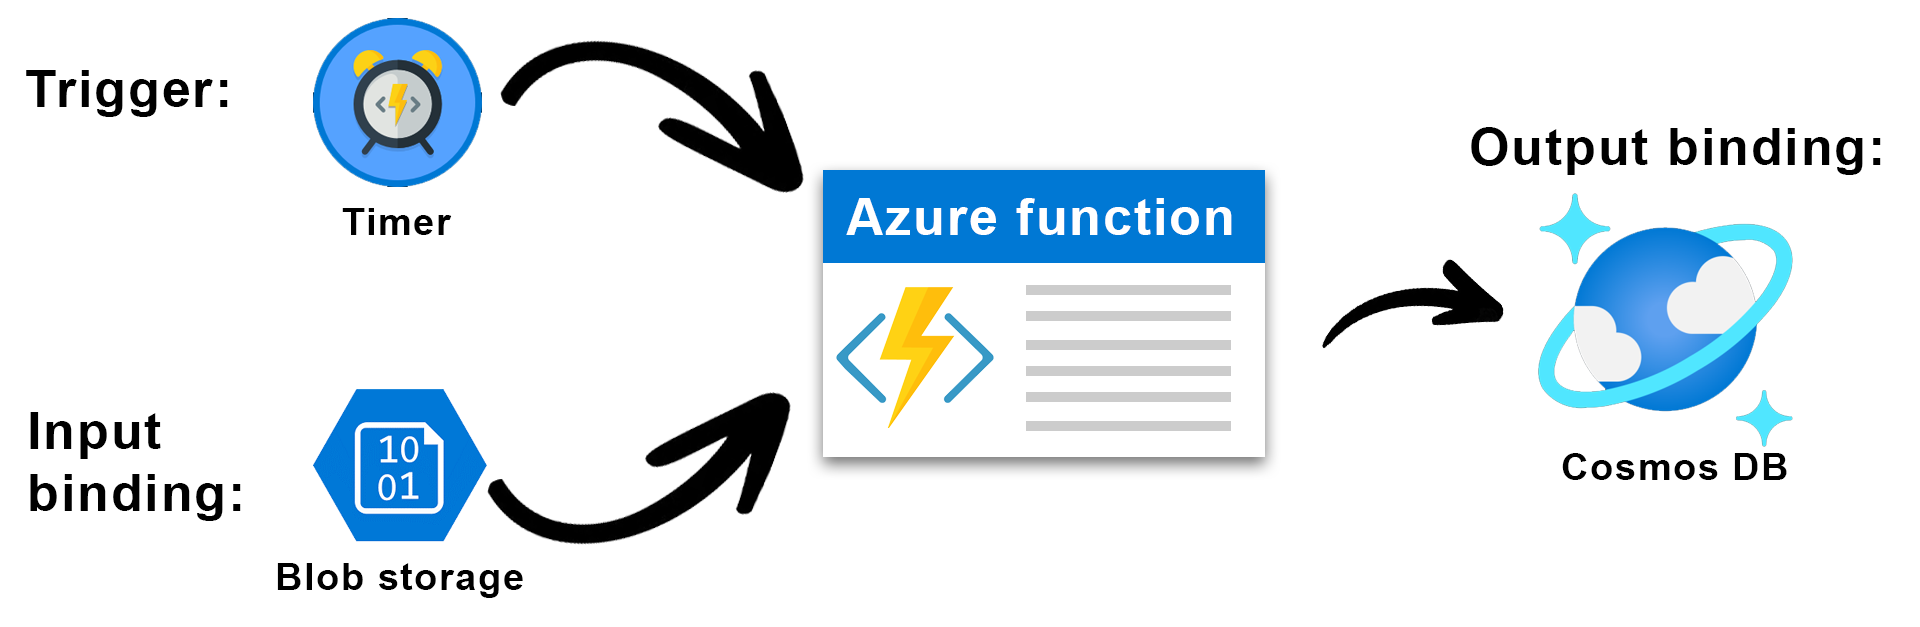
This diagram illustrates the core components we'll work with today. A trigger (like the Timer shown here, or the HTTP trigger you've already used) starts the function. An input binding can provide additional data (like reading from Blob Storage), and an output binding serves as a destination for the function's results (like writing to Cosmos DB).
1. Understanding Triggers, Input, and Output Bindings
In Azure Functions, bindings provide a declarative way to connect to data from within your code. They come in three directions:
- Trigger: A special input binding that starts your function. A function must have exactly one trigger (e.g.,
HttpTrigger,QueueTrigger). You've already used the HTTP trigger. - Input Binding: Provides data to your function as a parameter. It's a way to read data from a source without using an SDK client.
- Output Binding: A destination for data from your function. Typically, the return value of your function is sent to the output binding.
The primary benefit is simplicity. You declare the connection with an attribute, and the runtime handles opening connections, reading/writing data, and closing connections.
This short video explains the concept clearly.
Azure Cosmos DB + Azure Functions - serverless database processing
The video "Azure Cosmos DB + Azure Functions" from the official Azure Cosmos DB channel provides a great conceptual overview of how bindings work.
Watch the segment from what functions are. Focus on how the speaker describes the flow: an event happens, your code runs, and bindings connect to input and output services like Cosmos DB or Blob Storage.
2. Implementing an Output Binding
Let's start with the most common use case: taking data from a trigger and writing it somewhere. We'll modify the HTTP-triggered function you built in the previous lesson to write a document to an Azure Cosmos DB container. Since you have a strong background in C#, you'll find that this is mainly about applying the correct attributes and NuGet packages.
For functions using the .NET Isolated Worker model (which you are), you typically define a single output binding by applying an attribute to the function method and using the method's return value as the data to be written.
Let's look at the official documentation to see how this is structured.
Guide for running C# Azure Functions in an isolated worker ...
This guide from Microsoft Learn is the definitive resource for the .NET Isolated Worker model. We'll reference it for the correct syntax.
First, quickly read the introductory section on "Bindings" to understand how they are defined using attributes. Then, focus on the subsection "Output bindings". Notice the key pattern: the [QueueOutput] attribute is applied to the method, and the return messages; line sends the data to the queue. We will apply this same pattern using a Cosmos DB attribute.
Now, let's apply this concept. The following resource provides a clean, modern example of an HTTP trigger writing to Cosmos DB.
How to Build Serverless Azure Functions with Cosmos DB ...
This blog post provides excellent, up-to-date C# code for using Cosmos DB bindings with the .NET Isolated Worker model.
Focus on the section "The Simplest Pattern: Output Binding". Follow these steps in your existing function project: Add the NuGet Package: From the command line in your project directory, run dotnet add package Microsoft.Azure.Functions.Worker.Extensions.CosmosDB. Modify Your Function: Replace your existing HTTP-triggered function's code with the code from the example. You can simplify the Run method's return object for now to just this, which we'll trigger from a query string:
- Add the NuGet Package: From the command line in your project directory, run
dotnet add package Microsoft.Azure.Functions.Worker.Extensions.CosmosDB. - Modify Your Function: Replace your existing HTTP-triggered function's code with the code from the example. You can simplify the
Runmethod's return object for now to just this, which we'll trigger from a query string:public object Run( [HttpTrigger(AuthorizationLevel.Anonymous, "get", Route = "orders")] HttpRequestData req) { string name = req.Query["name"]; // Read 'name' from query string return new { // a unique id is required id = Guid.NewGuid().ToString(), customerName = name, createdAt = DateTime.UtcNow }; } - Configure Settings: Open your
local.settings.jsonfile. You need to add a connection string for your Cosmos DB account. The name must match theConnectionproperty in the[CosmosDBOutput]attribute ("CosmosDBConnection").
You will need to create a Cosmos DB account in the Azure portal to get this connection string. Use the API for NoSQL.{ "IsEncrypted": false, "Values": { "AzureWebJobsStorage": "UseDevelopmentStorage=true", "FUNCTIONS_WORKER_RUNTIME": "dotnet-isolated", "CosmosDBConnection": "AccountEndpoint=...;AccountKey=...;" } }
After setting this up, run your function locally (F5). Navigate to the URL and add a query parameter (e.g., http://localhost:7071/api/orders?name=JohnDoe). You should see a new document created in your Cosmos DB container.
3. Implementing an Input Binding
Input bindings are just as straightforward. They allow you to fetch data and pass it into your function as a parameter. A common pattern is to use a route parameter from an HTTP trigger to look up a specific item.
For this, you decorate a method parameter with an input binding attribute.
How to Build Serverless Azure Functions with Cosmos DB ...
Continuing with the same blog post, this section demonstrates reading a single document.
Read the section "Input Binding: Read a Single Document" and add this new function to your project. Note these key details: The HTTP trigger route is orders/{id}. The [CosmosDBInput] attribute is on the order parameter. The Id = "{id}" property in the attribute tells the runtime to use the id value from the trigger's route to fetch the specific document. This is called a "binding expression". The function code itself doesn't contain any database logic; it simply checks if the order object is null.
To test this, run your project and use the ID of a document you created in the previous step. Navigate to http://localhost:7071/api/orders/{your-document-id}. Your function will be invoked with the corresponding document already retrieved from Cosmos DB.
4. Handling Multiple Output Bindings
What if your function needs to write to more than one destination? For example, returning an HTTP response and writing a message to a queue.
In the .NET Isolated model, you handle this by creating a custom C# class for your return type. Each property of the class can then be decorated with an output binding attribute.
Guide for running C# Azure Functions in an isolated worker ...
The Microsoft documentation explains this pattern clearly.
Read the subsection "Multiple output bindings". The example shows a function that needs to return an HTTP result and write to a queue. The solution is the MyOutputType class, where one property gets the [HttpResult] attribute and the other gets the [QueueOutput] attribute. The function's return type is now MyOutputType.
This is a powerful pattern that allows you to compose complex operations declaratively. Let's imagine an HTTP-triggered function that creates a Cosmos DB entry and also returns an HTTP 200 OK response.
Your implementation would look like this:
// Define a custom return type
public class MultiOutput
{
    // Property for the Cosmos DB output binding
    [CosmosDBOutput("OrdersDB", "Orders", Connection = "CosmosDBConnection")]
    public object Document { get; set; }

    // Property for the HTTP response
    public HttpResponseData HttpResponse { get; set; }
}

// ... in your function class ...
[Function("CreateOrderAndRespond")]
public MultiOutput Run(
    [HttpTrigger(AuthorizationLevel.Anonymous, "post", Route = "multi-output-order")] HttpRequestData req)
{
    // Assume we read some data from the request body
    var orderData = ...;

    var response = req.CreateResponse(HttpStatusCode.OK);
    response.WriteString("Order created successfully.");

    return new MultiOutput
    {
        Document = orderData,
        HttpResponse = response
    };
}
In this scenario, the Functions runtime inspects the returned MultiOutput object. It sees the [CosmosDBOutput] attribute and writes the Document property's content to Cosmos DB. Simultaneously, it uses the HttpResponse property to construct and send the HTTP response back to the client.
5. A Complete Workflow Example
To tie these concepts together, let's watch a video that demonstrates a full end-to-end workflow. An HTTP trigger will write a message to an Azure Service Bus queue (output binding), and a second function will be triggered by that queue message and write the content to Azure Blob Storage (another output binding).
Note: The video uses the older .NET in-process model, so the C# syntax for defining the bindings is slightly different (e.g., binding to IAsyncCollector<T>). However, the overall process—adding NuGet packages, decorating with attributes, configuring local.settings.json, and seeing the data flow—is identical and provides an excellent practical demonstration.
Azure Functions Bindings Tutorial | Service Bus | Storage
This tutorial from Kamal Rathnayake provides a great step-by-step walkthrough of a binding-driven workflow.
Focus on the process being shown, not the exact C# syntax: HTTP Trigger with Service Bus Output: Watch how the [ServiceBus] output binding is added to the HTTP-triggered function. Service Bus Trigger with Blob Output: See how a second function is created that is triggered by the queue and uses a [Blob] output binding. Configuration and Setup: Observe the creation of Azure resources and, critically, how the connection strings are added to local.settings.json. Local Test: See how invoking the single HTTP endpoint triggers the entire two-function workflow, all connected via bindings.
Conclusion
In this lesson, you've learned how to leverage one of the most productive features of Azure Functions. By using bindings, you can focus on your business logic and let the platform handle the mechanics of data integration.
Here are the key takeaways:
- Declarative Integration: Bindings are attributes in your C# code that connect your function to other Azure services.
- Input vs. Output: Input bindings bring data into your function via parameters. Output bindings send data from your function, typically via the return value.
- .NET Isolated Model Patterns: For a single output, you return the object to be written. for multiple outputs, you create a custom class and decorate its properties with output binding attributes.
- Configuration is Key: The
Connectionproperty in a binding attribute must correspond to an entry in yourlocal.settings.jsonfile (for local development) or application settings (in Azure).
In our next lesson, we will explore another trigger type: the timer trigger. You'll learn how to create functions that run on a recurring schedule using CRON expressions, a common requirement for background jobs and maintenance tasks.