Introduction
In our last lesson, you implemented the cache-aside pattern, a powerful strategy for improving application performance. We briefly touched upon the importance of data lifetime and expiration as crucial considerations. Today, we'll delve into that topic, focusing on how to explicitly configure data expiration policies in Azure Cache for Redis.
This lesson is essential for ensuring your cache is not only fast but also serves fresh, relevant data. We will explore two key mechanisms: setting expirations programmatically from your .NET application and configuring server-side eviction policies in Azure for when your cache reaches its memory limit. Mastering these will allow you to fine-tune the critical balance between performance and data consistency.
Why Data Expiration is Fundamental to Caching
Before we jump into the implementation, let's reinforce why setting an expiration time is not an optional extra, but a core part of any caching strategy. Storing data in a cache indefinitely is risky; if the original data in your database changes, the cached copy becomes stale. Expiration policies are your primary defense against serving outdated information.
How Azure Redis Cache can make your .NET 7 API Super Fast!
This video from Israel Quiroz on .NET and Redis succinctly explains why expiration is an integral part of setting cache data.
Watch the short segment from expiration time. The key takeaway is that a cache is a temporary store, and you must define how long the data should live there.
1. Programmatic Expiration in .NET
As a .NET developer, you will most often control cache expiration directly within your application code when you set a cache item. The IDistributedCache interface in ASP.NET Core provides a clean way to manage this using DistributedCacheEntryOptions.
There are two primary expiration models you can implement:
- Absolute Expiration: This sets a fixed point in time when a cache entry will expire. It's useful for data you know has a specific lifetime (e.g., "cache this for 60 minutes"). The item is removed after the duration passes, regardless of how many times it was accessed.
- Sliding Expiration: This resets the expiration timer every time the cache entry is accessed. It's ideal for data related to user sessions, where you want to keep the data in the cache as long as the user is active. The item is removed only if it hasn't been accessed for a specified period.
The following resource provides a concise code example for setting these policies.
Distributed Caching in ASP.NET Core 6 Using Redis in Azure
This article from CODE Magazine explains the two cache expiration strategies and shows the corresponding DistributedCacheEntryOptions.
Focus on the "Cache Expiration" section. Note the code snippet that initializes a DistributedCacheEntryOptions object with both AbsoluteExpirationRelativeToNow and SlidingExpiration. In practice, you would typically use one or the other for a given cache entry.
Practical Demonstration
Now, let's see absolute expiration in action. The following video demonstrates how to use DistributedCacheEntryOptions to set a short expiration on a cached item and then verify that the cache automatically purges the data after the time has elapsed.
Azure Cache for Redis (.NET 6)
This video from DotNetMastery provides a clear, practical demonstration of setting an absolute expiration policy in a .NET 6 application.
Watch the section from setting options. The presenter does an excellent job of: Creating a DistributedCacheEntryOptions object. Setting the AbsoluteExpirationRelativeToNow property to a TimeSpan. Passing these options into the SetStringAsync method. Demonstrating that after the 30-second expiration, a new request triggers a cache miss and fetches fresh data from the database.
As you saw, the implementation is straightforward. Here is the core C# logic:
// 1. Define the expiration options
var cacheOptions = new DistributedCacheEntryOptions()
    .SetAbsoluteExpiration(TimeSpan.FromMinutes(5)); // Or .SetSlidingExpiration(...)

// 2. Fetch the data from your database
var dataFromDb = await _database.GetDataAsync();
var serializedData = JsonSerializer.Serialize(dataFromDb);

// 3. Set the data in the cache with the expiration policy
await _cache.SetStringAsync(cacheKey, serializedData, cacheOptions);
While IDistributedCache is the high-level abstraction, it's helpful to know that the underlying StackExchange.Redis library provides direct methods for managing expirations, which you might encounter in different codebases.
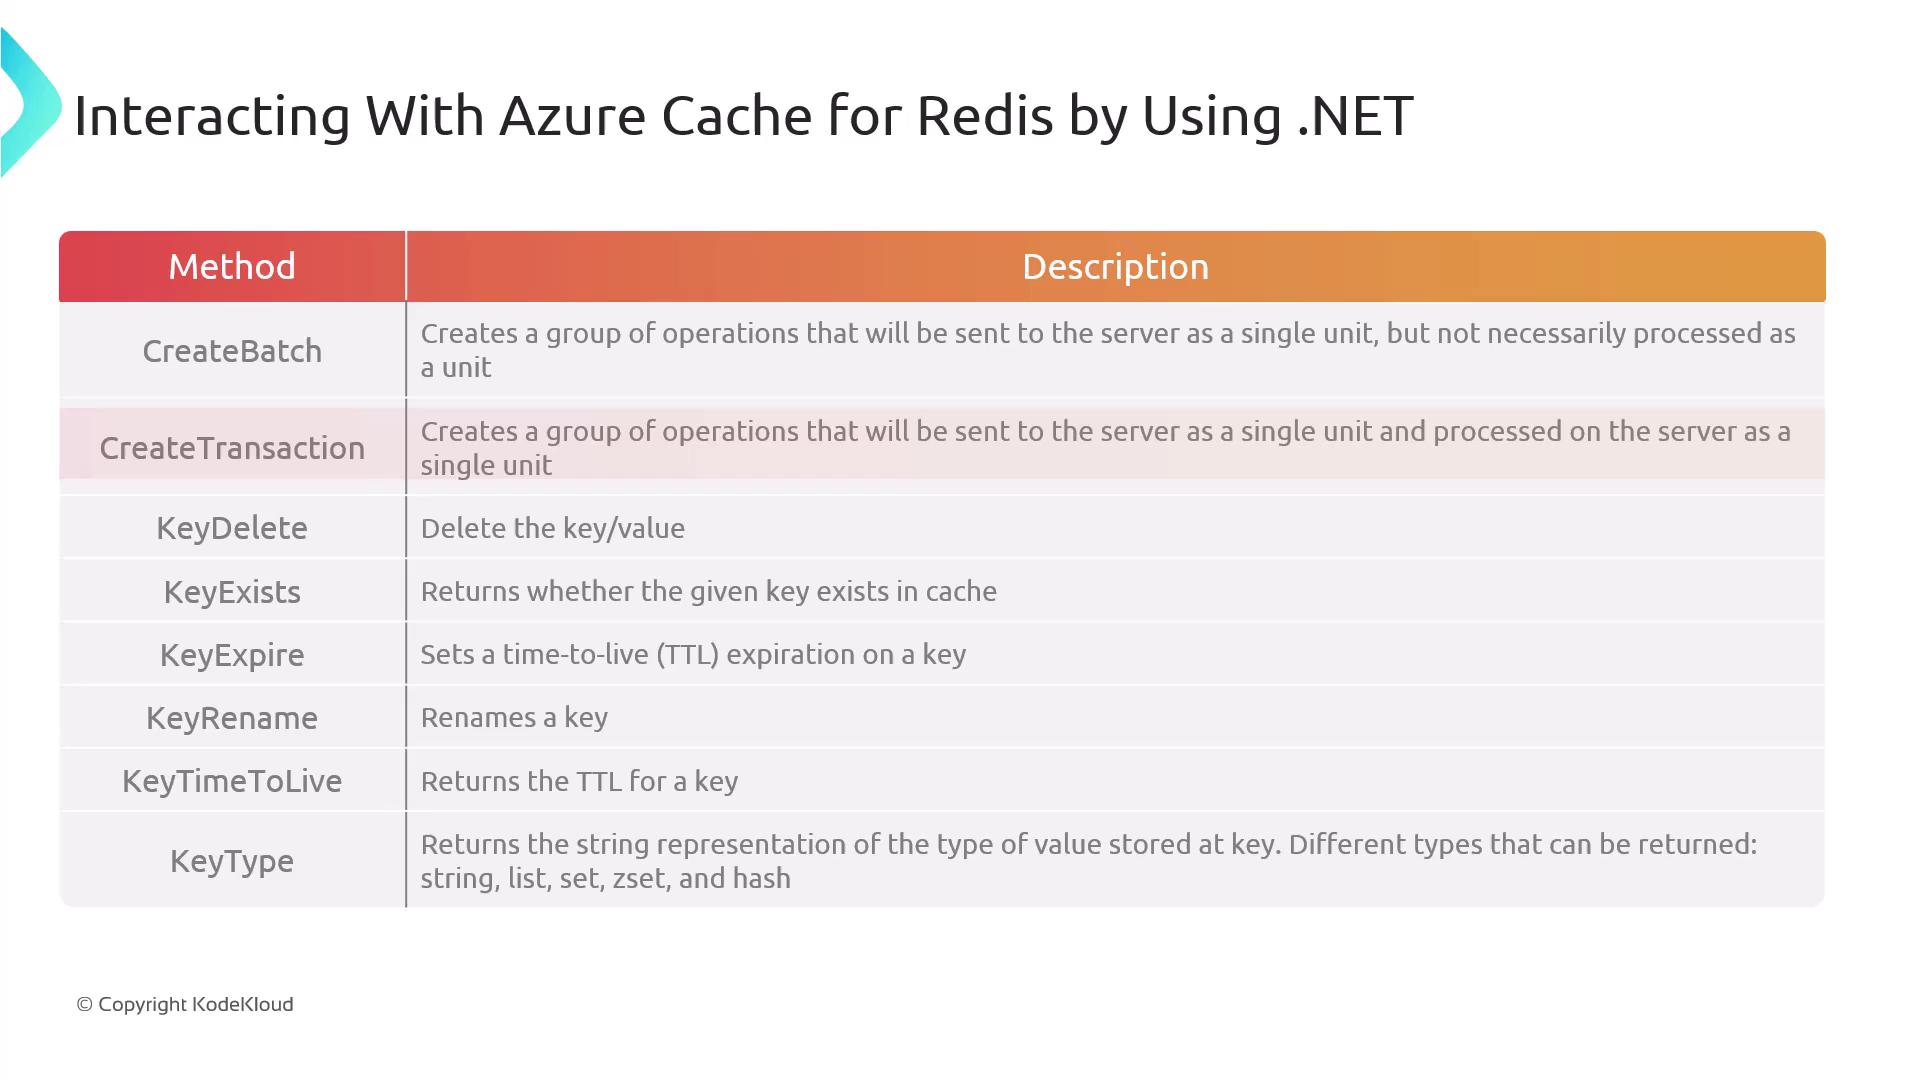
2. Server-Side Eviction Policies
Programmatic expiration is for managing data freshness. But what happens when the cache runs out of memory? If you keep adding items, something has to be removed to make space. This is where eviction policies come in. These are server-side rules you configure on the Azure Cache for Redis instance itself.
The primary setting for this is maxmemory-policy. It tells Redis which algorithm to use to select keys for eviction when the cache is full.
Let's review the official documentation to see the available policies.
How to configure Azure Cache for Redis
This Microsoft Learn documentation details the advanced settings available for an Azure Cache for Redis instance, including the crucial memory policies.
In the article, navigate to the Advanced settings section on the left menu (as described in the text). Within that section, focus on the part titled Memory policies. Read the list of available eviction policies carefully.
From your reading, you should have noted several policies. For the AZ-204 exam and general practice, these are the most important ones to understand:
noeviction: Don't evict anything. When the cache is full, write operations will return an error.allkeys-lru: Removes the least recently used key from all keys to make space.volatile-lru: This is the default policy for Azure Cache for Redis. It removes the least recently used key only from those keys that have an expiration (TTL) set.volatile-ttl: Removes the key with the shortest time to live (i.e., the one that will expire soonest).
The default policy, volatile-lru, has a significant implication for you as a developer: If you add an item to the cache without an expiration time, it will never be evicted by the default policy. This can lead to the cache filling up with "immortal" data, eventually causing all new write operations to fail. This reinforces why you should almost always set a programmatic expiration on your cache items.
Conclusion
In this lesson, you have learned the two fundamental mechanisms for managing the lifecycle of data in Azure Cache for Redis. These concepts are critical for building robust, high-performance applications.
Here are the key takeaways:
- Programmatic Expiration is set in your .NET code using
DistributedCacheEntryOptionsto control data freshness. You can choose between absolute (fixed duration) and sliding (resets on access) expiration. - Server-Side Eviction Policies are configured in Azure to manage cache memory when it reaches full capacity.
- The default Azure policy is
volatile-lru, which only evicts keys that have an expiration time set. - Best Practice: Always set a programmatic expiration (a TTL) on your cache items. This ensures data stays fresh and allows the default eviction policy to manage memory effectively.
You have now completed the core topics on using Azure Cache for Redis. In our next lesson, we will shift our focus to another critical performance optimization technique: delivering static content efficiently across the globe using Azure Content Delivery Network (CDN).