Welcome back! In our previous lesson, we laid the groundwork by creating an Azure Event Hubs namespace and an event hub, preparing the infrastructure for a data streaming solution. You learned how to provision these resources using both the Azure Portal and the Azure CLI.
Now it's time to bring that infrastructure to life. In this lesson, we will focus on the "producer" side of the equation. Leveraging your deep experience with .NET, you will write a console application to send events to the event hub you now know how to create. This is a fundamental skill for building any application that generates telemetry, logs, or other real-time data streams.
By the end of this lesson, you will be able to connect a .NET application to an Event Hub and send a batch of events using the Azure SDK.
1. Authenticating Your Application
Before your application can send data, it must securely authenticate with Azure Event Hubs. The Azure SDK for .NET offers two primary authentication methods:
- Passwordless (Azure AD): This modern approach uses credentials from the environment where the code is run, such as your logged-in user in Visual Studio or a Managed Identity on an Azure host. It relies on Azure Role-Based Access Control (RBAC) to grant permissions. This is the recommended best practice for production environments as it avoids storing secrets in your code or configuration.
- Connection String: This method uses a secret key that grants specific permissions (e.g., Send, Listen). While simpler for initial development and testing, it requires careful management of the connection string itself.
The official Microsoft documentation provides a good overview of these options.
Quickstart: Send or receive events using .NET - Azure Event Hubs
This document introduces the two main authentication methods.
Read the section Authenticate the app to Azure. Focus on understanding the conceptual difference between the passwordless approach using Azure Event Hubs Data Owner role and the connection string approach.
For today's hands-on exercise, we will use a connection string for its straightforward setup. However, we will revisit the passwordless approach later in the lesson, as it is crucial for both the AZ-204 exam and modern application security.
2. Obtaining a Connection String
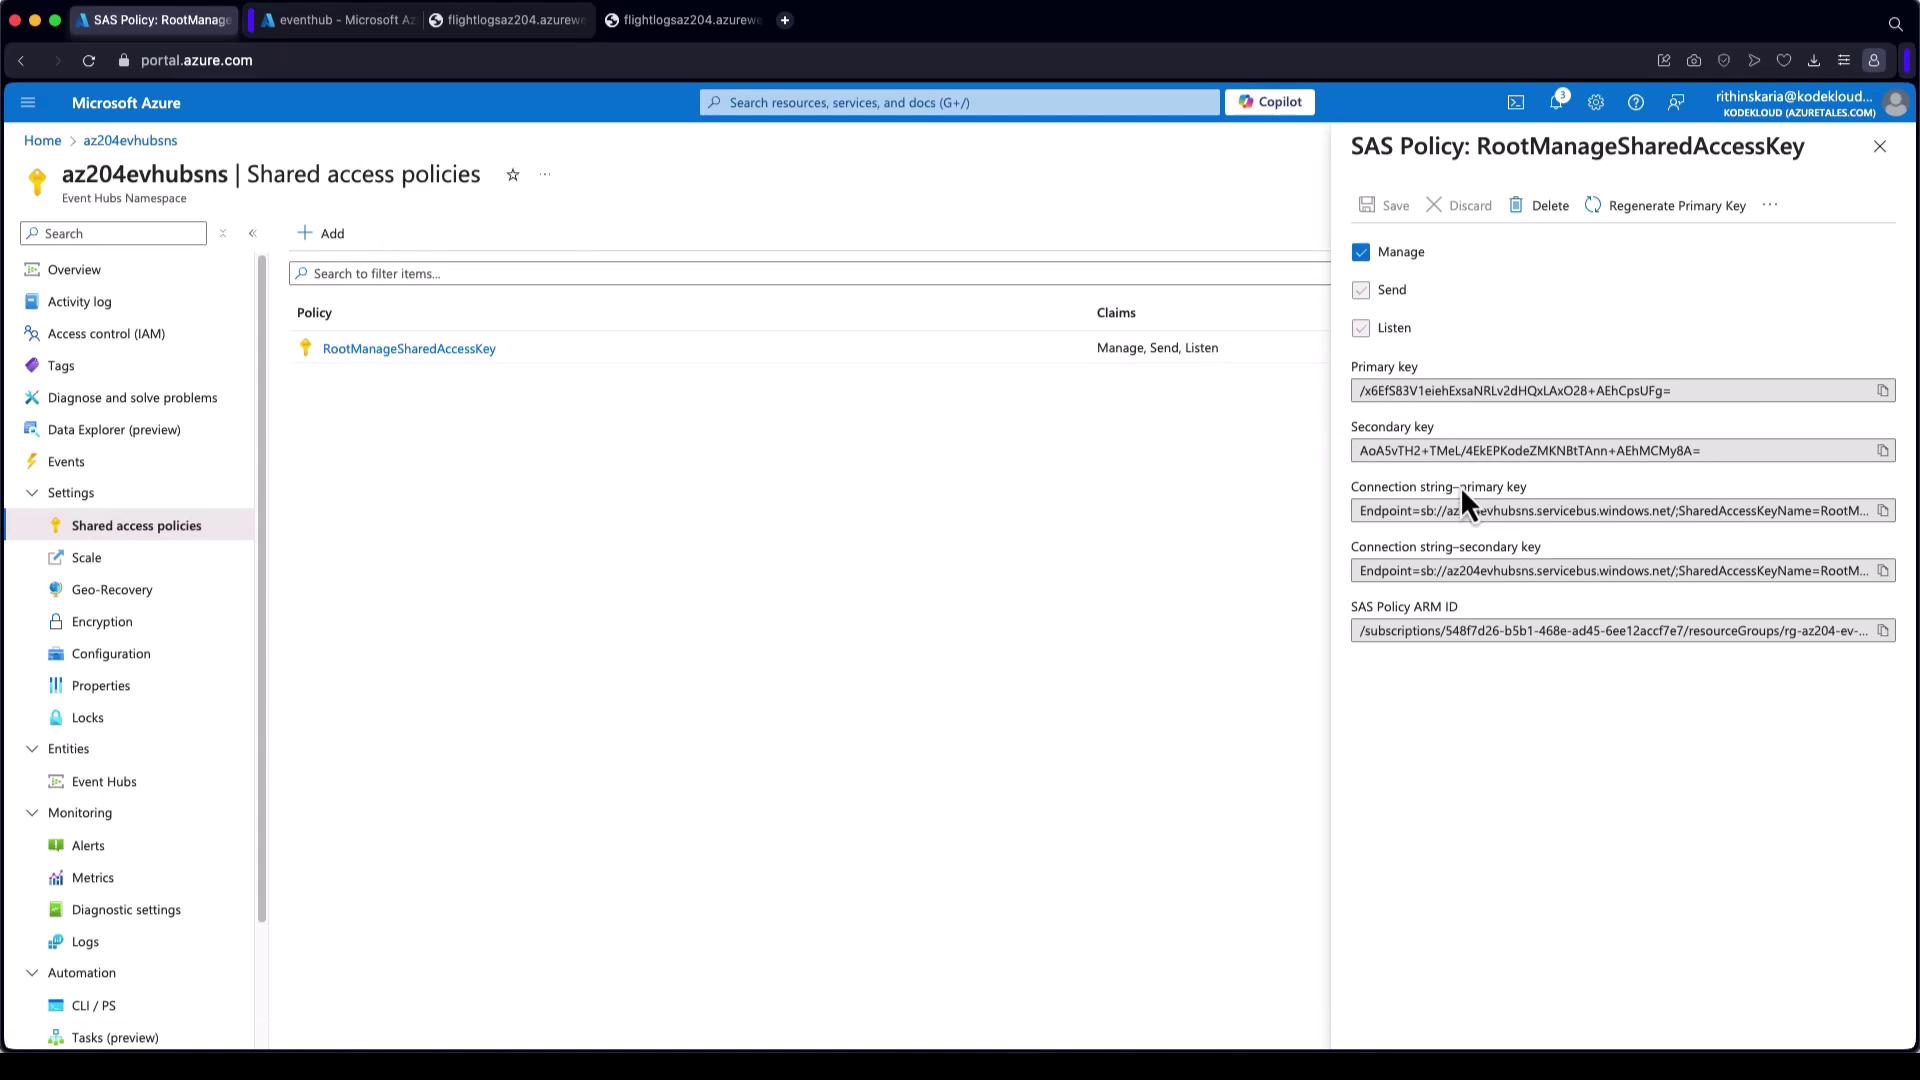
To get a connection string, you need to create a Shared Access Policy (SAP). An SAP defines the authorization rules and permissions for a specific resource. To adhere to the principle of least privilege, you should create a policy on the event hub itself that only grants Send permissions.
The following video demonstrates how to create a dedicated 'send' policy and retrieve its connection string.
Azure Event Hub Tutorial | Big data message streaming service
This clip from the "Azure Event Hub Tutorial" by Adam Marczak shows the precise steps to create a scoped access policy.
Watch the segment from creating a policy. Observe how a new policy named "mySander" is created with only Send permission directly on the event hub, not the entire namespace. This is the connection string you will copy.
The image below shows exactly where in the Azure portal you can find and copy the connection string once the policy is created.
3. Building the .NET Event Producer
With your connection string ready, you can now build the .NET console application that will act as your event producer. The general workflow is:
- Create a new .NET console project.
- Add the
Azure.Messaging.EventHubsNuGet package. - Write the C# code to connect, create a batch, add events, and send them.
The following video provides a complete walkthrough of this process.
Azure Event Hub Tutorial | Big data message streaming service
The "Azure Event Hub Tutorial" demonstrates how to build and run a .NET producer application from scratch.
Watch the section on building the sender app. The presenter will guide you through initializing the project, installing packages, and writing the C# code to send three events in a batch.
Code Breakdown
Let's dissect the key components of the producer code. Since you're a seasoned .NET developer, you'll recognize these patterns quickly.
First, you need to install the necessary package via the .NET CLI or NuGet Package Manager:
dotnet add package Azure.Messaging.EventHubs
Here is a complete, simplified Program.cs file that sends a batch of events.
using System.Text;
using Azure.Messaging.EventHubs;
using Azure.Messaging.EventHubs.Producer;

// TODO: Replace with your connection string and event hub name
const string connectionString = "<YOUR_CONNECTION_STRING>";
const string eventHubName = "<YOUR_EVENT_HUB_NAME>";

int numOfEvents = 3;

// 1. Create a producer client
await using (var producerClient = new EventHubProducerClient(connectionString, eventHubName))
{
    // 2. Create a batch to send events
    using EventDataBatch eventBatch = await producerClient.CreateBatchAsync();

    for (int i = 1; i <= numOfEvents; i++)
    {
        // 3. Try to add events to the batch
        var eventBody = new EventData(Encoding.UTF8.GetBytes($"Event {i}"));
        if (!eventBatch.TryAdd(eventBody))
        {
            // If the batch is full, you would send it and create a new one.
            throw new Exception($"Event {i} is too large for the batch and cannot be sent.");
        }
    }

    try
    {
        // 4. Send the batch of events to the event hub
        await producerClient.SendAsync(eventBatch);
        Console.WriteLine($"A batch of {numOfEvents} events has been published.");
    }
    catch (Exception ex)
    {
        Console.WriteLine($"An error occurred: {ex.Message}");
    }
}
Let's review the numbered steps:
EventHubProducerClient: This is the main client object used to interact with a specific event hub. It's safe to cache and reuse this object as a singleton for the lifetime of your application.CreateBatchAsync: Sending events in batches is far more performant than sending them one by one. This method creates anEventDataBatchobject that you can fill with events.EventDataandTryAdd: Each event is represented by anEventDataobject, whose payload must be a byte array. TheTryAddmethod is crucial because a batch has a maximum size (typically 1 MB). This method returnsfalseif the event is too large to fit, allowing you to handle this gracefully (e.g., by sending the current batch and starting a new one).SendAsync: This method sends the entire batch to the event hub.
4. Running the App and Verifying the Results
After replacing the placeholders in the code with your connection string and event hub name, you can run the application from your terminal:
dotnet run
If successful, you will see the confirmation message: A batch of 3 events has been published.
To confirm the events arrived in Azure, you can check the Metrics chart on your event hub's Overview page in the Azure portal. You should see an increase in "Incoming Messages."
For a more detailed inspection during development, you can use the Data Explorer (in preview). This tool lets you view the actual events within a partition.

5. A Quick Look at Passwordless Authentication
As mentioned, using a connection string is not ideal for production. The modern, secure way is passwordless authentication. To use it, you would make two changes:
- Grant Permissions: Assign the
Azure Event Hubs Data Ownerrole to the identity running the code (e.g., your Azure user account) on the Event Hubs namespace. - Update Code: Install the
Azure.Identitypackage and instantiate the client with aDefaultAzureCredential.
dotnet add package Azure.Identity
The client initialization would change to this:
// Replace with your namespace and event hub name
string namespaceName = "<YOUR_NAMESPACE_NAME>";
string eventHubName = "<YOUR_EVENT_HUB_NAME>";
string fullyQualifiedNamespace = $"{namespaceName}.servicebus.windows.net";

await using (var producerClient = new EventHubProducerClient(fullyQualifiedNamespace, eventHubName, new DefaultAzureCredential()))
{
    // ... rest of the code is the same
}
DefaultAzureCredential automatically tries several authentication methods, making your code portable across different environments. You can explore a complete example in the official quickstart.
Quickstart: Send or receive events using .NET - Azure Event Hubs
This document provides the full code for sending events.
Review the code under the heading Write code to send events to the event hub. Notice the two tabs for Passwordless and Connection String. Compare them to see how little the code changes to adopt the more secure, passwordless method.
Conclusion
In this lesson, you successfully bridged the gap between your .NET application and Azure by sending events to an Event Hub. You've now seen the full "producer" side of a streaming data pipeline in action.
Here are your key takeaways:
- Authentication is a choice: You can use a connection string for quick setup or passwordless authentication (with Azure AD and RBAC) for a more secure, production-ready approach.
- The Producer Workflow: The core process involves the
EventHubProducerClient, creating anEventDataBatch, addingEventDataobjects, and finally sending the batch withSendAsync. - Batching is Key: Sending events in batches is a critical performance optimization for high-throughput scenarios.
- Verification: You can confirm that your events have been sent by checking the Metrics or using the Data Explorer in the Azure portal.
You have now successfully published data to your event hub. The next logical step is to consume and process that data. In our next lesson, we will build an event "consumer" or "processor" to read and act on the events you've just sent.