Welcome back! In our last lesson, you successfully built a .NET application to produce and send events to an Azure Event Hub. We've filled the pipeline with data; now it's time to process it.
This lesson completes the event-driven workflow by focusing on the consumer side. We will build a .NET application that receives and processes events from your event hub. You will learn about the key concepts that make Event Hubs a robust solution for high-throughput data streaming, such as consumer groups and checkpointing. Given your background, the C# implementation will feel familiar, allowing us to focus on the powerful features the Azure SDK provides for building resilient event processors.
By the end of this lesson, you will be able to implement a .NET application that uses the recommended EventProcessorClient to reliably process events from an Azure Event Hub, manage state through checkpointing, and handle errors gracefully.
1. The Architecture of Event Consumption
Before writing any code, it's essential to understand the core components that enable reliable and scalable event consumption in Event Hubs.
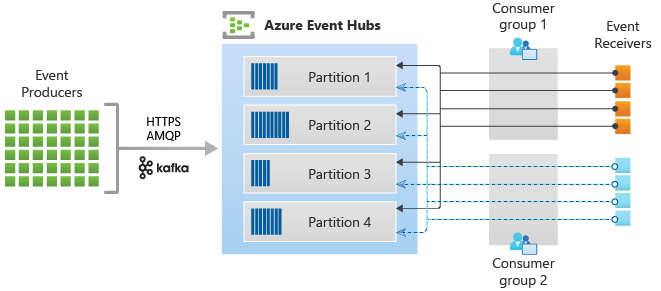
As the diagram shows, a few key concepts govern how consumers read data:
- Partitions: An event hub is divided into one or more partitions, which are ordered sequences of events. When you send an event without specifying a partition, Event Hubs distributes it among the partitions. This partitioning is what allows for massive parallel processing on the consumer side.
- Consumer Groups: A consumer group is a specific "view" of the entire event stream. By using different consumer groups, multiple applications can consume the same events independently, without interfering with each other. Each consumer group maintains its own position (or offset) in each partition.
- Checkpointing: This is the process of recording the position of the last processed event in a partition for a specific consumer group. If a consumer application stops or restarts, it can use the checkpoint to resume processing from where it left off, preventing data loss or reprocessing of all events.
To dive deeper into these foundational concepts, please read the "Key concepts" section of the Microsoft documentation for the Event Processor library.
Azure Event Hubs Event Processor client library for .NET
This document provides clear definitions for event processors, checkpointing, partitions, and consumer groups.
Read the section titled Key concepts. Pay close attention to the definition of Checkpointing, as it explains why an external store—in our case, Azure Blob Storage—is necessary.
2. Introducing the EventProcessorClient
While you could write code to manually manage partition leases, balance work between consumer instances, and handle checkpoints, this is complex and error-prone. The Azure SDK provides a high-level class, the EventProcessorClient, that handles all of this for you.
The EventProcessorClient is the recommended way to build robust event consumers. It provides:
- Cooperative event processing: Multiple instances of your processor application can work together within the same consumer group, automatically balancing the processing load of all partitions.
- Resilience: If one instance fails, the other instances will automatically pick up the partitions it was processing.
- Durable state management: It uses Azure Blob Storage to durably store checkpoints and manage partition ownership.
3. Building the .NET Event Processor
Now, let's build the application. This involves setting up a storage account for checkpointing and then writing the .NET code to process the events.
Step 1: Prerequisites
- Event Hub: You should have the event hub from the previous lesson, which already contains the events you sent.
- Azure Storage Account: The
EventProcessorClientneeds a place to store checkpoints. You will need to create a new Azure Storage Account and a Blob Container inside it.- In the Azure portal, search for and create a "Storage account". A general-purpose v2 account with Locally-redundant storage (LRS) is sufficient.
- Once the account is created, navigate to it, select "Containers" from the "Data storage" section, and create a new container. Give it a name like
checkpoints.
- .NET Console App: Create a new .NET console application in Visual Studio or using the CLI.
Step 2: Project Setup
First, you need to add the necessary NuGet packages to your project. The EventProcessor package includes a dependency on the base EventHubs package, and you'll also need the Blobs package to connect to your storage container.
dotnet add package Azure.Messaging.EventHubs.Processor
dotnet add package Azure.Storage.Blobs
Next, gather your connection strings:
- Event Hubs Connection String: Navigate to your Event Hubs namespace in the Azure portal, go to "Shared access policies", and create a new policy with Listen permissions. Copy the connection string for this policy. Using a listen-only key adheres to the principle of least privilege.
- Storage Account Connection String: Navigate to your storage account, go to "Access keys", and copy one of the connection strings.
Step 3: Writing the Consumer Code
Now, replace the content of your Program.cs file with the following code. This code sets up and runs the EventProcessorClient.
using System.Text;
using Azure.Messaging.EventHubs;
using Azure.Messaging.EventHubs.Consumer;
using Azure.Messaging.EventHubs.Processor;
using Azure.Storage.Blobs;

// TODO: Replace with your connection strings and names
const string storageConnectionString = "<YOUR_STORAGE_CONNECTION_STRING>";
const string blobContainerName = "checkpoints"; // Or the name you chose
const string eventHubsConnectionString = "<YOUR_EVENTHUBS_LISTEN_CONNECTION_STRING>";
const string eventHubName = "<YOUR_EVENT_HUB_NAME>";
const string consumerGroup = EventHubConsumerClient.DefaultConsumerGroupName;

// 1. Create a client for the storage container
BlobContainerClient storageClient = new BlobContainerClient(storageConnectionString, blobContainerName);

// 2. Create an event processor client
var processor = new EventProcessorClient(
    storageClient,
    consumerGroup,
    eventHubsConnectionString,
    eventHubName);

// 3. Define the event and error handlers
processor.ProcessEventAsync += ProcessEventHandler;
processor.ProcessErrorAsync += ProcessErrorHandler;

// 4. Start the processor
Console.WriteLine("Starting the event processor...");
await processor.StartProcessingAsync();

Console.WriteLine("Processor started. Press Enter to stop.");
Console.ReadLine();

// 5. Stop the processor
Console.WriteLine("Stopping the event processor...");
await processor.StopProcessingAsync();
Console.WriteLine("Processor stopped.");

// Handler for processing events
async Task ProcessEventHandler(ProcessEventArgs eventArgs)
{
    // The eventArgs.Data is the event from the Event Hub
    string eventBody = Encoding.UTF8.GetString(eventArgs.Data.Body.ToArray());
    Console.WriteLine($"Received event from partition {eventArgs.Partition.PartitionId}: '{eventBody}'");

    // Update the checkpoint in the storage account after processing the event
    await eventArgs.UpdateCheckpointAsync(eventArgs.CancellationToken);
}

// Handler for processing errors
Task ProcessErrorHandler(ProcessErrorEventArgs eventArgs)
{
    Console.WriteLine($"ERROR: Partition: '{eventArgs.PartitionId}', Operation: '{eventArgs.Operation}'");
    Console.WriteLine($"\tException: {eventArgs.Exception}");
    return Task.CompletedTask;
}
Let's break this down:
BlobContainerClient: This client connects to the specific container in your storage account that will hold the checkpoint data.EventProcessorClient: This is the main object. You initialize it with the storage client, the consumer group name, and the Event Hubs connection details.- Handlers: You subscribe two methods to the processor's events:
ProcessEventAsync: This is where your core logic goes. It's called for each event (or batch of events) received.ProcessErrorAsync: This is called for any internal errors that occur while the processor is running (e.g., network issues).
- Start/Stop:
StartProcessingAsyncbegins the background processing. TheConsole.ReadLine()keeps the application alive.StopProcessingAsyncgracefully shuts it down. UpdateCheckpointAsync: Inside the event handler, calling this method tells the processor to save its current position to the blob container. This is how you mark events as "processed". It's common to do this after every N events or every T seconds, but for this example, we do it after each one.
Step 4: Watch it Work
The following video provides a complete walkthrough of creating a processor application. Crucially, it demonstrates the power of checkpointing by stopping the consumer, sending new events, and restarting it to show that it only reads the new data.
AZ-204 - Connect and Consume Services - Azure Event Hubs
This segment from "AZ-204 - Connect and Consume Services" by Alan Rodrigues demonstrates building a robust event consumer using the EventProcessorClient.
Watch the entire section from using the processor. The presenter covers: Adding the Azure.Messaging.EventHubs.Processor package. The need for a storage account for checkpointing. Writing the code with event and error handlers. Running the app, stopping it, sending more data with the producer from the previous lesson, and restarting the consumer to see it resume from the checkpoint. This is the key takeaway.
Conclusion
In this lesson, you've completed the event-driven loop by building a resilient consumer for your Azure Event Hub. You've gone beyond simply reading messages and have implemented a production-ready pattern using the EventProcessorClient.
Here are the key takeaways:
EventProcessorClientis the standard: It's the high-level, recommended client for consuming events, as it handles partition load balancing, fault tolerance, and checkpointing.- Checkpointing ensures reliability: By persisting progress to Azure Blob Storage, your application can safely stop and restart without losing its place in the event stream.
- Consumer groups enable independent processing: They provide separate, isolated views of the event stream for different applications.
- Implementation is event-driven: The processor works by invoking event handlers you provide, allowing you to focus on your business logic.
With the ability to both send and receive events, you now have a solid foundation in building event-driven solutions on Azure.
In our next module, we will shift gears and explore another fundamental pillar of modern cloud development: containerization. Our first lesson will introduce you to Docker fundamentals and how to author a Dockerfile for a .NET application, preparing you to deploy applications to services like Azure Container Apps and Azure Container Instances.