Hello! In our last lesson, we completed our exploration of Azure Event Grid by building an event handler to consume custom events. We concluded by noting that while Event Grid is excellent for routing discrete notifications, Azure offers other services for different eventing needs.
Today, we transition to one of those services: Azure Event Hubs. This lesson introduces Event Hubs as a platform for high-throughput data streaming. Your goal is to understand its core components and learn how to create the necessary resources in Azure. As a software engineer, think of this as setting up the foundational infrastructure before you start writing the code to produce and consume data streams, which we'll cover next.
By the end of this lesson, you will be able to create an Azure Event Hubs namespace and an Event Hub, both through the Azure portal and the Azure CLI.
1. Understanding Event Hubs Architecture
Before creating any resources, it's crucial to understand the main components of Azure Event Hubs and its role in a data pipeline. Unlike Event Grid, which is a reactive event routing service, Event Hubs is designed as a "front door" for big data, capable of ingesting millions of events per second from sources like IoT devices or application telemetry.
The main architectural concepts you need to grasp are:
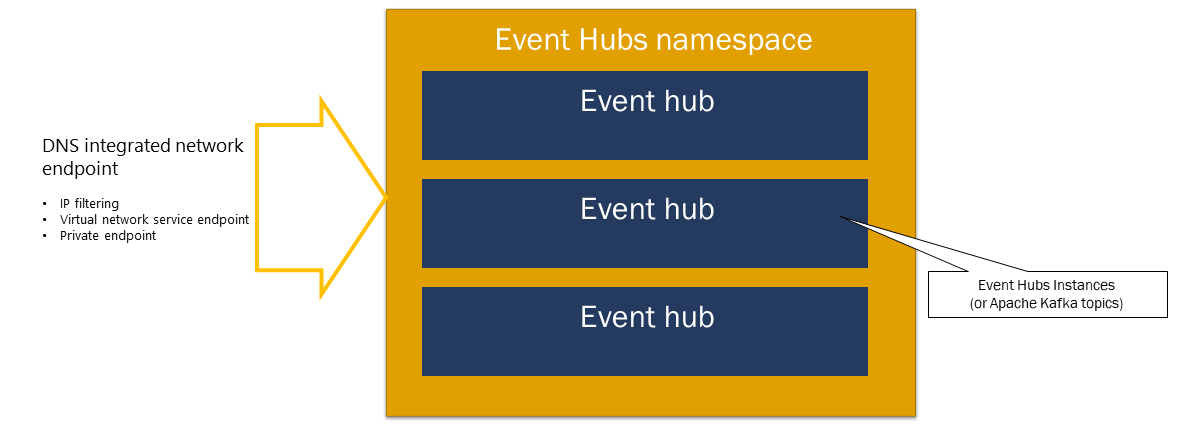
- Namespace: This is a scoping container for one or more event hubs. It provides a unique, fully qualified domain name (FQDN) and is the level at which you manage capacity (throughput) and network security.
- Event Hub: This is the specific resource where your data is sent. You can think of it as a single stream of events, similar to a topic in Apache Kafka.
- Partitions: Within an event hub, events are stored in one or more partitions. A partition is an ordered log of events. Splitting an event hub into multiple partitions is the key to its scalability, as it allows multiple consumers to read from the stream in parallel.
The following image clearly shows how event hubs are contained within a namespace.
To get a solid overview of these concepts, the video below provides an excellent introduction.
Azure Event Hub Tutorial | Big data message streaming service
The "Azure Event Hub Tutorial" from Adam Marczak - Azure for Everyone gives a concise explanation of Event Hubs' key characteristics and terminology.
Please watch the first part of the video covering the basics. Focus on understanding the definitions of event producers, partitions, and namespaces, and how they relate to each other.
2. Creating an Event Hub via the Azure Portal
Now that you understand the concepts, let's walk through the practical steps of creating the resources in the Azure portal. The process involves two main steps:
- Create the Event Hubs Namespace.
- Create the Event Hub inside that namespace.
The same video provides a clear, step-by-step demonstration. As you watch, pay close attention to the configuration choices you need to make.
Azure Event Hub Tutorial | Big data message streaming service
This part of the "Azure Event Hub Tutorial" demonstrates the creation process in the Azure portal.
First, watch the segment on creating a namespace. Note the choices for Pricing Tier (Basic vs. Standard) and Throughput Units (TUs), which control the capacity and features of your namespace. Next, watch how to create an event hub within the namespace. Focus on the settings for Partition Count and Message Retention.
To supplement the video, you can also refer to the official Microsoft Learn documentation. It provides a text-based guide that you can follow along with. This guide also gives a good explanation of the Auto-inflate feature, which allows your namespace to scale its Throughput Units automatically based on load.
Quickstart: Create an event hub using Azure portal - Microsoft Learn
This guide from Microsoft Learn provides the official, step-by-step instructions for creating both a namespace and an event hub.
Review the sections titled Create an Event Hubs namespace and Create an event hub. These sections mirror the steps shown in the video and serve as a great written reference. Pay attention to the description of the Auto-inflate feature within the namespace creation steps.
3. Creating an Event Hub via the Azure CLI
While the Azure portal is great for learning and one-off tasks, in a professional development environment, you'll often use command-line tools to script and automate infrastructure setup. This is a common practice in CI/CD pipelines, which aligns with your experience in Azure DevOps.
The Azure CLI provides a powerful and scriptable way to manage Azure resources. The following resource shows the commands to create a resource group, an Event Hubs namespace, and an event hub.
How to Handle Azure Event Hub - OneUptime
This blog post from OneUptime includes a concise section with the Azure CLI commands needed to create a full Event Hubs setup.
Review the code block under the heading Creating an Event Hub Namespace. You don't need to run these commands right now, but you should understand how they map to the settings you configured in the portal.
Let's break down those CLI commands.
-
Create a Resource Group: All Azure resources must live in a resource group.
az group create --name myEventHubRG --location eastus -
Create an Event Hubs Namespace: This command creates the container for your event hub. Notice how the parameters correspond to the portal options.
az eventhubs namespace create \
  --name myEventHubNamespace \
  --resource-group myEventHubRG \
  --location eastus \
  --sku Standard \
  --enable-auto-inflate true \
  --maximum-throughput-units 20
--sku Standard: This corresponds to the Pricing Tier.--enable-auto-inflate true: This enables the auto-scaling feature for throughput.
-
Create an Event Hub: Finally, this command creates the event hub itself within the specified namespace.
az eventhubs eventhub create \
  --name myEventHub \
  --resource-group myEventHubRG \
  --namespace-name myEventHubNamespace \
  --partition-count 4 \
  --message-retention 7
--partition-count 4: Sets the number of partitions for parallel consumption.--message-retention 7: Sets the data retention period in days.
Being familiar with both the portal and CLI methods is essential for the AZ-204 exam and for versatile cloud development.
Conclusion
In this lesson, you've taken the first step into the world of Azure Event Hubs. You've learned the fundamental architectural concepts and, most importantly, how to create the necessary resources that will serve as the foundation for a data streaming application.
Here are the key takeaways:
- Event Hubs vs. Event Grid: Event Hubs is for high-throughput data streaming (telemetry, logs), while Event Grid is for event routing (reactive notifications).
- Core Components: An Event Hubs Namespace is a management container for one or more Event Hubs. Each event hub is divided into partitions to enable scalable, parallel processing.
- Key Configuration: When creating these resources, you must decide on the pricing tier, throughput units (capacity), partition count (parallelism), and message retention period.
- Creation Methods: You can create and manage Event Hubs resources using the Azure Portal for a visual experience or the Azure CLI for automation and scripting.
Now that we have an event hub ready, our next logical step is to start sending data to it. In the next lesson, you will use your .NET skills to write a producer application that sends events to the event hub you've just learned how to create.