Welcome to the second lesson on managing APIs with Azure API Management. In our previous lesson, we explored the "what" and "why" of APIM, breaking down its core components—the API Gateway, Management Plane, and Developer Portal—and comparing the different service tiers. You learned how APIM provides a centralized facade for your backend services.
Today, we transition from theory to practice. This lesson directly addresses the learning outcome: Import and publish an API in Azure API Management. We'll perform the fundamental task of taking a backend API and exposing it through your APIM instance. As a Senior Software Engineer, you are well-versed in building APIs; this session will focus on the process of bringing a .NET API under APIM's management, a critical step for securing, monitoring, and productizing it.
1. The End-to-End Goal: From App Service to APIM
Our goal is to take a backend API—in this case, a .NET Web API hosted on Azure App Service—and place it behind our APIM gateway. This means that instead of clients calling the App Service directly, they will call the APIM endpoint, which then securely forwards the request to the backend.
To achieve this, we will follow these steps:
- Provision an Azure App Service to host our API and an Azure API Management instance to act as the facade.
- Deploy a sample .NET Web API to the App Service.
- Import the API definition from the App Service into API Management.
- Test the API by making calls through the APIM gateway endpoint.
The following video provides a complete, end-to-end walkthrough of this process. We will use it as our primary guide for the hands-on sections.
AZ-204 - Connect and Consume services - Azure API Management
This video by Alan Rodrigues covers the entire lifecycle from provisioning resources to importing the API. We'll start by setting up the necessary Azure resources.
First, watch the segment on provisioning the Azure Web App and the API Management instance. This will create the foundational infrastructure for our lesson. Focus on the steps from creating the resources. Note that creating the APIM instance can take a significant amount of time (20-30 minutes or more), which is normal.
2. Preparing and Publishing the Backend API
While the resources are provisioning, let's look at the backend API. The video demonstrates creating a .NET Web API from scratch in Visual Studio. Given your extensive experience with .NET, you don't need to follow the coding steps line-by-line.
The key takeaways from the API development part of the video are:
- It's a standard ASP.NET Core Web API with controllers that expose GET and POST operations.
- The project is configured to generate an OpenAPI specification (via the Swashbuckle/Swagger library). This creates a
swagger.jsonfile that describes the API's endpoints, which is crucial for easy import into APIM. - The API is then published directly from Visual Studio to the Azure App Service created in the previous step.
AZ-204 - Connect and Consume services - Azure API Management
Now, let's observe the process of deploying the API and making it ready for import.
You can skim through the API development part of the video. The important segment to watch is the publishing process. Watch from publishing the API. This shows how the .NET application is deployed to the App Service and then tested to ensure it's running correctly. The presenter confirms that endpoints like /api/course are responding with data.
3. Importing the API into API Management
With our backend API live on App Service and our APIM instance ready, we can now import it. There are two main ways to do this: manually defining each operation, or automatically importing from a specification file. The latter is the standard and far more efficient method.
Importing from an OpenAPI Specification
Using an OpenAPI (Swagger) definition is the recommended approach. APIM reads the specification file, automatically creating all the API operations, their parameters, and expected responses. Since our .NET project was configured with Swashbuckle, it exposes a swagger.json endpoint that APIM can consume directly.
The following Microsoft Learn tutorial provides an excellent reference for this process, detailing all the fields you'll encounter.
Tutorial: Import and Publish Your First API in Azure API Management
This document walks through the import process using a public demo API, but the principles and UI are identical to what we're doing.
Read the sections "Go to your API Management instance" and "Import and publish a backend API". Pay close attention to the table that describes the settings in the "Create from OpenAPI specification" window, such as: OpenAPI specification: The URL to your swagger.json file. Display name: The human-readable name for your API in the portal. API URL suffix: The unique path segment that identifies this API in the APIM gateway URL.
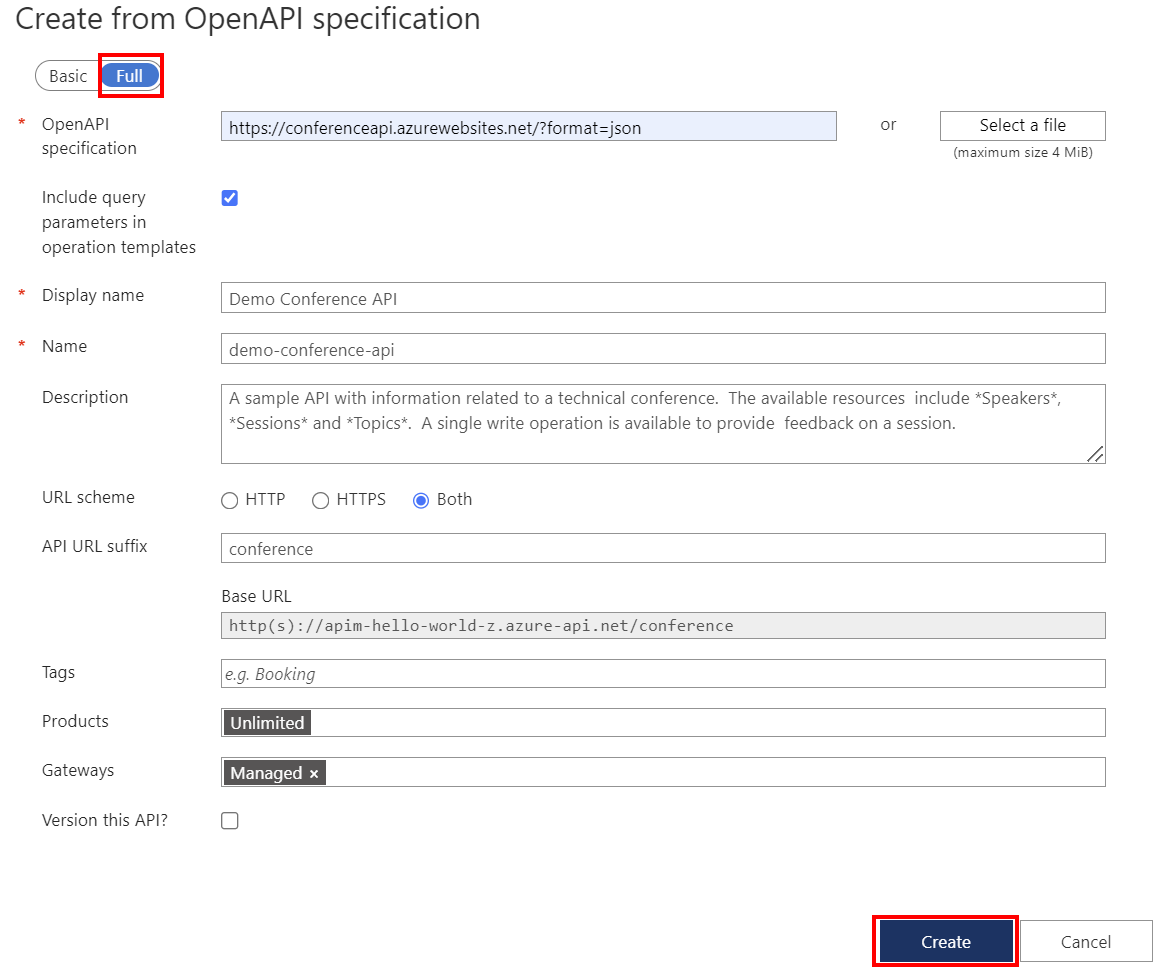
Now, let's see this in action with the .NET API we just deployed.
AZ-204 - Connect and Consume services - Azure API Management
This part of the video demonstrates the streamlined import process using the OpenAPI specification from our deployed App Service.
Watch the segment from importing with OpenAPI. The presenter first adds Swagger to the project (which we've noted), republishes, and then uses the generated specification URL to import the entire API into APIM in one step. Notice how this automatically creates the GET and POST operations that were previously added manually.
4. Testing the API via the Gateway
After importing the API, it's published and accessible through the APIM gateway. It's crucial to test it to ensure that requests are correctly routed to the backend App Service.
APIM provides a built-in test console in the Azure portal. When you use it, APIM automatically includes the required subscription key in the request header. This key is the default mechanism APIM uses to authorize calls to the gateway.
AZ-204 - Connect and Consume services - Azure API Management
Let's see how to test our newly imported API and understand the role of the subscription key.
Watch from testing the operation. This section demonstrates two key things: Testing an operation successfully from within the Azure portal's test console. Attempting to call the API from an external tool (Postman) and receiving an "Access denied" error, then successfully making the call by adding the Ocp-Apim-Subscription-Key header.
This flow highlights the core function of the gateway: it's the new front door to your API, and it enforces the rules you configure—in this case, requiring a valid subscription key.
The Microsoft Learn documentation also provides a clear guide on the test console.
Tutorial: Import and Publish Your First API in Azure API Management
This article reinforces the testing process and explains the underlying routing mechanism.
Read the sections "Test the new API in the Azure portal" and "How API Management routes requests". The second section is particularly useful, as it clearly breaks down how a client request URL is mapped to the backend service URL.
The routing concept is simple but powerful. APIM combines its base gateway URL with your API's URL suffix and the operation endpoint to form the public URL. It then forwards the request to the backend web service URL you defined during import.
Conclusion
In this lesson, you have learned the practical steps to bring a backend API under the management of Azure API Management. By leveraging your .NET skills and an OpenAPI specification, you can quickly and efficiently publish your APIs, making them available through a secure and managed gateway.
Here are the key takeaways:
- Backend First: You need a functional backend API (like one on App Service) before you can import it into APIM.
- OpenAPI is Key: Using an OpenAPI (Swagger) specification is the standard, most efficient method for importing an API. It automatically configures operations, parameters, and more.
- The Gateway is the Endpoint: Once imported, your API is accessed via the APIM gateway URL, not the backend URL directly.
- Subscription Keys: By default, APIM protects your APIs with a subscription key, which must be provided in the
Ocp-Apim-Subscription-Keyrequest header. - Testing is Essential: The Azure portal provides a test console to validate that your API is correctly configured and that requests are successfully routed to the backend.
Now that you have successfully published an API, the next logical step is to customize its behavior. In our next lesson, we will explore the structure of an API Management policy document and see how you can use policies to implement powerful features like rate limiting, request transformation, and caching.