Hello! In our last lesson, you learned how to manage your application's configuration externally using Application Settings and Connection Strings. This is a vital skill for creating secure and flexible applications.
Today, we're going to address a common challenge in software development: how to deploy updates to a live application without causing downtime or introducing bugs for your users. Directly deploying to production is risky. A much safer approach is to use a staging environment to test your changes before they go live.
In this lesson, we will cover how to enable and configure deployment slots for staging and production swapping. You'll learn how Azure App Service facilitates this process seamlessly, enabling zero-downtime deployments and easy rollbacks. This is a fundamental pattern for professional release management and a key topic for the AZ-204 exam.
1. What Are Deployment Slots?
At its core, a deployment slot is a live, running instance of your web app with its own unique hostname. Your default App Service instance is called the "production" slot. You can create additional slots, such as "staging," which run on the same App Service Plan, meaning they share the same compute resources and don't typically incur extra costs.
The primary benefits of using deployment slots are:
- Validation: You can deploy new changes to a non-production slot (e.g., staging) and test them thoroughly in a production-like environment.
- Zero-Downtime Swaps: When you're ready, Azure "warms up" the staging slot and then swaps it with the production slot. This is a fast operation that redirects traffic, ensuring no requests are dropped.
- Easy Rollbacks: If you discover an issue after a swap, the old production code is now in the staging slot. Rolling back is as simple as performing another swap.
To get started, let's read the official introduction to this feature.
Set Up Staging Environments in Azure App Service
This document from Microsoft Learn provides the definitive guide to deployment slots.
Read the introductory section, starting from the top down to (but not including) the "Prerequisites" section. Focus on the benefits of deployment slots and the tiers that support them (Standard, Premium, or Isolated).
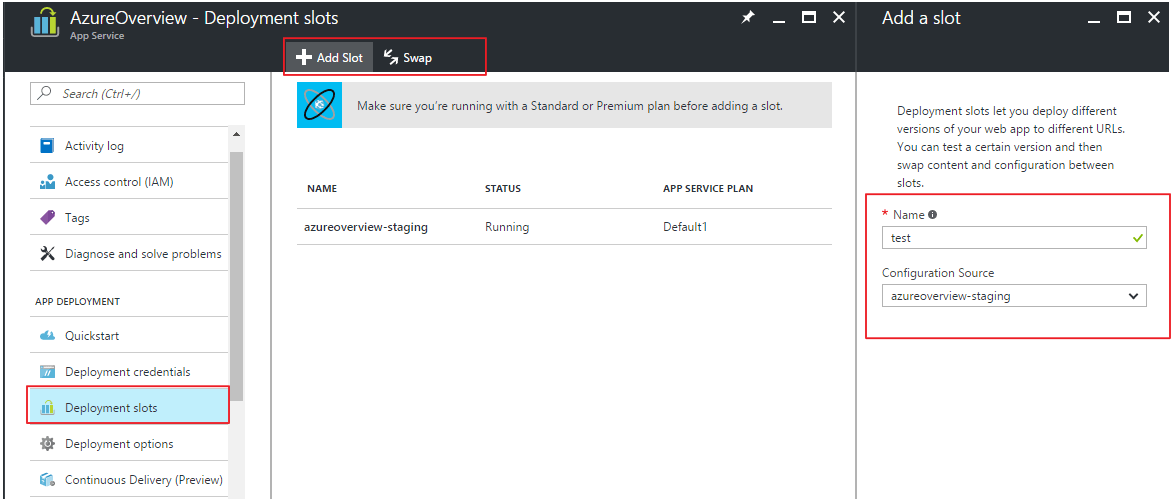
2. Creating and Deploying to a Staging Slot
Let's put this into practice. You'll now create a staging slot for the web app you deployed in the previous lessons. We will continue using the Azure CLI to automate these tasks.
Step 1: Create a Staging Slot
Open your terminal and run the following command. Remember to replace the placeholder values with your unique app name and resource group.
az webapp deployment slot create --name <your-unique-app-name> --resource-group <your-resource-group-name> --slot staging
This command creates a new slot named staging. It will have its own URL, typically http://<your-unique-app-name>-staging.azurewebsites.net.
Step 2: Deploy Updated Code to the Staging Slot
Now, let's make a change to our application and deploy it specifically to the new staging slot.
-
In your local
MyFirstAzureWebAppproject, openPages/Index.cshtml. -
Modify the
<h1>tag to reflect that this is a new version. You can use the existing configuration value or change the text entirely. Let's update it to:<h1 class="display-4">Welcome to Version 2.0</h1> -
Now, deploy the application, but this time, target the
stagingslot using the--slotparameter.az webapp up --name <your-unique-app-name> --resource-group <your-resource-group-name> --slot staging
After the deployment completes, navigate to your staging URL (http://<your-unique-app-name>-staging.azurewebsites.net). You should see "Welcome to Version 2.0." Meanwhile, your production URL (http://<your-unique-app-name>.azurewebsites.net) will still show the original version.
To see this process in action, watch this short video from Microsoft.
How to use Deployment Slots in Azure App Service | Azure Tips & Tricks
This video provides a quick, end-to-end demonstration of creating a slot, deploying to it, and verifying the changes.
Watch from the introduction to slots to see one being created. Then, observe how it's treated as a full-fledged App Service. Finally, see the new code being published to the slot and tested.
3. Performing the Swap
With your new code tested and verified on the staging slot, you're ready for the main event: swapping it into production. The swap operation is what enables a zero-downtime deployment.

To perform the swap, use the following CLI command:
az webapp deployment slot swap --name <your-unique-app-name> --resource-group <your-resource-group-name> --slot staging --target-slot production
After the command completes:
- Navigate to your production URL. You will now see "Welcome to Version 2.0."
- Navigate to your staging URL. You will see the old version of the site that was previously in production.
This immediate rollback capability is one of the most powerful aspects of deployment slots. If you find an issue, you can simply run the same swap command again to revert to the previous state instantly.
How to use Deployment Slots in Azure App Service | Azure Tips & Tricks
This part of the video demonstrates the swap itself.
Watch the section on swapping the slot into production. Notice how the production URL immediately reflects the new version after the swap, with no interruption.
4. Configuring Slot-Specific ("Sticky") Settings
This is a critical concept that builds on our last lesson. When you swap slots, the application code and most configurations are swapped. However, some settings, like a connection string to a staging database, should not move to production. These are called slot-specific or "sticky" settings.
When you mark a setting as slot-specific, it remains attached to the slot regardless of any swaps.
Let's explore what gets swapped and what can be made sticky.
Set Up Staging Environments in Azure App Service
This documentation details exactly which settings are swapped by default and how to make them sticky.
First, read the section "Understand what happens during a swap," focusing on the sub-section "Which settings are swapped." This is important knowledge for the exam. Next, read "Make an app setting unswappable" to see how to apply this concept in the portal and with the CLI.
Hands-On: Configuring a Sticky Setting
Let's test this. We'll create a new setting to identify the environment and make it sticky.
-
Add a sticky setting to the
productionslot:
Note that we don't specify a--slotparameter here, as we are targeting the default production slot.az webapp config appsettings set --name <your-unique-app-name> --resource-group <your-resource-group-name> --settings "EnvironmentName=Production" --slot-settings "EnvironmentName"The
--slot-settingsparameter is the key: it designatesEnvironmentNameas sticky. -
Add the same sticky setting to the
stagingslot:az webapp config appsettings set --name <your-unique-app-name> --resource-group <your-resource-group-name> --slot staging --settings "EnvironmentName=Staging" --slot-settings "EnvironmentName" -
Update your code to display the environment name:
InPages/Index.cshtml, add a new line to display this setting. Your file should now look something like this:@page @inject Microsoft.Extensions.Configuration.IConfiguration Configuration <div class="text-center"> <h1 class="display-4">Welcome to Version 2.0</h1> <h2>Environment: @Configuration["EnvironmentName"]</h2> <p>Learn about <a href="https://docs.microsoft.com/aspnet/core">building Web apps with ASP.NET Core</a>.</p> </div> -
Deploy the update to the
stagingslot:az webapp up --name <your-unique-app-name> --resource-group <your-resource-group-name> --slot staging -
Test and Swap:
- Visit your staging URL. It should say "Welcome to Version 2.0" and "Environment: Staging".
- Visit your production URL. It should show the old code and "Environment: Production".
- Now, perform another swap:
az webapp deployment slot swap --name <your-unique-app-name> --resource-group <your-resource-group-name> --slot staging - After the swap, refresh both URLs.
- The production URL now shows "Welcome to Version 2.0" but correctly displays "Environment: Production". The code was swapped, but the sticky setting was not.
- The staging URL now shows the old code but correctly displays "Environment: Staging".
5. Advanced Swapping: Swap with Preview and Auto Swap
For mission-critical applications, you can perform an even safer swap using a two-phase process called Swap with Preview.
- Phase 1 (Preview): App Service applies the production slot's settings (including sticky ones) to the staging slot and warms it up, but does not redirect traffic. This lets you run final tests on the staging slot with the exact production configuration.
- Phase 2 (Complete): If everything looks good, you complete the swap. If not, you can cancel it.
Set Up Staging Environments in Azure App Service
This document explains these advanced deployment techniques.
Briefly review the sections "Swap with preview (multiple-phase swap)" and "Configure auto swap." Understand the purpose of each. Auto swap is particularly useful in CI/CD pipelines, where a successful deployment to a staging slot automatically triggers a swap to production.
Conclusion
You've now mastered one of the most powerful features of Azure App Service for managing application lifecycles. Deployment slots are essential for professional, reliable deployments.
Here are your key takeaways from this lesson:
- Deployment slots are separate, live environments for testing updates without affecting production.
- Swapping is a near-instant, zero-downtime operation that redirects traffic between slots.
- Rollbacks are as simple as swapping back, providing a rapid recovery mechanism.
- Sticky settings are crucial for managing environment-specific configurations (like connection strings) that should not be swapped with the code.
- Advanced techniques like Swap with Preview and Auto Swap provide additional safety and automation for your deployment process.
In our next and final lesson for this module, we will explore another critical aspect of managing a production application: auto-scaling. You'll learn how to configure your App Service to automatically scale out to handle more traffic and scale in to save costs.