Welcome to our next lesson! In our previous session, you successfully deployed a .NET web app to Azure App Service using the Azure CLI. You now have a running application in the cloud, which is an excellent foundation to build upon.
Today, we'll focus on a critical aspect of managing any real-world application: configuration. Hardcoding settings like database connection strings or API keys into your code is insecure and inflexible. Azure App Service provides a robust mechanism to manage these settings externally. Our goal is to learn how to configure application settings, connection strings, and general platform settings for your App Service instance. For you, as a .NET developer, this will feel very similar to managing appsettings.json, but with the added power of Azure's environment-specific overrides.
The Anatomy of App Service Configuration
Most of the settings we'll discuss are found within the Configuration blade of your App Service in the Azure portal. This central hub is divided into a few key tabs that we will explore.

Let's start with a quick video overview to get oriented.
Azure App Service (Web Apps) Tutorial
This video provides a great walkthrough of the 'Configuration' blade in App Service.
Please watch the segment on settings and configuration. Pay close attention to the distinction between 'Application settings' and 'Connection strings', and the explanation of how these are exposed as environment variables, which is a key concept for .NET applications.
1. Application Settings: Your App's External Configuration
Application settings are key-value pairs that are injected into your application's environment at runtime. The most important principle to understand is that App Service application settings override settings in your appsettings.json file. This allows you to use your local appsettings.development.json for local debugging and have production-safe values injected automatically when you deploy to Azure, without ever checking secrets into your source code repository.
Let's dive into the details of how to manage and use these settings.
This Microsoft Learn document provides a comprehensive guide to App Service configuration. We'll start with the section on application settings.
Please read the section titled "Configure app settings." Focus on: How app settings are passed as environment variables. The precedence over appsettings.json. The Azure CLI commands for managing settings (az webapp config appsettings set, list, and delete). The special note for Linux containers on how nested JSON keys (e.g., Logging:LogLevel:Default) are transformed using double underscores (Logging__LogLevel__Default).
Hands-On: Adding and Using an App Setting
Let's apply this knowledge. We'll add a new setting to the web app you deployed in the last lesson and modify the code to display it.
-
Set the App Setting using Azure CLI:
Open your terminal and run the following command. Replace<your-unique-app-name>and<your-resource-group-name>with the values from your previous deployment.az webapp config appsettings set --name <your-unique-app-name> --resource-group <your-resource-group-name> --settings "App:Greeting=Hello from Azure App Settings!"This command adds a setting with the key
App:Greeting. -
Update Your .NET App to Read the Setting:
In your localMyFirstAzureWebAppproject, openPages/Index.cshtml. We will use theIConfigurationservice, which is automatically available in Razor pages, to read our new setting. Add the following code at the top of the file, just below the@pagedirective:@inject Microsoft.Extensions.Configuration.IConfiguration ConfigurationNow, find the
<h1>tag and modify it to display the value from your configuration:<h1 class="display-4">@Configuration["App:Greeting"]</h1>If the setting isn't found, this will simply display an empty string. A good practice for production is to have a fallback value in
appsettings.json, which will be overridden by the value from Azure. -
Redeploy Your App:
Just as you did in the last lesson, publish and deploy your updated application. The simplest way is to runaz webapp upfrom the project root again.az webapp upOnce the deployment is complete, refresh your web app in the browser. You should now see "Hello from Azure App Settings!" displayed on the homepage, confirming that your app is reading the configuration directly from App Service.
2. Connection Strings: For Databases and Services
While you could store connection strings in application settings, App Service provides a dedicated Connection strings section. This has a few advantages:
- It provides better logical organization.
- It prefixes the environment variable keys based on the connection type (e.g.,
SQLAZURECONNSTR_,CUSTOMCONNSTR_), which can be helpful. - In .NET, you can retrieve them easily using the
IConfiguration.GetConnectionString()extension method.
Now, let's look at the dedicated section for connection strings in the same Microsoft Learn document.
Read the section "Configure connection strings." Note the different prefixes available and how the access pattern differs slightly from regular app settings. For modern .NET apps, using the CUSTOMCONNSTR_ prefix (by selecting type Custom) is often the most straightforward approach, as it integrates seamlessly with GetConnectionString().
Hands-On: Reading a Connection String
In your .NET code, accessing a connection string is simple and will be familiar to you.
// In a class where IConfiguration is injected
var myDbConnection = _configuration.GetConnectionString("MyDbConnection");
This code looks for a connection string with the name MyDbConnection. On your local machine, it would pull from appsettings.json. In Azure, it will pull from the value you've configured in the App Service Connection strings blade, again overriding the local value. You can add one using the CLI like so:
az webapp config connection-string set -g <your-resource-group-name> -n <your-unique-app-name> --settings MyDbConnection="Server=..." --connection-string-type Custom
3. General Settings: Configuring the Platform
Finally, the General settings tab lets you configure the underlying platform your app runs on. This includes the language stack version, platform architecture, and other important behaviors.
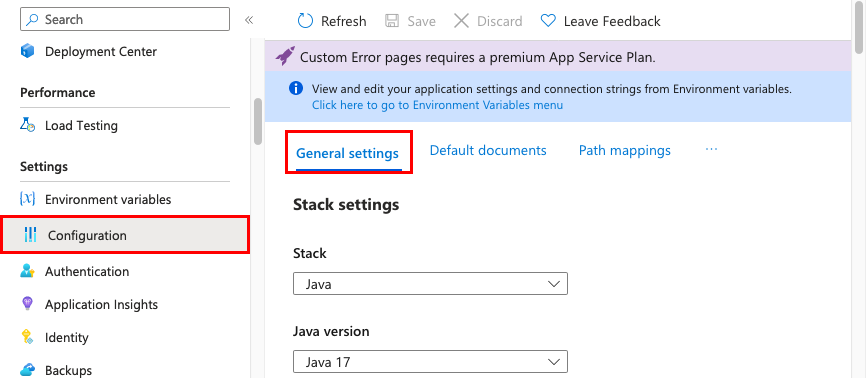
Let's review the options available in the general settings.
Skim the section "Configure general settings." Pay particular attention to these key settings relevant to the AZ-204 exam: Stack settings: Where you select the .NET version. Platform: 32-bit vs. 64-bit. Always On: Keeps your app's instance loaded even with no traffic. This is required for continuous WebJobs and is crucial for avoiding "cold start" latency on low-traffic sites. (Note: This is not available on the Free tier). HTTPS Only: Enforces HTTPS by redirecting all HTTP traffic.
For example, to enable the Always On feature (assuming you are on a Basic or higher tier), you could use the following CLI command:
az webapp config set --name <your-unique-app-name> --resource-group <your-resource-group-name> --always-on true
Conclusion
In this lesson, you've learned how to decouple your application's configuration from its code, a fundamental practice for building secure and maintainable cloud applications.
Here are the key takeaways:
- Configuration Precedence: App Service settings (both Application Settings and Connection Strings) override any values defined in your local
appsettings.jsonfile. - Application Settings: Use these for general key-value configuration. Access them in .NET via
IConfiguration["MyKey"]. Remember the__syntax for nested keys on Linux. - Connection Strings: Use this dedicated section for database and service endpoints. Access them in .NET via
IConfiguration.GetConnectionString("MyConnection"). - General Settings: Use this to control the behavior of the App Service platform itself, including runtime versions and features like "Always On."
- Management: You can manage all these settings through the Azure Portal for easy viewing and editing, or programmatically with the Azure CLI for automation.
You now have a solid grasp of how to configure a deployed application. In our next lesson, we will explore deployment slots, a powerful feature that lets you deploy and test new versions of your app in a staging environment before swapping it into production with zero downtime.